mysql 索引筆記

MyISAM引擎的B+Tree的索引

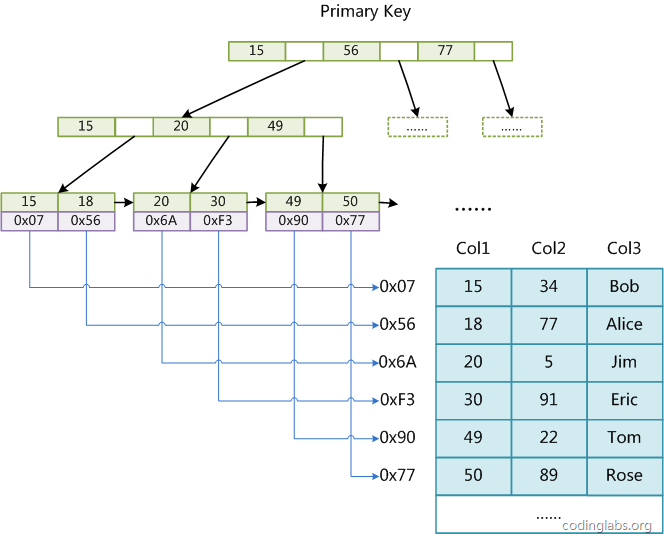
通過上圖可以直接的看出, 在MyISAM對B+樹的運用中明顯的特點如下:

  • 所有的非恭弘=叶 恭弘子節點中存儲的全部是索引信息
  • 在恭弘=叶 恭弘子節點中存儲的 value值其實是 數據庫中某行數據的index

MyISAM引擎 索引文件的查看:

在 /var/lib/mysql目錄中

.myd 即 my data , 數據庫中表的數據文件

.myi 即 my index , 數據庫中 索引文件

.log 即 mysql的日誌文件

InnoDB引擎 索引文件的查看:

同樣在 /var/lib/mysql 目錄下面

InnoDB引擎的B+Tree的索引

InnoDB的實現方式業內也稱其為聚簇索引, 什麼是聚簇索引呢? 就是相鄰的行的簡直被存儲到一起, 對比上面的兩幅圖片就會發現, 在InnDB中, B+樹的恭弘=叶 恭弘子節點中存儲的是數據行中的一行行記錄, 缺點: 因為索引文件被存放在硬盤上, 所以很占硬盤的空間

一般我們會在每一個表中添加一列 取名 id, 設置它為primary key , 即將他設置成主鍵, 如果使用的存儲引擎也是InnoDB的話, 底層就會建立起主鍵索引, 也是聚簇索引, 並且會自動按照id的大小為我們排好序,(因為它的一個有序的樹)

局部性原理

局部性原理是指CPU訪問存儲器時,無論是存取指令還是存取數據,所訪問的存儲單元都趨於聚集在一個較小的連續區域中。 更進一步說, 當我們通過程序向操作系統發送指令讓它讀取我們指定的數據時, 操作系統會一次性讀取一頁(centos 每頁4kb大小,InnoDB存儲引擎中每一頁16kb)的數據, 它遵循局部性理論, 猜測當用戶需要使用某個數據時, 用戶很可能會使用這個數據周圍的數據,故而進行一次

InnoDB的頁格式

什麼是頁呢? 簡單說,就是一條條數據被的存儲在磁盤上, 使用數據時需要先將數據從磁盤上讀取到內存中, InnoDB每次讀出數據時同樣會遵循 局部性原理, 而不是一條條讀取, 於是InnoDB將數據劃分成一個一個的頁, 以頁作為和磁盤之間交互的基本單位

通過如下sql, 可以看到,InnoDB中每一頁的大小是16kb

show global status like 'Innodb_page_size';

名稱 簡述
File Header 文件頭部, 存儲頁的一些通用信息
Page Header 頁面頭部, 存儲數據頁專有的信息
Infinum + supremum 最大記錄和最小記錄, 這是兩個虛擬的行記錄
User Records 用戶記錄, 用來實際存儲行記錄中的內容
Free Space 空閑空間, 頁中尚位使用的空間
Page Directory 頁面目錄, 存儲頁中某些記錄的位置
File Tailer 文件尾部 , 用來校驗頁是否完整

InnoDB的行格式 compact

每一頁中存儲的行數據越多. 整體的性能就會越強

compact的行格式如下圖所示

可以看到在行格式中在存儲真正的數據的前面會存儲一些其他信息, 這些信息是為了描述這條記錄而不得不添加的一些信息, 這些額外的信息就是上圖中的前三行

  • 變長字段的長度列表

在mysql中char是固定長度的類型, 同時mysql還支持諸如像 varchar這樣可變長度的類型, 不止varchar , 想 varbinary text blob這樣的變長數據類型, 因為 變長的數據類型的列存儲的數據的長度是不固定的, 所以說我們在存儲真正的數據時, 也得將這些數據到底佔用了多大的長度也給保存起來

  • NULL標誌位

compact行格式會將值可以為NULL的列統一標記在 NULL標誌位中, 如果數據表中所有的字段都被標記上not null , 那麼就沒有NULL值列表

  • 記錄頭信息

記錄頭信息, 顧名思義就是用來描述記錄頭中的信息, 記錄頭信息由固定的5個字節組成, 一共40位, 不同位代表的意思也不同, 如下錶

名稱 單位 bit 簡介
預留位1 1 未使用
預留位2 1 未使用
delete_mark 1 標記改行記錄是否被刪除了
min_rec_mark 1 標記在 B+樹中每層的非恭弘=叶 恭弘子節點中最小的node
n_owned 4 表示當前記錄擁有的記錄數
heap_no 13 表示當前記錄在堆中的位置
record_type 3 表示當前記錄的類型 , 0表示普通記錄, 1表示B+樹中非恭弘=叶 恭弘子節點記錄, 2表示最小記錄 ,3表示最大記錄
next_record 16 表示下一條記錄的相對位置

行溢出

在mysql中每一行, 能存儲的最大的字節數是65535個字節數, 此時我們使用下面的sql執行時就會出現行溢出現象

CREATE TABLE test ( c VARCHAR(65535) ) CHARSET=ascii ROW_FORMAT=Compact;

給varchar申請最大65535 , 再加上compact行格式中還有前面三個非數據列佔用內存,所以一準溢出, 如果不想溢出, 可以適當的將 65535 – 3

頁溢出

前面說了, InnoDB中數據的讀取按照頁為單位, 每一頁的大小是 16kb, 換算成字節就是16384個字節, 但是每行最多存儲 65535個字節啊, 也就是說一行數據可能需要好幾個頁來存儲

怎麼辦呢?

  • compact行格式會在存儲真實數據的列中多存儲一部分數據, 這部分數據中存儲的就是下一頁的地址
  • dynamic行格式 中直接存儲數據所在的地址, 換句話說就是數據都被存儲在了其他頁上
  • compressed行格式會使用壓縮算法對行格式進行壓縮處理

一般我們都是將表中的id列設置為主鍵, 這就會形成主鍵索引, 於是我們需要注意了:

主鍵的佔用的空間越小,整體的檢索效率就會越高

為什麼這麼說呢? 這就可以結合頁的概念來解析, 在B+樹這種數據結果中, 恭弘=叶 恭弘子節點中用來存儲數據, 存儲數據的格式類似Key-value key就是索引值, value就是數據內容, 如果索引佔用的空間太大的話, 單頁16kb能存儲的索引就越小, 這就導致數據被分散在更多的頁上, 致使查詢的效率降低

建立索引的技巧

為某一列建立索引

給text表中的title列創建索引, 索引名字 my_index
alter table text add index my_index (title);

雖然建立索引能提升查詢的效率, 根據前人的經驗看, 這並不是一定的, 建立索引本身會直接消耗內存空間, 同時索, 插入,刪除, 這種寫操作就會打破B+樹的平衡面臨索引的重建, 一般出現如下兩種情況時,是不推薦建立索引的

  1. 表中的數據本身就很少
  2. 我們計算一下索引的選擇性很低

兼顧 – 索引的選擇性與前綴索引

所謂選擇性,其實就是說不重複出現的索引值(基數,Cardinality) 與 表中的記錄數的比值

即: 選擇性= 基數 / 記錄數

選擇性的取值範圍在(0,1]之間, 選擇性越接近1 , 說明建立索引的必要性就越強, 比如對sex列進行建立索引,這裏面非男即女, 如果對它建立索引的話, 其實是沒意義的, 還不如直接進行全表掃描來的快

如何使用sql計算選擇性呢? 嚴格遵循上面的公式

SELECT count(DISTINCT(title))/count(*) AS Selectivity FROM employees.titles;
count(基數/記錄數)
DISTINCT(title) / /count(*)

更詳細的例子看下面的連接

索引失效問題

注意事項

  • 索引無法存儲null值

  • 如果條件中有or, 即使條件中存在索引也不會使用索引,如果既想使用or,又想使用索引, 就給所有or條件控制的列加上索引

  • 使用like查詢時, 如果以%開頭,肯定是進行全表掃描

  • 使用like查詢時, 如果%在條件後面

    • 對於主鍵索引, 索引失效
    • 對於普通索引, 索引不失效
  • 如果列的類型是字符串類型, 那麼一定要在條件中將數據用引號引起來,不然也會是索引失效

  • 如果mysql認為全表掃描比用索引塊, 同樣不會使用索引

聯合索引

什麼是聯合索引

聯合索引, 也叫複合索引,說白了就是多個字段一起組合成一個索引

像下面這樣使用 id + title 組合在一起構成一個聯合索引

CREATE TABLE `text` (
  `id` int(11) NOT NULL AUTO_INCREMENT,
  `title` varchar(255) NOT NULL,
  `content` text NOT NULL,
  PRIMARY KEY (`id`,`title`)
) ENGINE=InnoDB AUTO_INCREMENT=3691 DEFAULT CHARSET=utf8
  • 如果我們像上圖那樣創建了索引,我們只要保證我們的 id+title 兩者結合起來全局唯一就ok
  • 建立聯合索引同樣是需要進行排序的,排序的規則就是按照聯合索引所有列組成的字符串的之間的先後順序進行排序, 如a比b優先

左前原則

使用聯合索引進行查詢時一定要遵循左前綴原則, 什麼是左前綴原則呢? 就是說想讓索引生效的話,一定要添加上第一個索引, 只使用第二個索引進行查詢的話會導致索引失效

比如上面創建的聯合索引, 假如我們的查詢條件是 where id = ‘1’ 或者 where id = ‘1’ and title = ‘唐詩宋詞’ 索引都會不失效

但是如果我們不使用第一個索引id, 像這樣 where title = ‘唐詩’ , 結果就是導致索引失效

聯合索引的分組&排序

還是使用這個例子:

CREATE TABLE `text` (
  `id` int(11) NOT NULL AUTO_INCREMENT,
  `title` varchar(255) NOT NULL,
  `content` text NOT NULL,
  PRIMARY KEY (`id`,`title`)
) ENGINE=InnoDB AUTO_INCREMENT=3691 DEFAULT CHARSET=utf8

demo1: 當我們像下面這樣寫sql時, 就會先按照id進行排序, 當id相同時,再按照title進行排序

select * form text order by id, title;

demo2: 當我們像下面這樣寫sql時, 就會先將id相同的劃分為一組, 再將title相同的劃分為一組

select id,title form text group by id, title;

demo3: ASC和DESC混用, 其實大家都知道底層使用B+樹, 本身就是有序的, 要是不加限制的話,默認就是ASC, 反而是混着使用就使得索引失效

select * form text order by id ASC, title DESC;

如何定位慢查詢

相關參數

名稱 簡介
slow_query_log 慢查詢的開啟狀態
slow_query_log_file 慢查詢日誌存儲的位置
long_query_time 查詢超過多少秒才記錄下來

常用sql

# 查看mysql是否開啟了慢查詢
show variables like 'slow_query_log';   
# 將全局變量設置為ON
set global slow_query_log ='on';
# 查看慢查詢日誌存儲的位置
show variables like 'slow_query_log_file';
# 查看規定的超過多少秒才被算作慢查詢記錄下來
show variables like 'long_query_time';
show variables like 'long_query%';
# 超過一秒就記錄 , 每次修改這個配置都重新建立一次鏈接
set global long_query_time=1; 

本站聲明:網站內容來源於博客園,如有侵權,請聯繫我們,我們將及時處理【其他文章推薦】

※帶您來了解什麼是 USB CONNECTOR  ?

※自行創業 缺乏曝光? 下一步"網站設計"幫您第一時間規劃公司的門面形象

※如何讓商品強力曝光呢? 網頁設計公司幫您建置最吸引人的網站,提高曝光率!!

※綠能、環保無空污,成為電動車最新代名詞,目前市場使用率逐漸普及化

※廣告預算用在刀口上,網站設計公司幫您達到更多曝光效益

基於.NetStandard的簡易EventBus實現-基礎實現

一、問題背景

  最近離職來到了一家新的公司,原先是在乙方工作,這回到了甲方,在這一個月中,發現目前的業務很大一部分是靠輪詢實現的,例如:通過輪詢判斷數據處於B狀態了,則輪詢到數據后執行某種動作,這個其實是非常浪費的,並且對於數據的實時性也會不怎麼友好,基於以上的情況,在某天開車堵車時候,想到了之前偶然了解過的事件總線(EventBus),對比了公司當前的場景后,覺得事件總線應該是可以滿足需求的(PS:只是我覺得這個有問題,很多人不覺得有問題),那既然想到了,那就想自己是否可以做個事件總線的輪子

二、什麼是事件總線

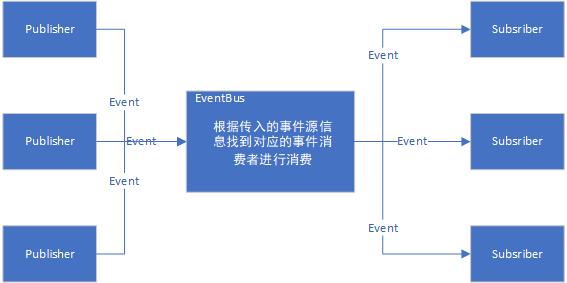
  我們知道事件是由一個Publisher跟一個或多個的Subsriber組成,但是在實際的使用過程中,我們會發現,Subsriber必須知道Publisher是誰才可以註冊事件,進而達到目的,那這其實就是一種耦合,為了解決這個問題,就出現了事件總線的模式,事件總線允許不同的模塊之間進行彼此通信而又不需要相互依賴,如下圖所示,通過EventBus,讓Publisher以及Subsriber都只需要對事件源(EventData)進行關注,不用管Publisher是誰,那麼EventBus主要是做了一些什麼事呢?

三、EventBus做了什麼事?

  1、EventBus實現了對於事件的註冊以及取消註冊的管理

  2、EventBus內部維護了一份事件源與事件處理程序的對應關係,並且通過這個對應關係在事件發布的時候可以找到對應的處理程序去執行

  3、EventBus應該要支持默認就註冊事件源與處理程序的關係,而不需要開發人員手動去註冊(這裏可以讓開發人員去控制自動還是手動)

四、具體實現思路

   首先在事件總線中,存在註冊、取消註冊以及觸發事件這三種行為,所以我們可以將這三種行為抽象一個接口出來,最終的接口代碼如下:

using System;
using System.Collections.Generic;
using System.Text;
using System.Threading.Tasks;

namespace MEventBus.Core
{
    public interface IEventBus
    {
        #region 接口註冊
        void Register<TEventData>(Type handlerType) where TEventData : IEventData;
        void Register(Type eventType, Type handlerType);
        void Register(string eventType, Type handlerType);
        #endregion

        #region 接口取消註冊
        void Unregister<TEventData>(Type handler) where TEventData : IEventData;
        void Unregister(Type eventType, Type handlerType);
        void Unregister(string eventType, Type handlerType);
        #endregion


        void Trigger(string pubKey, IEventData eventData);
        Task TriggerAsync(string pubKey, IEventData eventData);
        Task TriggerAsync<TEventData>(TEventData eventData) where TEventData : IEventData;
        void Trigger<TEventData>(TEventData eventData) where TEventData : IEventData;
    }
}

  在以上代碼中發現有些方法是有IEventData約束的,這邊IEventData就是約束入參行為,原則上規定,每次觸發的EventData都需要繼承IEventData,而註冊的行為也是直接跟入參類型相關,具體代碼如下:

using System;
using System.Collections.Generic;
using System.Text;

namespace MEventBus.Core
{
    public interface IEventData
    {
        string Id { get; set; }
        DateTime EventTime { get; set; }
        object EventSource { get; set; }
    }
}

  接下來我們看下具體的實現代碼

using System;
using System.Collections.Concurrent;
using System.Collections.Generic;
using System.IO;
using System.Linq;
using System.Reflection;
using System.Text;
using System.Threading.Tasks;

namespace MEventBus.Core
{
    public class EventBus : IEventBus
    {
        private static ConcurrentDictionary<string, List<Type>> dicEvent = new ConcurrentDictionary<string, List<Type>>();
        private IResolve _iresolve { get; set; }
        public EventBus(IResolve resolve)
        {
            _iresolve = resolve;
            InitRegister();
        }

        public void InitRegister()
        {
            if (dicEvent.Count > 0)
            {
                return;
            }
            //_iresolve = ioc_container;
            dicEvent = new ConcurrentDictionary<string, List<Type>>();
            //自動掃描類型並且註冊
            foreach (var file in Directory.GetFiles(AppDomain.CurrentDomain.BaseDirectory, "*.dll"))
            {
                var ass = Assembly.LoadFrom(file);
                foreach (var item in ass.GetTypes().Where(p => p.GetInterfaces().Contains(typeof(IEventHandler))))
                {
                    if (item.IsClass)
                    {
                        foreach (var item1 in item.GetInterfaces())
                        {
                            foreach (var item2 in item1.GetGenericArguments())
                            {
                                if (item2.GetInterfaces().Contains(typeof(IEventData)))
                                {
                                    Register(item2, item);
                                }
                            }
                        }
                    }
                }
            }
        }
        //註冊以及取消註冊的時候需要加鎖處理
        private static readonly object obj = new object();

        #region 註冊事件
        public void Register<TEventData>(Type handlerType) where TEventData : IEventData
        {
            //將數據存儲到mapDic
            var dataType = typeof(TEventData).FullName;
            Register(dataType, handlerType);
        }
        public void Register(Type eventType, Type handlerType)
        {
            var dataType = eventType.FullName;
            Register(dataType, handlerType);
        }
        public void Register(string pubKey, Type handlerType)
        {
            lock (obj)
            {
                //將數據存儲到dicEvent
                if (dicEvent.Keys.Contains(pubKey) == false)
                {
                    dicEvent[pubKey] = new List<Type>();
                }
                if (dicEvent[pubKey].Exists(p => p.GetType() == handlerType) == false)
                {
                    //IEventHandler obj = Activator.CreateInstance(handlerType) as IEventHandler;
                    dicEvent[pubKey].Add(handlerType);
                }
            }
        }


        #endregion

        #region 取消事件註冊
        public void Unregister<TEventData>(Type handler) where TEventData : IEventData
        {
            var dataType = typeof(TEventData);
            Unregister(dataType, handler);
        }

        public void Unregister(Type eventType, Type handlerType)
        {
            string _key = eventType.FullName;
            Unregister(_key, handlerType);
        }
        public void Unregister(string eventType, Type handlerType)
        {
            lock (obj)
            {
                if (dicEvent.Keys.Contains(eventType))
                {
                    if (dicEvent[eventType].Exists(p => p.GetType() == handlerType))
                    {
                        dicEvent[eventType].Remove(dicEvent[eventType].Find(p => p.GetType() == handlerType));
                    }
                }
            }
        }
        #endregion

        #region Trigger觸發
        //trigger時候需要記錄到數據庫
        public void Trigger<TEventData>(TEventData eventData) where TEventData : IEventData
        {
            var dataType = eventData.GetType().FullName;
            //獲取當前的EventData綁定的所有Handler
            Notify(dataType, eventData);
        }

        public void Trigger(string pubKey, IEventData eventData)
        {
            //獲取當前的EventData綁定的所有Handler
            Notify(pubKey, eventData);
        }
        public async Task TriggerAsync<TEventData>(TEventData eventData) where TEventData : IEventData
        {
            await Task.Factory.StartNew(new Action(()=> 
            {
                var dataType = eventData.GetType().FullName;
                Notify(dataType, eventData);
            }));
        }
        public async Task TriggerAsync(string pubKey, IEventData eventData)
        {
            await Task.Factory.StartNew(new Action(() =>
            {
                var dataType = eventData.GetType().FullName;
                Notify(pubKey, eventData);
            }));
        }
        //通知每成功執行一個就需要記錄到數據庫
        private void Notify<TEventData>(string eventType, TEventData eventData) where TEventData : IEventData
        {
            //獲取當前的EventData綁定的所有Handler
            var handlerTypes = dicEvent[eventType];
            foreach (var handlerType in handlerTypes)
            {
                var resolveObj = _iresolve.Resolve(handlerType);
                IEventHandler<TEventData> handler = resolveObj as IEventHandler<TEventData>;
                handler.Handle(eventData);

            }
        }
        #endregion
    }
}

  代碼說明:

  1、如上的EventBus是繼承了IEventBus后的具體實現,小夥伴可能看到在構造函數里,有一個接口參數IResolve,這個主要是為了將解析的過程進行解耦,由於在一些WebApi的項目中,更加多的是使用IOC的機制進行對象的創建,那基於IResolve就可以實現不同的對象創建方式(內置的是通過反射實現)

  2、InitRegister方法通過遍歷當前目錄下的dll文件,去尋找所有實現了IEventHandler<IEventData>接口的信息,並且自動註冊到EventBus中,所以在實際使用過程中,應該是沒有機會去適用register註冊的

  3、觸發機制實現了同步以及異步的調用,這個從方法命名中就可以看出來

五、程序Demo

  TestHandler2(繼承IEventHandler)

using System;
using System.Collections.Generic;
using System.Text;
using System.Threading;
using System.Windows.Forms;
using MEventBus.Core;

namespace MEventBusHandler.Test
{
    public class TestHandler2 : IEventHandler<TestEventData>
    {
        public void Handle(TestEventData eventData)
        {
            Thread.Sleep(2000);
            MessageBox.Show(eventData.EventTime.ToString());
        }
    }
}

  TestEventData(繼承EventData,EventData是繼承了IEventData的代碼)

using MEventBus.Core;
using System;
using System.Collections.Generic;
using System.Text;

namespace MEventBusHandler.Test
{
    public class TestEventData : EventData
    { }
}

  調用代碼

using MEventBus.Core;
using MEventBusHandler.Test;
using System;
using System.Collections.Generic;
using System.ComponentModel;
using System.Data;
using System.Drawing;
using System.Linq;
using System.Text;
using System.Threading.Tasks;
using System.Windows.Forms;

namespace MEventBus.Test
{
    public partial class Form1 : Form
    {
        public Form1()
        {
            InitializeComponent();
            TestHandler.OnOut += TestHandler_OnOut;
        }

        private void TestHandler_OnOut(object sender, EventArgs e)
        {
            MessageBox.Show("Hello World");
        }

        private void button1_Click(object sender, EventArgs e)
        {
            var task = new MEventBus.Core.EventBus(new ReflectResolve()).TriggerAsync(new TestEventData());
            task.ContinueWith((obj) => {
                MessageBox.Show("事情全部做完");
            });
        }

        private void button2_Click(object sender, EventArgs e)
        {
           new EventBus(new ReflectResolve()).Trigger(new TestEventData());
        }
    }


}

  執行結果


 我在真正的Demo中,其實是註冊了2個handler,可以在後續公布的項目地址里看到

六、總結

  從有這個想法開始,到最終實現這個事件總線,大概總共花了2,3天的時間(PS:晚上回家獨自默默幹活),目前只能說是有一個初步可以使用的版本,並且還存在着一些問題:

  1、在.NetFrameWork下(目前公司還不想升級到.NetCore,吐血。。),如果使用AutoFac創建EventBus(單例模式下),如果Handler也使用AutoFac進行創建,會出現要麼對象創建失敗,要麼handler里的對象與調用方的對象不是同一個實例,為了解決這個問題,我讓EventBus不再是單例模式,將dicEvent變成了靜態,暫時表面解決

  2、未考慮跨進程的實現(感覺用savorboard大佬的就可以了)

  3、目前這個東西在一個小的新項目里使用,暫時在測試環境還算沒啥問題,各位小夥伴如果有類似需求,可以做個參考

  由於個人原因,在測試上可能會有所不夠,如果有什麼bug的話,還請站內信告知,感謝(ps:文字表達弱雞,技術渣渣,各位多多包涵)

  最後:附上項目地址:


作者: Mango

出處: 

關於自己:專註.Net桌面開發以及Web後台開發,對.NetCore、微服務、DevOps,K8S等感興趣,最近到了個甲方公司準備休養一段時間

本文版權歸作者和博客園共有,歡迎轉載,但未經作者同意必須保留此段聲明,且在文章頁面明顯位置給出原文鏈接,如有問題, 可站內信告知.


本站聲明:網站內容來源於博客園,如有侵權,請聯繫我們,我們將及時處理【其他文章推薦】

※為什麼 USB CONNECTOR 是電子產業重要的元件?

網頁設計一頭霧水??該從何著手呢? 找到專業技術的網頁設計公司,幫您輕鬆架站!

※想要讓你的商品成為最夯、最多人討論的話題?網頁設計公司讓你強力曝光

※想知道最厲害的台北網頁設計公司推薦台中網頁設計公司推薦專業設計師”嚨底家”!!

CSS(8)—通俗講解定位(position)

CSS(8)—通俗講解定位(position)

CSS有三種基本的定位機制: 普通流浮動定位。前面兩個之前已經講過,詳見博客:

1、

2、

3、

一、為什麼要用定位?

如果說浮動關鍵在一個 “浮” 字上面, 那麼 我們的定位,關鍵在於一個 “位” 上。

我們來思考下定位用於的場景。

1、打Log標籤

比如你想在商品的圖片想打個標籤比如:包郵、最新上架等等。

怎麼做比較好呢,如果你要粗暴那就直接ps在圖片上添加標籤。只是這樣有個很大的弊端,比如你要添加新標籤你需要重現修圖,比如商品之前包郵後面不包郵了,

那你又需要重新p圖。這樣肯定是不合適的。那怎麼做比較合適?

其實很簡單,將商品圖片和標籤的標籤分開來。然後通過css在商品圖片上添加標籤。這個時候通常會定位去完成。

2、切換Banner

有些商城的首頁都會有個Banner,這裏 左右的箭頭下面的小點點一般也是用定位來做。

3、廣告位窗口

有些位置在左右側會有固定的廣告窗口,不論怎麼滑動頁面這個廣告窗口都是在固定位置

這個就需要用到固定定位了。

二、定位概念

1、定位的分類

在CSS中,position 屬性用於定義元素的定位模式,其基本語法格式如下:

選擇器 {position:屬性值;}

屬性值

這裏還有個概念就是 邊偏移 因為你定位肯定要指定定位在哪裡,所以需要通過 邊偏移 來指定。

所以定位是要和邊偏移搭配使用的。不過對於static(靜態定位)設置邊偏移是無用的。

2、靜態定位(static)

static 是此屬性的默認值。這時候,我們稱那個元素沒有被定位。簡單來說就是網頁中所有元素都默認的是靜態定位。 其實就是標準流的特性。

所以如果需要使用定位那這裏就不能是這個默認值了。

注意 在靜態定位狀態下,此時 top, right, bottom, left 和 z-index 屬性無效。

3、相對定位(relative)

它的主要特點如下

1、 參照元素原來的位置進行移動。
2、 通過"left"、 "top"、 "right"、 "bottom" 屬性進行定位。
3、 元素原有的空間位保留。
4、 元素在移動時會蓋住其他元素。

舉例說明

<!DOCTYPE html>
<html>
    <head>
        <meta charset="UTF-8">
        <title>相對定位</title>
        <style type="text/css">
            #one {
                width: 120px;
                height: 120px;
                background: #E19D59;
            }
            #two {
                width: 120px;
                height: 120px;
                background: #FF0000;
                position: relative;   /*設置相對定位*/
                left: 20px;           /*設置距離左邊偏移位置*/
                top: 20px;            /*設置距離頂部偏移位置*/
            }
            #three {
                width: 120px;
                height: 120px;
                background: #008000;
            }
        </style>
    </head>
    <body>      
        <div id="one">div1</div>
        <div id="two">div2</div>
        <div id="three">div3</div>        
    </body>
</html>

運行結果

通過我們這個示例我們可以看出

1、它的左右,上下邊偏移的量是根據這個div2原始位置基礎上進行移動的。
2、這個div2它還是個標準流,並沒有浮起來,所以這個位置它還是佔有的。(如果div2浮動那麼div3就會向上移動,這裏顯然沒有)
3、當它偏移后 如果和其它元素有重疊,它會覆蓋其它元素。(div2覆蓋了部分div3元素)

作用 我的理解相對定位主要用途是用來給絕對定位的一個盒子。(下面會解釋這句話)

4、絕對定位absolute

特點

1、參照距離他最近的有定位屬性的父級元素進行移動
2、通過"left"、 "top"、 "right"、 "bottom" 屬性進行定位
3、元素完全脫離文檔流,原有位置不再保留
4、元素在移動時會蓋住其他元素
5、一般我們設置絕對定位時,都會找一個合適的父級將其設置為相對定位。最好為這個具有相對定位屬性的父級設置寬高

舉例說明

<!DOCTYPE html>
<html>
    <head>
        <meta charset="UTF-8">
        <title></title>
        <style type="text/css">
           #father{
                width: 400px;
                height: 400px;
                margin: 100px;
               /*  position: relative;*/
                background: yellow;
            }
            #bd1{
                width: 120px;
                height: 120px;
                background: #E19D59;
            }
            #bd2{
                width: 120px;
                height: 120px;
                background: #FF0000;
                position: absolute;
                left: 20px;
                top: 20px;
            }
            #bd3{
                width: 120px;
                height: 120px;
                background: #008000;
            }
        </style>
    </head>
    <body>  
    <div id="father"> 
        <div id="bd1">div1</div>
        <div id="bd2">div2</div>
        <div id="bd3">div3</div>  
    </div>         
    </body>
</html>

運行結果

從這幅圖可以看出一點

這裏因為父div沒有設置定位,所以它的位置是相對於body進行邊偏移。

這個時候我們將父標籤設置 position: relative;

再刷新頁面

從這張圖很直觀看到:

1、因為父div設置了定位,所以這裏的邊偏移變成都是相對於父div進行偏移(正常貼標籤就是這樣)
2、我們可以看出當設置絕對定位后,該元素已經脫離文檔流,已經浮上來了(因為div2上浮所有div3才會上移)
3、元素在移動時會蓋住其他元素 (div2覆蓋了部分div3)

5、固定定位(fixed)

特點

1、以body為定位時的對象,總是根據瀏覽器的窗口來進行元素的定位
2、通過"left"、 "top"、 "right"、 "bottom" 屬性進行定位
3、元素完全脫離文檔流,原有位置不再保留
4、元素不會隨着文檔流的滑動而滑動

固定定位最大的特點就是第一點,可以理解成它是以可視區域為準,會一直显示在可視區域,屏幕滑動也會显示在定位的位置。

6、四種定位總結

還有比較重要的三點

定位模式轉換

跟 浮動一樣, 元素添加了 絕對定位和固定定位之後, 元素模式也會發生轉換, 都自動轉換為 行內塊元素。

絕對定位的盒子水平/垂直居中

注意 普通的盒子是左右margin 改為 auto就可, 但是對於絕對定位就無效了。

定位的盒子也可以水平或者垂直居中,有一個算法(下面會舉例說明)。

1. 首先left 50%   父盒子的一半大小
2. 然後走自己外邊距負的一半值就可以了 margin-left。

子絕父相

這句話的意思是 子級是絕對定位的話,父級要用相對定位

為什麼會有這個概念,那是因為絕對定位的邊偏移特點是

 如果父元素沒有設置定位,那麼它的位置是相對於body進行邊偏移。如果父元素設置定位,那就根據父元素偏移。

一般我們肯定是希望根據父元素偏移。就好比圖片打標籤,不可能跟着body偏移而是父元素進行定位。而且父元素相對定位最大的好處就是它會佔有位置,因此父親最好是 相對定位。

三、經典示例

1、打上log標記

示例

<!DOCTYPE html>
<html lang="en">
<head>
    <meta charset="UTF-8">
    <title>log標籤</title>
    <style>
    div {
        width: 310px;
        height: 190px;
        border: 1px solid #ccc;
        margin: 100px auto; 
        position: relative;  /*父選擇相對定位*/
    }
    .top {
        position: absolute; /*子取相對定位*/
        top: 0;             /*位置 左上*/
        left: 0;
    }
    
    </style>
</head>
<body>
    <div>
        <img src="images/log.jpg" alt="" class="top">     <!-- log的圖片 -->
        <img src="images/goods.jpg" height="190" width="310" alt=""> <!-- 商品圖片,長和寬和父div大小一致 -->
    </div>
</body>
</html>

運行結果就是上面的最終結果。

2、定位水平居中

加了定位 浮動的的盒子 margin 0 auto 失效了

代碼

<!DOCTYPE html>
<html lang="en">
<head>
    <meta charset="UTF-8">
    <title>水平居中</title>
    <style>
    div {
        width: 200px;
        height: 200px;
        background-color: pink;
        position: absolute;
        /*加了定位 浮動的的盒子  margin 0 auto 失效了*/
        left: 50%;
        margin-left: -100px;  /*減去總寬度一般*/
        top: 50%;
        margin-top: -100px;   /*減去總高度一般*/
    }
    </style>
</head>
<body>
    <div></div>
</body>
</html>

這個這個div就處於整個頁面的居中了,這裏我們來說明下下面這兩個的意思

        left: 50%;
        margin-left: -100px;  /*減去總寬度一般*/

3、輪播圖

<!DOCTYPE html>
<html lang="en">
<head>
    <meta charset="UTF-8">
    <title>輪播圖</title>
    <style>
    * {
        margin: 0;
        padding: 0;
    }
    li {
        list-style: none;
    }
    .tb {
        width: 520px;
        height: 280px;
        background-color: pink;
        margin: 100px auto;
        position: relative;
    }
    .tb a {
        width: 24px;
        height: 36px;
        
        display: block;
        position: absolute;
        top: 50%;
        margin-top: -18px;
    }
    .left {
        left: 0;
        background: url(images/left.png) no-repeat;
    }
    .right {
        right: 0;
        background: url(images/right.png) no-repeat;
    }
    .tb ul {
        width: 70px;
        height: 13px;
        background: rgba(255, 255, 255, .3);
        position: absolute; /* 加定位*/
        bottom: 18px;
        left: 50%; /*水平走父容器的一半*/
        margin-left: -35px; /*左走自己的一半*/
        border-radius: 8px;
    }
    .tb ul li {
        width: 8px;
        height: 8px;
        background-color: #fff;
        float: left;
        margin: 3px;
        border-radius: 50%;
    }
    .tb .current {
        background-color: #f40;
    }
    </style>
</head>
<body>
    <div class="tb">
        <img src="images/tb.jpg" >
        <a href="#" class="left"></a>
        <a href="#" class="right"></a>
        <ul>
            <li class="current"></li>
            <li></li>
            <li></li>
            <li></li>
            <li></li>
        </ul>

    </div>
</body>
</html>

運行結果

參考

1、

2、

你如果願意有所作為,就必須有始有終。(10)

本站聲明:網站內容來源於博客園,如有侵權,請聯繫我們,我們將及時處理【其他文章推薦】

USB CONNECTOR掌控什麼技術要點? 帶您認識其相關發展及效能

※評比前十大台北網頁設計台北網站設計公司知名案例作品心得分享

※智慧手機時代的來臨,RWD網頁設計已成為網頁設計推薦首選

星際爭霸2 AI開發(持續更新)

準備

我的環境是python3.6,sc2包0.11.1
機器學習包下載鏈接:
地圖下載鏈接
pysc2是DeepMind開發的星際爭霸Ⅱ學習環境。 它是封裝星際爭霸Ⅱ機器學習API,同時也提供Python增強學習環境。
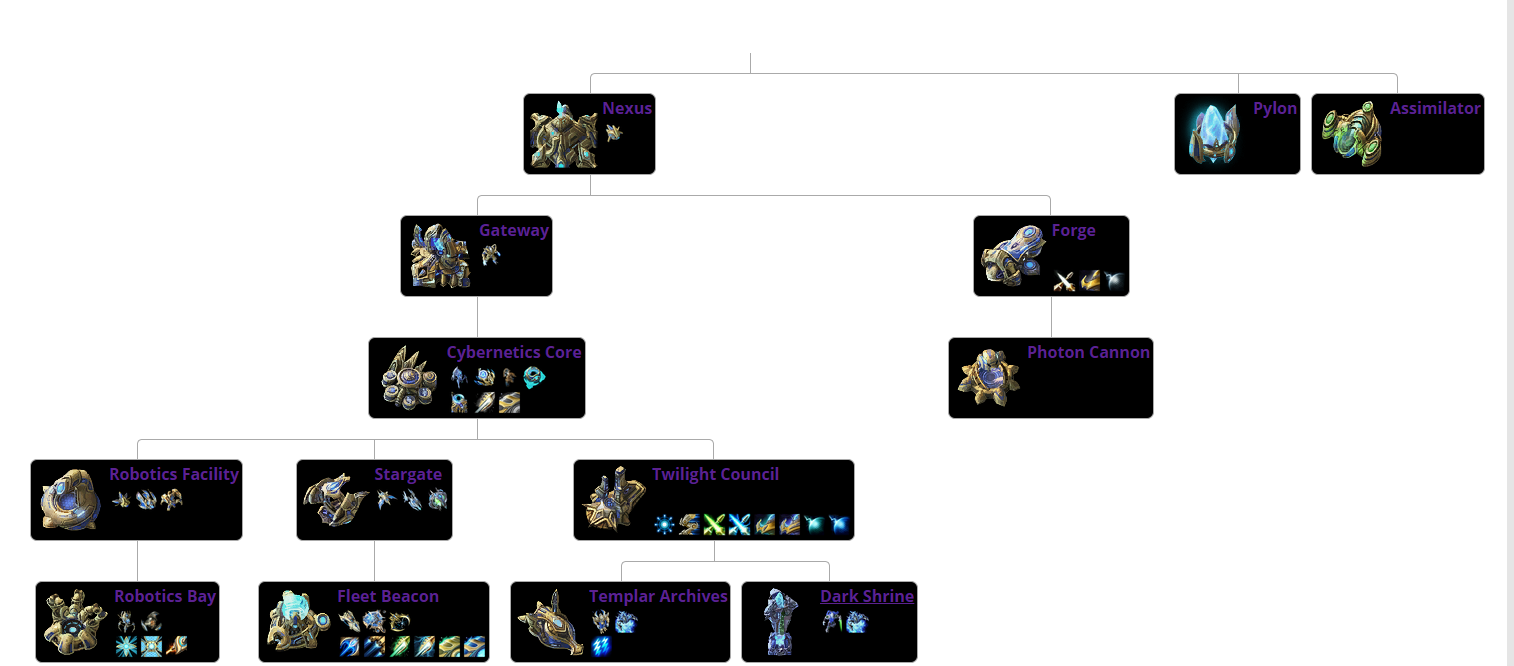
以神族為例編寫代碼,神族建築科技圖如下:

採礦

# -*- encoding: utf-8 -*-
'''
@File    :   __init__.py.py    
@Modify Time      @Author       @Desciption
------------      -------       -----------
2019/11/3 12:32   Jonas           None
'''

import sc2
from sc2 import run_game, maps, Race, Difficulty
from sc2.player import Bot, Computer


class SentdeBot(sc2.BotAI):
    async def on_step(self, iteration: int):
        await self.distribute_workers()


run_game(maps.get("AcidPlantLE"), [
    Bot(Race.Protoss, SentdeBot()), Computer(Race.Terran, Difficulty.Easy)
],realtime = True)

注意
game_data.py的assert self.id != 0註釋掉
pixel_map.py的assert self.bits_per_pixel % 8 == 0, "Unsupported pixel density"註釋掉
否則會報錯

運行結果如下,农民開始採礦

可以正常採礦

建造农民和水晶塔

import sc2
from sc2 import run_game, maps, Race, Difficulty
from sc2.player import Bot, Computer
from sc2.constants import *


class SentdeBot(sc2.BotAI):
    async def on_step(self, iteration: int):
        await self.distribute_workers()
        await self.build_workers()
        await self.build_pylons()

    # 建造农民
    async def build_workers(self):
        # 星靈樞紐(NEXUS)無隊列建造,可以提高晶體礦的利用率,不至於佔用資源
        for nexus in self.units(UnitTypeId.NEXUS).ready.noqueue:
            # 是否有50晶體礦
            if self.can_afford(UnitTypeId.PROBE):
                await self.do(nexus.train(UnitTypeId.PROBE))

    ## 建造水晶
    async def build_pylons(self):
        ## 供應人口和現有人口之差小於5且水晶不是正在建造
        if self.supply_left<5 and not self.already_pending(UnitTypeId.PYLON):
            nexuses = self.units(UnitTypeId.NEXUS).ready
            if nexuses.exists:
                if self.can_afford(UnitTypeId.PYLON):
                    await self.build(UnitTypeId.PYLON,near=nexuses.first)

## 啟動遊戲
run_game(maps.get("AcidPlantLE"), [
    Bot(Race.Protoss, SentdeBot()), Computer(Race.Terran, Difficulty.Easy)
],realtime = True)

運行結果如下,基地造农民,农民造水晶

收集氣體和開礦

代碼如下

import sc2
from sc2 import run_game, maps, Race, Difficulty
from sc2.player import Bot, Computer
from sc2.constants import *


class SentdeBot(sc2.BotAI):
    async def on_step(self, iteration: int):
        await self.distribute_workers()
        await self.build_workers()
        await self.build_pylons()
        await self.build_assimilators()
        await self.expand()

    # 建造农民
    async def build_workers(self):
        # 星靈樞紐(NEXUS)無隊列建造,可以提高晶體礦的利用率,不至於佔用資源
        for nexus in self.units(UnitTypeId.NEXUS).ready.noqueue:
            # 是否有50晶體礦
            if self.can_afford(UnitTypeId.PROBE):
                await self.do(nexus.train(UnitTypeId.PROBE))

    ## 建造水晶
    async def build_pylons(self):
        ## 供應人口和現有人口之差小於5且建築不是正在建造
        if self.supply_left < 5 and not self.already_pending(UnitTypeId.PYLON):
            nexuses = self.units(UnitTypeId.NEXUS).ready
            if nexuses.exists:
                if self.can_afford(UnitTypeId.PYLON):
                    await self.build(UnitTypeId.PYLON, near=nexuses.first)

    ## 建造吸收廠
    async def build_assimilators(self):
        for nexus in self.units(UnitTypeId.NEXUS).ready:
            # 在瓦斯泉上建造吸收廠
            vaspenes = self.state.vespene_geyser.closer_than(15.0,nexus)
            for vaspene in vaspenes:
                if not self.can_afford(UnitTypeId.ASSIMILATOR):
                    break
                worker = self.select_build_worker(vaspene.position)
                if worker is None:
                    break
                if not self.units(UnitTypeId.ASSIMILATOR).closer_than(1.0,vaspene).exists:
                    await self.do(worker.build(UnitTypeId.ASSIMILATOR,vaspene))

    ## 開礦
    async def expand(self):
        if self.units(UnitTypeId.NEXUS).amount<3 and self.can_afford(UnitTypeId.NEXUS):
            await self.expand_now()

## 啟動遊戲
run_game(maps.get("AcidPlantLE"), [
    Bot(Race.Protoss, SentdeBot()), Computer(Race.Terran, Difficulty.Easy)
], realtime=False)

run_game的realtime設置成False,可以在加速模式下運行遊戲。
運行效果如下:

可以建造吸收廠和開礦

建造軍隊

import sc2
from sc2 import run_game, maps, Race, Difficulty
from sc2.player import Bot, Computer
from sc2.constants import *


class SentdeBot(sc2.BotAI):
    async def on_step(self, iteration: int):
        await self.distribute_workers()
        await self.build_workers()
        await self.build_pylons()
        await self.build_assimilators()
        await self.expand()
        await self.offensive_force_buildings()
        await self.build_offensive_force()

    # 建造农民
    async def build_workers(self):
        # 星靈樞紐(NEXUS)無隊列建造,可以提高晶體礦的利用率,不至於佔用資源
        for nexus in self.units(UnitTypeId.NEXUS).ready.noqueue:
            # 是否有50晶體礦
            if self.can_afford(UnitTypeId.PROBE):
                await self.do(nexus.train(UnitTypeId.PROBE))

    ## 建造水晶
    async def build_pylons(self):
        ## 供應人口和現有人口之差小於5且建築不是正在建造
        if self.supply_left < 5 and not self.already_pending(UnitTypeId.PYLON):
            nexuses = self.units(UnitTypeId.NEXUS).ready
            if nexuses.exists:
                if self.can_afford(UnitTypeId.PYLON):
                    await self.build(UnitTypeId.PYLON, near=nexuses.first)

    ## 建造吸收廠
    async def build_assimilators(self):
        for nexus in self.units(UnitTypeId.NEXUS).ready:
            # 在瓦斯泉上建造吸收廠
            vaspenes = self.state.vespene_geyser.closer_than(15.0,nexus)
            for vaspene in vaspenes:
                if not self.can_afford(UnitTypeId.ASSIMILATOR):
                    break
                worker = self.select_build_worker(vaspene.position)
                if worker is None:
                    break
                if not self.units(UnitTypeId.ASSIMILATOR).closer_than(1.0,vaspene).exists:
                    await self.do(worker.build(UnitTypeId.ASSIMILATOR,vaspene))

    ## 開礦
    async def expand(self):
        if self.units(UnitTypeId.NEXUS).amount<2 and self.can_afford(UnitTypeId.NEXUS):
            await self.expand_now()

    ## 建造進攻性建築
    async def offensive_force_buildings(self):
        if self.units(UnitTypeId.PYLON).ready.exists:
            pylon = self.units(UnitTypeId.PYLON).ready.random
            if self.units(UnitTypeId.PYLON).ready.exists:
                # 根據神族建築科技圖,折躍門建造過後才可以建造控制核心
                if self.units(UnitTypeId.GATEWAY).ready.exists:
                    if not self.units(UnitTypeId.CYBERNETICSCORE):
                        if self.can_afford(UnitTypeId.CYBERNETICSCORE) and not self.already_pending(UnitTypeId.CYBERNETICSCORE):
                            await self.build(UnitTypeId.CYBERNETICSCORE,near = pylon)
                # 否則建造折躍門
                else:
                    if self.can_afford(UnitTypeId.GATEWAY) and not self.already_pending(UnitTypeId.GATEWAY):
                        await self.build(UnitTypeId.GATEWAY,near=pylon)

    # 造兵
    async def build_offensive_force(self):
        # 無隊列化建造
        for gw in self.units(UnitTypeId.GATEWAY).ready.noqueue:
            if self.can_afford(UnitTypeId.STALKER) and self.supply_left>0:
                await self.do(gw.train(UnitTypeId.STALKER))


## 啟動遊戲
run_game(maps.get("AcidPlantLE"), [
    Bot(Race.Protoss, SentdeBot()), Computer(Race.Terran, Difficulty.Easy)
], realtime=False)

運行結果如下:

可以看到,我們建造了折躍門和控制核心並訓練了追獵者

控制部隊進攻

代碼如下


import sc2
from sc2 import run_game, maps, Race, Difficulty
from sc2.player import Bot, Computer
from sc2.constants import *
import random

class SentdeBot(sc2.BotAI):
    async def on_step(self, iteration: int):
        await self.distribute_workers()
        await self.build_workers()
        await self.build_pylons()
        await self.build_assimilators()
        await self.expand()
        await self.offensive_force_buildings()
        await self.build_offensive_force()
        await self.attack()

    # 建造农民
    async def build_workers(self):
        # 星靈樞紐(NEXUS)無隊列建造,可以提高晶體礦的利用率,不至於佔用資源
        for nexus in self.units(UnitTypeId.NEXUS).ready.noqueue:
            # 是否有50晶體礦
            if self.can_afford(UnitTypeId.PROBE):
                await self.do(nexus.train(UnitTypeId.PROBE))

    ## 建造水晶
    async def build_pylons(self):
        ## 供應人口和現有人口之差小於5且建築不是正在建造
        if self.supply_left < 5 and not self.already_pending(UnitTypeId.PYLON):
            nexuses = self.units(UnitTypeId.NEXUS).ready
            if nexuses.exists:
                if self.can_afford(UnitTypeId.PYLON):
                    await self.build(UnitTypeId.PYLON, near=nexuses.first)

    ## 建造吸收廠
    async def build_assimilators(self):
        for nexus in self.units(UnitTypeId.NEXUS).ready:
            # 在瓦斯泉上建造吸收廠
            vaspenes = self.state.vespene_geyser.closer_than(15.0,nexus)
            for vaspene in vaspenes:
                if not self.can_afford(UnitTypeId.ASSIMILATOR):
                    break
                worker = self.select_build_worker(vaspene.position)
                if worker is None:
                    break
                if not self.units(UnitTypeId.ASSIMILATOR).closer_than(1.0,vaspene).exists:
                    await self.do(worker.build(UnitTypeId.ASSIMILATOR,vaspene))

    ## 開礦
    async def expand(self):
        if self.units(UnitTypeId.NEXUS).amount<3 and self.can_afford(UnitTypeId.NEXUS):
            await self.expand_now()

    ## 建造進攻性建築
    async def offensive_force_buildings(self):
        if self.units(UnitTypeId.PYLON).ready.exists:
            pylon = self.units(UnitTypeId.PYLON).ready.random
            # 根據神族建築科技圖,折躍門建造過後才可以建造控制核心
            if self.units(UnitTypeId.GATEWAY).ready.exists and not self.units(UnitTypeId.CYBERNETICSCORE):
                if self.can_afford(UnitTypeId.CYBERNETICSCORE) and not self.already_pending(UnitTypeId.CYBERNETICSCORE):
                    await self.build(UnitTypeId.CYBERNETICSCORE,near = pylon)
            # 否則建造折躍門
            elif len(self.units(UnitTypeId.GATEWAY))<=3:
                if self.can_afford(UnitTypeId.GATEWAY) and not self.already_pending(UnitTypeId.GATEWAY):
                    await self.build(UnitTypeId.GATEWAY,near=pylon)

    ## 造兵
    async def build_offensive_force(self):
        # 無隊列化建造
        for gw in self.units(UnitTypeId.GATEWAY).ready.noqueue:
            if self.can_afford(UnitTypeId.STALKER) and self.supply_left>0:
                await self.do(gw.train(UnitTypeId.STALKER))

    ## 尋找目標
    def find_target(self,state):
        if len(self.known_enemy_units)>0:
            # 隨機選取敵方單位
            return random.choice(self.known_enemy_units)
        elif len(self.known_enemy_units)>0:
            # 隨機選取敵方建築
            return random.choice(self.known_enemy_structures)
        else:
            # 返回敵方出生點位
            return self.enemy_start_locations[0]

    ## 進攻
    async def attack(self):
        # 追獵者數量超過15個開始進攻
        if self.units(UnitTypeId.STALKER).amount>15:
            for s in self.units(UnitTypeId.STALKER).idle:
                await self.do(s.attack(self.find_target(self.state)))

        # 防衛模式:視野範圍內存在敵人,開始攻擊
        if self.units(UnitTypeId.STALKER).amount>5:
            if len(self.known_enemy_units)>0:
                for s in self.units(UnitTypeId.STALKER).idle:
                    await self.do(s.attack(random.choice(self.known_enemy_units)))

## 啟動遊戲
run_game(maps.get("AcidPlantLE"), [
    Bot(Race.Protoss, SentdeBot()), Computer(Race.Terran, Difficulty.Medium)
], realtime=False)

運行結果如下

可以看到,4個折躍門訓練追獵者並發動進攻。

擊敗困難電腦

我們目前的代碼只能擊敗中等和簡單電腦,那麼如何擊敗困難電腦呢?
代碼如下


import sc2
from sc2 import run_game, maps, Race, Difficulty
from sc2.player import Bot, Computer
from sc2.constants import *
import random


class SentdeBot(sc2.BotAI):
    def __init__(self):
        # 經過計算,每分鐘大約165迭代次數
        self.ITERATIONS_PER_MINUTE = 165
        # 最大农民數量
        self.MAX_WORKERS = 65

    async def on_step(self, iteration: int):
        self.iteration = iteration
        await self.distribute_workers()
        await self.build_workers()
        await self.build_pylons()
        await self.build_assimilators()
        await self.expand()
        await self.offensive_force_buildings()
        await self.build_offensive_force()
        await self.attack()

    # 建造农民
    async def build_workers(self):
        # 星靈樞鈕*16(一個基地配備16個农民)大於農民數量並且現有农民數量小於MAX_WORKERS
        if len(self.units(UnitTypeId.NEXUS))*16>len(self.units(UnitTypeId.PROBE)) and len(self.units(UnitTypeId.PROBE))<self.MAX_WORKERS:
                # 星靈樞紐(NEXUS)無隊列建造,可以提高晶體礦的利用率,不至於佔用資源
                for nexus in self.units(UnitTypeId.NEXUS).ready.noqueue:
                    # 是否有50晶體礦建造农民
                    if self.can_afford(UnitTypeId.PROBE):
                        await self.do(nexus.train(UnitTypeId.PROBE))

    ## 建造水晶
    async def build_pylons(self):
        ## 供應人口和現有人口之差小於5且建築不是正在建造
        if self.supply_left < 5 and not self.already_pending(UnitTypeId.PYLON):
            nexuses = self.units(UnitTypeId.NEXUS).ready
            if nexuses.exists:
                if self.can_afford(UnitTypeId.PYLON):
                    await self.build(UnitTypeId.PYLON, near=nexuses.first)

    ## 建造吸收廠
    async def build_assimilators(self):
        for nexus in self.units(UnitTypeId.NEXUS).ready:
            # 在瓦斯泉上建造吸收廠
            vaspenes = self.state.vespene_geyser.closer_than(15.0,nexus)
            for vaspene in vaspenes:
                if not self.can_afford(UnitTypeId.ASSIMILATOR):
                    break
                worker = self.select_build_worker(vaspene.position)
                if worker is None:
                    break
                if not self.units(UnitTypeId.ASSIMILATOR).closer_than(1.0,vaspene).exists:
                    await self.do(worker.build(UnitTypeId.ASSIMILATOR,vaspene))

    ## 開礦
    async def expand(self):
        # (self.iteration / self.ITERATIONS_PER_MINUTE)是一個緩慢遞增的值,動態開礦
        if self.units(UnitTypeId.NEXUS).amount<self.iteration / self.ITERATIONS_PER_MINUTE and self.can_afford(UnitTypeId.NEXUS):
            await self.expand_now()

    ## 建造進攻性建築
    async def offensive_force_buildings(self):
        print(self.iteration / self.ITERATIONS_PER_MINUTE)
        if self.units(UnitTypeId.PYLON).ready.exists:
            pylon = self.units(UnitTypeId.PYLON).ready.random
            # 根據神族建築科技圖,折躍門建造過後才可以建造控制核心
            if self.units(UnitTypeId.GATEWAY).ready.exists and not self.units(UnitTypeId.CYBERNETICSCORE):
                if self.can_afford(UnitTypeId.CYBERNETICSCORE) and not self.already_pending(UnitTypeId.CYBERNETICSCORE):
                    await self.build(UnitTypeId.CYBERNETICSCORE, near=pylon)
            # 否則建造折躍門
            # (self.iteration / self.ITERATIONS_PER_MINUTE)/2 是一個緩慢遞增的值
            elif len(self.units(UnitTypeId.GATEWAY)) < ((self.iteration / self.ITERATIONS_PER_MINUTE) / 2):
                if self.can_afford(UnitTypeId.GATEWAY) and not self.already_pending(UnitTypeId.GATEWAY):
                    await self.build(UnitTypeId.GATEWAY, near=pylon)
            # 控制核心存在的情況下建造星門
            if self.units(UnitTypeId.CYBERNETICSCORE).ready.exists:
                if len(self.units(UnitTypeId.STARGATE)) < ((self.iteration / self.ITERATIONS_PER_MINUTE) / 2):
                    if self.can_afford(UnitTypeId.STARGATE) and not self.already_pending(UnitTypeId.STARGATE):
                        await self.build(UnitTypeId.STARGATE, near=pylon)

    ## 造兵
    async def build_offensive_force(self):
        # 無隊列化建造
        for gw in self.units(UnitTypeId.GATEWAY).ready.noqueue:
            if not self.units(UnitTypeId.STALKER).amount > self.units(UnitTypeId.VOIDRAY).amount:

                if self.can_afford(UnitTypeId.STALKER) and self.supply_left > 0:
                    await self.do(gw.train(UnitTypeId.STALKER))

        for sg in self.units(UnitTypeId.STARGATE).ready.noqueue:
            if self.can_afford(UnitTypeId.VOIDRAY) and self.supply_left > 0:
                await self.do(sg.train(UnitTypeId.VOIDRAY))

    ## 尋找目標
    def find_target(self,state):
        if len(self.known_enemy_units)>0:
            # 隨機選取敵方單位
            return random.choice(self.known_enemy_units)
        elif len(self.known_enemy_units)>0:
            # 隨機選取敵方建築
            return random.choice(self.known_enemy_structures)
        else:
            # 返回敵方出生點位
            return self.enemy_start_locations[0]

    ## 進攻
    async def attack(self):
        # {UNIT: [n to fight, n to defend]}
        aggressive_units = {UnitTypeId.STALKER: [15, 5],
                            UnitTypeId.VOIDRAY: [8, 3]}

        for UNIT in aggressive_units:
            # 攻擊模式
            if self.units(UNIT).amount > aggressive_units[UNIT][0] and self.units(UNIT).amount > aggressive_units[UNIT][
                1]:
                for s in self.units(UNIT).idle:
                    await self.do(s.attack(self.find_target(self.state)))
            # 防衛模式
            elif self.units(UNIT).amount > aggressive_units[UNIT][1]:
                if len(self.known_enemy_units) > 0:
                    for s in self.units(UNIT).idle:
                        await self.do(s.attack(random.choice(self.known_enemy_units)))
## 啟動遊戲
run_game(maps.get("AcidPlantLE"), [
    Bot(Race.Protoss, SentdeBot()), Computer(Race.Terran, Difficulty.Hard)
], realtime=False)

運行結果如下

可以看到,擊敗了困難人族電腦,但是電腦選擇了rush戰術,我們寫得AI腳本會輸掉遊戲。顯然,這不是最佳方案。
“只有AI才能拯救我的勝率”,請看下文。

採集地圖數據

這次我們只造一個折躍門,全力通過星門造虛空光輝艦
修改offensive_force_buildings(self)方法的判斷

elif len(self.units(GATEWAY)) < 1:
                if self.can_afford(GATEWAY) and not self.already_pending(GATEWAY):
                    await self.build(GATEWAY, near=pylon)

註釋或者刪除build_offensive_force(self)的建造追獵者的代碼

        ## 造兵
    async def build_offensive_force(self):
        # 無隊列化建造
        # for gw in self.units(UnitTypeId.GATEWAY).ready.noqueue:
        #     if not self.units(UnitTypeId.STALKER).amount > self.units(UnitTypeId.VOIDRAY).amount:
        #
        #         if self.can_afford(UnitTypeId.STALKER) and self.supply_left > 0:
        #             await self.do(gw.train(UnitTypeId.STALKER))

        for sg in self.units(UnitTypeId.STARGATE).ready.noqueue:
            if self.can_afford(UnitTypeId.VOIDRAY) and self.supply_left > 0:
                await self.do(sg.train(UnitTypeId.VOIDRAY))

attack(self)中的aggressive_units註釋掉Stalker
導入numpy和cv2庫

game_data = np.zeros((self.game_info.map_size[1], self.game_info.map_size[0], 3), np.uint8)

建立以地圖Heigt為行,Width為列的三維矩陣

for nexus in self.units(NEXUS):
            nex_pos = nexus.position
            print(nex_pos)
            cv2.circle(game_data, (int(nex_pos[0]), int(nex_pos[1])), 10, (0, 255, 0), -1)  # BGR

遍歷星靈樞紐,獲取下一個位置,畫圓,circle(承載圓的img, 圓心, 半徑, 顏色, thickness=-1表示填充)
接下來我們要垂直翻轉三維矩陣,因為我們建立的矩陣左上角是原點(0,0),縱坐標向下延申,橫坐標向右延申。翻轉之後就成了正常的坐標系。

flipped = cv2.flip(game_data, 0)

圖像縮放,達到可視化最佳。

        resized = cv2.resize(flipped, dsize=None, fx=2, fy=2)
        cv2.imshow('Intel', resized)
        cv2.waitKey(1)

至此,完整代碼如下

import sc2
from sc2 import run_game, maps, Race, Difficulty
from sc2.player import Bot, Computer
from sc2.constants import *
import random
import numpy as np
import cv2


class SentdeBot(sc2.BotAI):
    def __init__(self):
        # 經過計算,每分鐘大約165迭代次數
        self.ITERATIONS_PER_MINUTE = 165
        # 最大农民數量
        self.MAX_WORKERS = 65

    async def on_step(self, iteration: int):
        self.iteration = iteration
        await self.distribute_workers()
        await self.build_workers()
        await self.build_pylons()
        await self.build_assimilators()
        await self.expand()
        await self.offensive_force_buildings()
        await self.build_offensive_force()
        await self.intel()
        await self.attack()

    async def intel(self):
        # 根據地圖建立的三維矩陣
        game_data = np.zeros((self.game_info.map_size[1], self.game_info.map_size[0], 3), np.uint8)
        for nexus in self.units(UnitTypeId.NEXUS):
            nex_pos = nexus.position
            # circle(承載圓的img, 圓心, 半徑, 顏色, thickness=-1表示填充)
            # 記錄星靈樞紐的位置
            cv2.circle(game_data, (int(nex_pos[0]), int(nex_pos[1])), 10, (0, 255, 0), -1)
        # 圖像翻轉垂直鏡像
        flipped = cv2.flip(game_data, 0)
        # 圖像縮放
        # cv2.resize(原圖像,輸出圖像的大小,width方向的縮放比例,height方向縮放的比例)
        resized = cv2.resize(flipped, dsize=None, fx=2, fy=2)
        cv2.imshow('Intel', resized)

        # cv2.waitKey(每Xms刷新圖像)
        cv2.waitKey(1)

    # 建造农民
    async def build_workers(self):
        # 星靈樞鈕*16(一個基地配備16個农民)大於農民數量並且現有农民數量小於MAX_WORKERS
        if len(self.units(UnitTypeId.NEXUS)) * 16 > len(self.units(UnitTypeId.PROBE)) and len(
                self.units(UnitTypeId.PROBE)) < self.MAX_WORKERS:
            # 星靈樞紐(NEXUS)無隊列建造,可以提高晶體礦的利用率,不至於佔用資源
            for nexus in self.units(UnitTypeId.NEXUS).ready.noqueue:
                # 是否有50晶體礦建造农民
                if self.can_afford(UnitTypeId.PROBE):
                    await self.do(nexus.train(UnitTypeId.PROBE))

    ## 建造水晶
    async def build_pylons(self):
        ## 供應人口和現有人口之差小於5且建築不是正在建造
        if self.supply_left < 5 and not self.already_pending(UnitTypeId.PYLON):
            nexuses = self.units(UnitTypeId.NEXUS).ready
            if nexuses.exists:
                if self.can_afford(UnitTypeId.PYLON):
                    await self.build(UnitTypeId.PYLON, near=nexuses.first)

    ## 建造吸收廠
    async def build_assimilators(self):
        for nexus in self.units(UnitTypeId.NEXUS).ready:
            # 在瓦斯泉上建造吸收廠
            vaspenes = self.state.vespene_geyser.closer_than(15.0, nexus)
            for vaspene in vaspenes:
                if not self.can_afford(UnitTypeId.ASSIMILATOR):
                    break
                worker = self.select_build_worker(vaspene.position)
                if worker is None:
                    break
                if not self.units(UnitTypeId.ASSIMILATOR).closer_than(1.0, vaspene).exists:
                    await self.do(worker.build(UnitTypeId.ASSIMILATOR, vaspene))

    ## 開礦
    async def expand(self):
        # (self.iteration / self.ITERATIONS_PER_MINUTE)是一個緩慢遞增的值,動態開礦
        if self.units(UnitTypeId.NEXUS).amount < self.iteration / self.ITERATIONS_PER_MINUTE and self.can_afford(
                UnitTypeId.NEXUS):
            await self.expand_now()

    ## 建造進攻性建築
    async def offensive_force_buildings(self):
        print(self.iteration / self.ITERATIONS_PER_MINUTE)
        if self.units(UnitTypeId.PYLON).ready.exists:
            pylon = self.units(UnitTypeId.PYLON).ready.random
            # 根據神族建築科技圖,折躍門建造過後才可以建造控制核心
            if self.units(UnitTypeId.GATEWAY).ready.exists and not self.units(UnitTypeId.CYBERNETICSCORE):
                if self.can_afford(UnitTypeId.CYBERNETICSCORE) and not self.already_pending(UnitTypeId.CYBERNETICSCORE):
                    await self.build(UnitTypeId.CYBERNETICSCORE, near=pylon)
            # 否則建造折躍門
            # (self.iteration / self.ITERATIONS_PER_MINUTE)/2 是一個緩慢遞增的值
            # elif len(self.units(UnitTypeId.GATEWAY)) < ((self.iteration / self.ITERATIONS_PER_MINUTE) / 2):
            elif len(self.units(UnitTypeId.GATEWAY)) < 1:
                if self.can_afford(UnitTypeId.GATEWAY) and not self.already_pending(UnitTypeId.GATEWAY):
                    await self.build(UnitTypeId.GATEWAY, near=pylon)
            # 控制核心存在的情況下建造星門
            if self.units(UnitTypeId.CYBERNETICSCORE).ready.exists:
                if len(self.units(UnitTypeId.STARGATE)) < ((self.iteration / self.ITERATIONS_PER_MINUTE) / 2):
                    if self.can_afford(UnitTypeId.STARGATE) and not self.already_pending(UnitTypeId.STARGATE):
                        await self.build(UnitTypeId.STARGATE, near=pylon)

    ## 造兵
    async def build_offensive_force(self):
        # 無隊列化建造
        for sg in self.units(UnitTypeId.STARGATE).ready.noqueue:
            if self.can_afford(UnitTypeId.VOIDRAY) and self.supply_left > 0:
                await self.do(sg.train(UnitTypeId.VOIDRAY))

    ## 尋找目標
    def find_target(self, state):
        if len(self.known_enemy_units) > 0:
            # 隨機選取敵方單位
            return random.choice(self.known_enemy_units)
        elif len(self.known_enemy_units) > 0:
            # 隨機選取敵方建築
            return random.choice(self.known_enemy_structures)
        else:
            # 返回敵方出生點位
            return self.enemy_start_locations[0]

    ## 進攻
    async def attack(self):
        # {UNIT: [n to fight, n to defend]}
        aggressive_units = {UnitTypeId.VOIDRAY: [8, 3]}

        for UNIT in aggressive_units:
            # 攻擊模式
            if self.units(UNIT).amount > aggressive_units[UNIT][0] and self.units(UNIT).amount > aggressive_units[UNIT][1]:
                for s in self.units(UNIT).idle:
                    await self.do(s.attack(self.find_target(self.state)))
            # 防衛模式
            elif self.units(UNIT).amount > aggressive_units[UNIT][1]:
                if len(self.known_enemy_units) > 0:
                    for s in self.units(UNIT).idle:
                        await self.do(s.attack(random.choice(self.known_enemy_units)))


## 啟動遊戲
run_game(maps.get("AcidPlantLE"), [
    Bot(Race.Protoss, SentdeBot()), Computer(Race.Terran, Difficulty.Hard)
], realtime=False)

運行結果如下

採集到了地圖位置。

偵察

在intel(self)里創建一個字典draw_dict,UnitTypeId作為key,半徑和顏色是value


        draw_dict = {
            UnitTypeId.NEXUS: [15, (0, 255, 0)],
            UnitTypeId.PYLON: [3, (20, 235, 0)],
            UnitTypeId.PROBE: [1, (55, 200, 0)],
            UnitTypeId.ASSIMILATOR: [2, (55, 200, 0)],
            UnitTypeId.GATEWAY: [3, (200, 100, 0)],
            UnitTypeId.CYBERNETICSCORE: [3, (150, 150, 0)],
            UnitTypeId.STARGATE: [5, (255, 0, 0)],
            UnitTypeId.ROBOTICSFACILITY: [5, (215, 155, 0)],

            UnitTypeId.VOIDRAY: [3, (255, 100, 0)]
        }

迭代同上

for unit_type in draw_dict:
            for unit in self.units(unit_type).ready:
                pos = unit.position
                cv2.circle(game_data, (int(pos[0]), int(pos[1])), draw_dict[unit_type][0], draw_dict[unit_type][1], -1)

存儲三族的主基地名稱(星靈樞紐,指揮中心,孵化場),刻畫敵方建築。

# 主基地名稱
        main_base_names = ["nexus", "supplydepot", "hatchery"]
        # 記錄敵方基地位置
        for enemy_building in self.known_enemy_structures:
            pos = enemy_building.position
            if enemy_building.name.lower() not in main_base_names:
                cv2.circle(game_data, (int(pos[0]), int(pos[1])), 5, (200, 50, 212), -1)
        for enemy_building in self.known_enemy_structures:
            pos = enemy_building.position
            if enemy_building.name.lower() in main_base_names:
                cv2.circle(game_data, (int(pos[0]), int(pos[1])), 15, (0, 0, 255), -1)

刻畫敵方單位,如果是农民畫得小些,其他單位則畫大些。

        for enemy_unit in self.known_enemy_units:

            if not enemy_unit.is_structure:
                worker_names = ["probe", "scv", "drone"]
                # if that unit is a PROBE, SCV, or DRONE... it's a worker
                pos = enemy_unit.position
                if enemy_unit.name.lower() in worker_names:
                    cv2.circle(game_data, (int(pos[0]), int(pos[1])), 1, (55, 0, 155), -1)
                else:
                    cv2.circle(game_data, (int(pos[0]), int(pos[1])), 3, (50, 0, 215), -1)

在offensive_force_buildings(self)方法中添加建造机械台

            if self.units(CYBERNETICSCORE).ready.exists:
                if len(self.units(ROBOTICSFACILITY)) < 1:
                    if self.can_afford(ROBOTICSFACILITY) and not self.already_pending(ROBOTICSFACILITY):
                        await self.build(ROBOTICSFACILITY, near=pylon)

創建scout(),訓練Observer

async def scout(self):
        if len(self.units(OBSERVER)) > 0:
            scout = self.units(OBSERVER)[0]
            if scout.is_idle:
                enemy_location = self.enemy_start_locations[0]
                move_to = self.random_location_variance(enemy_location)
                print(move_to)
                await self.do(scout.move(move_to))

        else:
            for rf in self.units(ROBOTICSFACILITY).ready.noqueue:
                if self.can_afford(OBSERVER) and self.supply_left > 0:
                    await self.do(rf.train(OBSERVER))

生成隨機位置,很簡單。意思是橫坐標累計遞增-0.2和0.2倍的橫坐標,限制條件為如果x超過橫坐標,那麼就是橫坐標最大值。
縱坐標同理。

    def random_location_variance(self, enemy_start_location):
        x = enemy_start_location[0]
        y = enemy_start_location[1]

        x += ((random.randrange(-20, 20))/100) * enemy_start_location[0]
        y += ((random.randrange(-20, 20))/100) * enemy_start_location[1]

        if x < 0:
            x = 0
        if y < 0:
            y = 0
        if x > self.game_info.map_size[0]:
            x = self.game_info.map_size[0]
        if y > self.game_info.map_size[1]:
            y = self.game_info.map_size[1]

        go_to = position.Point2(position.Pointlike((x,y)))
        return go_to

完整代碼如下

# -*- encoding: utf-8 -*-
'''
@File    :   demo.py
@Modify Time      @Author       @Desciption
------------      -------       -----------
2019/11/3 12:32   Jonas           None
'''

import sc2
from sc2 import run_game, maps, Race, Difficulty, position
from sc2.player import Bot, Computer
from sc2.constants import *
import random
import numpy as np
import cv2


class SentdeBot(sc2.BotAI):
    def __init__(self):
        # 經過計算,每分鐘大約165迭代次數
        self.ITERATIONS_PER_MINUTE = 165
        # 最大农民數量
        self.MAX_WORKERS = 50

    async def on_step(self, iteration: int):
        self.iteration = iteration
        await self.scout()
        await self.distribute_workers()
        await self.build_workers()
        await self.build_pylons()
        await self.build_assimilators()
        await self.expand()
        await self.offensive_force_buildings()
        await self.build_offensive_force()
        await self.intel()
        await self.attack()

    ## 偵察
    async def scout(self):
        if len(self.units(UnitTypeId.OBSERVER)) > 0:
            scout = self.units(UnitTypeId.OBSERVER)[0]
            if scout.is_idle:
                enemy_location = self.enemy_start_locations[0]
                move_to = self.random_location_variance(enemy_location)
                print(move_to)
                await self.do(scout.move(move_to))

        else:
            for rf in self.units(UnitTypeId.ROBOTICSFACILITY).ready.noqueue:
                if self.can_afford(UnitTypeId.OBSERVER) and self.supply_left > 0:
                    await self.do(rf.train(UnitTypeId.OBSERVER))

    async def intel(self):
        game_data = np.zeros((self.game_info.map_size[1], self.game_info.map_size[0], 3), np.uint8)

        # UnitTypeId作為key,半徑和顏色是value
        draw_dict = {
            UnitTypeId.NEXUS: [15, (0, 255, 0)],
            UnitTypeId.PYLON: [3, (20, 235, 0)],
            UnitTypeId.PROBE: [1, (55, 200, 0)],
            UnitTypeId.ASSIMILATOR: [2, (55, 200, 0)],
            UnitTypeId.GATEWAY: [3, (200, 100, 0)],
            UnitTypeId.CYBERNETICSCORE: [3, (150, 150, 0)],
            UnitTypeId.STARGATE: [5, (255, 0, 0)],
            UnitTypeId.ROBOTICSFACILITY: [5, (215, 155, 0)],

            UnitTypeId.VOIDRAY: [3, (255, 100, 0)],
            # OBSERVER: [3, (255, 255, 255)],
        }

        for unit_type in draw_dict:
            for unit in self.units(unit_type).ready:
                pos = unit.position
                cv2.circle(game_data, (int(pos[0]), int(pos[1])), draw_dict[unit_type][0], draw_dict[unit_type][1], -1)

        # 主基地名稱
        main_base_names = ["nexus", "supplydepot", "hatchery"]
        # 記錄敵方基地位置
        for enemy_building in self.known_enemy_structures:
            pos = enemy_building.position
            # 不是主基地建築,畫小一些
            if enemy_building.name.lower() not in main_base_names:
                cv2.circle(game_data, (int(pos[0]), int(pos[1])), 5, (200, 50, 212), -1)
        for enemy_building in self.known_enemy_structures:
            pos = enemy_building.position
            if enemy_building.name.lower() in main_base_names:
                cv2.circle(game_data, (int(pos[0]), int(pos[1])), 15, (0, 0, 255), -1)

        for enemy_unit in self.known_enemy_units:

            if not enemy_unit.is_structure:
                worker_names = ["probe", "scv", "drone"]
                # if that unit is a PROBE, SCV, or DRONE... it's a worker
                pos = enemy_unit.position
                if enemy_unit.name.lower() in worker_names:
                    cv2.circle(game_data, (int(pos[0]), int(pos[1])), 1, (55, 0, 155), -1)
                else:
                    cv2.circle(game_data, (int(pos[0]), int(pos[1])), 3, (50, 0, 215), -1)

        for obs in self.units(UnitTypeId.OBSERVER).ready:
            pos = obs.position
            cv2.circle(game_data, (int(pos[0]), int(pos[1])), 1, (255, 255, 255), -1)

        # flip horizontally to make our final fix in visual representation:
        flipped = cv2.flip(game_data, 0)
        resized = cv2.resize(flipped, dsize=None, fx=2, fy=2)

        cv2.imshow('Intel', resized)
        cv2.waitKey(1)

    def random_location_variance(self, enemy_start_location):
        x = enemy_start_location[0]
        y = enemy_start_location[1]

        x += ((random.randrange(-20, 20)) / 100) * enemy_start_location[0]
        y += ((random.randrange(-20, 20)) / 100) * enemy_start_location[1]

        if x < 0:
            x = 0
        if y < 0:
            y = 0
        if x > self.game_info.map_size[0]:
            x = self.game_info.map_size[0]
        if y > self.game_info.map_size[1]:
            y = self.game_info.map_size[1]

        go_to = position.Point2(position.Pointlike((x, y)))
        return go_to

    # 建造农民
    async def build_workers(self):
        # 星靈樞鈕*16(一個基地配備16個农民)大於農民數量並且現有农民數量小於MAX_WORKERS
        if len(self.units(UnitTypeId.NEXUS)) * 16 > len(self.units(UnitTypeId.PROBE)) and len(
                self.units(UnitTypeId.PROBE)) < self.MAX_WORKERS:
            # 星靈樞紐(NEXUS)無隊列建造,可以提高晶體礦的利用率,不至於佔用資源
            for nexus in self.units(UnitTypeId.NEXUS).ready.noqueue:
                # 是否有50晶體礦建造农民
                if self.can_afford(UnitTypeId.PROBE):
                    await self.do(nexus.train(UnitTypeId.PROBE))

    ## 建造水晶
    async def build_pylons(self):
        ## 供應人口和現有人口之差小於5且建築不是正在建造
        if self.supply_left < 5 and not self.already_pending(UnitTypeId.PYLON):
            nexuses = self.units(UnitTypeId.NEXUS).ready
            if nexuses.exists:
                if self.can_afford(UnitTypeId.PYLON):
                    await self.build(UnitTypeId.PYLON, near=nexuses.first)

    ## 建造吸收廠
    async def build_assimilators(self):
        for nexus in self.units(UnitTypeId.NEXUS).ready:
            # 在瓦斯泉上建造吸收廠
            vaspenes = self.state.vespene_geyser.closer_than(15.0, nexus)
            for vaspene in vaspenes:
                if not self.can_afford(UnitTypeId.ASSIMILATOR):
                    break
                worker = self.select_build_worker(vaspene.position)
                if worker is None:
                    break
                if not self.units(UnitTypeId.ASSIMILATOR).closer_than(1.0, vaspene).exists:
                    await self.do(worker.build(UnitTypeId.ASSIMILATOR, vaspene))

    ## 開礦
    async def expand(self):
        # (self.iteration / self.ITERATIONS_PER_MINUTE)是一個緩慢遞增的值,動態開礦
        if self.units(UnitTypeId.NEXUS).amount < self.iteration / self.ITERATIONS_PER_MINUTE and self.can_afford(
                UnitTypeId.NEXUS):
            await self.expand_now()

    ## 建造進攻性建築
    async def offensive_force_buildings(self):
        print(self.iteration / self.ITERATIONS_PER_MINUTE)
        if self.units(UnitTypeId.PYLON).ready.exists:
            pylon = self.units(UnitTypeId.PYLON).ready.random
            # 根據神族建築科技圖,折躍門建造過後才可以建造控制核心
            if self.units(UnitTypeId.GATEWAY).ready.exists and not self.units(UnitTypeId.CYBERNETICSCORE):
                if self.can_afford(UnitTypeId.CYBERNETICSCORE) and not self.already_pending(UnitTypeId.CYBERNETICSCORE):
                    await self.build(UnitTypeId.CYBERNETICSCORE, near=pylon)
            # 否則建造折躍門
            # (self.iteration / self.ITERATIONS_PER_MINUTE)/2 是一個緩慢遞增的值
            # elif len(self.units(UnitTypeId.GATEWAY)) < ((self.iteration / self.ITERATIONS_PER_MINUTE) / 2):
            elif len(self.units(UnitTypeId.GATEWAY)) < 1:
                if self.can_afford(UnitTypeId.GATEWAY) and not self.already_pending(UnitTypeId.GATEWAY):
                    await self.build(UnitTypeId.GATEWAY, near=pylon)
            # 控制核心存在的情況下建造机械台
            if self.units(UnitTypeId.CYBERNETICSCORE).ready.exists:
                if len(self.units(UnitTypeId.ROBOTICSFACILITY)) < 1:
                    if self.can_afford(UnitTypeId.ROBOTICSFACILITY) and not self.already_pending(
                            UnitTypeId.ROBOTICSFACILITY):
                        await self.build(UnitTypeId.ROBOTICSFACILITY, near=pylon)

            # 控制核心存在的情況下建造星門
            if self.units(UnitTypeId.CYBERNETICSCORE).ready.exists:
                if len(self.units(UnitTypeId.STARGATE)) < ((self.iteration / self.ITERATIONS_PER_MINUTE) / 2):
                    if self.can_afford(UnitTypeId.STARGATE) and not self.already_pending(UnitTypeId.STARGATE):
                        await self.build(UnitTypeId.STARGATE, near=pylon)

    ## 造兵
    async def build_offensive_force(self):
        # 無隊列化建造
        # for gw in self.units(UnitTypeId.GATEWAY).ready.noqueue:
        #     if not self.units(UnitTypeId.STALKER).amount > self.units(UnitTypeId.VOIDRAY).amount:
        #
        #         if self.can_afford(UnitTypeId.STALKER) and self.supply_left > 0:
        #             await self.do(gw.train(UnitTypeId.STALKER))

        for sg in self.units(UnitTypeId.STARGATE).ready.noqueue:
            if self.can_afford(UnitTypeId.VOIDRAY) and self.supply_left > 0:
                await self.do(sg.train(UnitTypeId.VOIDRAY))

    ## 尋找目標
    def find_target(self, state):
        if len(self.known_enemy_units) > 0:
            # 隨機選取敵方單位
            return random.choice(self.known_enemy_units)
        elif len(self.known_enemy_units) > 0:
            # 隨機選取敵方建築
            return random.choice(self.known_enemy_structures)
        else:
            # 返回敵方出生點位
            return self.enemy_start_locations[0]

    ## 進攻
    async def attack(self):
        # {UNIT: [n to fight, n to defend]}
        aggressive_units = {UnitTypeId.VOIDRAY: [8, 3]}

        for UNIT in aggressive_units:
            # 攻擊模式
            if self.units(UNIT).amount > aggressive_units[UNIT][0] and self.units(UNIT).amount > aggressive_units[UNIT][
                1]:
                for s in self.units(UNIT).idle:
                    await self.do(s.attack(self.find_target(self.state)))
            # 防衛模式
            elif self.units(UNIT).amount > aggressive_units[UNIT][1]:
                if len(self.known_enemy_units) > 0:
                    for s in self.units(UNIT).idle:
                        await self.do(s.attack(random.choice(self.known_enemy_units)))


## 啟動遊戲
run_game(maps.get("AcidPlantLE"), [
    Bot(Race.Protoss, SentdeBot()), Computer(Race.Terran, Difficulty.Hard)
], realtime=False)

運行結果如下,紅色和粉紅色是敵方單位。

創建訓練數據

統計資源、人口和軍隊人口比,在intel方法添加如下代碼

        # 追蹤資源、人口和軍隊人口比
        line_max = 50
        mineral_ratio = self.minerals / 1500
        if mineral_ratio > 1.0:
            mineral_ratio = 1.0

        vespene_ratio = self.vespene / 1500
        if vespene_ratio > 1.0:
            vespene_ratio = 1.0

        population_ratio = self.supply_left / self.supply_cap
        if population_ratio > 1.0:
            population_ratio = 1.0

        plausible_supply = self.supply_cap / 200.0

        military_weight = len(self.units(UnitTypeId.VOIDRAY)) / (self.supply_cap - self.supply_left)
        if military_weight > 1.0:
            military_weight = 1.0

        # 农民/人口      worker/supply ratio
        cv2.line(game_data, (0, 19), (int(line_max * military_weight), 19), (250, 250, 200), 3)
        # 人口/200    plausible supply (supply/200.0)
        cv2.line(game_data, (0, 15), (int(line_max * plausible_supply), 15), (220, 200, 200), 3)
        # (人口-現有人口)/人口  population ratio (supply_left/supply)
        cv2.line(game_data, (0, 11), (int(line_max * population_ratio), 11), (150, 150, 150), 3)
        # 氣體/1500   gas/1500
        cv2.line(game_data, (0, 7), (int(line_max * vespene_ratio), 7), (210, 200, 0), 3)
        # 晶體礦/1500  minerals minerals/1500
        cv2.line(game_data, (0, 3), (int(line_max * mineral_ratio), 3), (0, 255, 25), 3)

運行結果如下,左下角自上而下依次是“农民/人口”,“人口/200”,“(人口-現有人口)/人口”,“氣體/1500”,“晶體礦/1500”

採集進攻行為數據,在attack方法中加入如下代碼

        if len(self.units(UnitTypeId.VOIDRAY).idle) > 0:
            choice = random.randrange(0, 4)
            target = False
            if self.iteration > self.do_something_after:
                if choice == 0:
                    # 什麼都不做
                    wait = random.randrange(20, 165)
                    self.do_something_after = self.iteration + wait

                elif choice == 1:
                    # 攻擊離星靈樞紐最近的單位
                    if len(self.known_enemy_units) > 0:
                        target = self.known_enemy_units.closest_to(random.choice(self.units(UnitTypeId.NEXUS)))

                elif choice == 2:
                    # 攻擊敵方建築
                    if len(self.known_enemy_structures) > 0:
                        target = random.choice(self.known_enemy_structures)

                elif choice == 3:
                    # 攻擊敵方出生位置
                    target = self.enemy_start_locations[0]

                if target:
                    for vr in self.units(UnitTypeId.VOIDRAY).idle:
                        await self.do(vr.attack(target))
                y = np.zeros(4)
                y[choice] = 1
                print(y)
                self.train_data.append([y, self.flipped])

輸出如下結果

···
[1. 0. 0. 0.]
[0. 0. 1. 0.]
[0. 0. 0. 1.]
[0. 0. 1. 0.]
[1. 0. 0. 0.]
···

為了使用self.flipped = cv2.flip(game_data, 0),修改

        flipped = cv2.flip(game_data, 0)
        resized = cv2.resize(flipped, dsize=None, fx=2, fy=2)

        self.flipped = cv2.flip(game_data, 0)
        resized = cv2.resize(self.flipped, dsize=None, fx=2, fy=2)

init 方法添加do_something_after和train_data

    def __init__(self):
        self.ITERATIONS_PER_MINUTE = 165
        self.MAX_WORKERS = 50
        self.do_something_after = 0
        self.train_data = []

採集攻擊數據的時候不需要畫圖,我們在類前加HEADLESS = False,intel方法代碼修改如下

        self.flipped = cv2.flip(game_data, 0)

        if not HEADLESS:
            resized = cv2.resize(self.flipped, dsize=None, fx=2, fy=2)
            cv2.imshow('Intel', resized)
            cv2.waitKey(1)

加入on_end方法,只存儲勝利的數據,在和代碼同級目錄新建train_data文件夾

    def on_end(self, game_result):
        print('--- on_end called ---')
        print(game_result)

        if game_result == Result.Victory:
            np.save("train_data/{}.npy".format(str(int(time.time()))), np.array(self.train_data))

完整代碼如下

import os
import time

import sc2
from sc2 import run_game, maps, Race, Difficulty, position, Result
from sc2.player import Bot, Computer
from sc2.constants import *
import random
import numpy as np
import cv2

HEADLESS = True
# os.environ["SC2PATH"] = 'F:\StarCraft II'

class SentdeBot(sc2.BotAI):
    def __init__(self):
        # 經過計算,每分鐘大約165迭代次數
        self.ITERATIONS_PER_MINUTE = 165
        # 最大农民數量
        self.MAX_WORKERS = 50
        self.do_something_after = 0
        self.train_data = []

    def on_end(self, game_result):
        print('--- on_end called ---')
        print(game_result)

        if game_result == Result.Victory:
            np.save("train_data/{}.npy".format(str(int(time.time()))), np.array(self.train_data))

    async def on_step(self, iteration: int):
        self.iteration = iteration
        await self.scout()
        await self.distribute_workers()
        await self.build_workers()
        await self.build_pylons()
        await self.build_assimilators()
        await self.expand()
        await self.offensive_force_buildings()
        await self.build_offensive_force()
        await self.intel()
        await self.attack()

    ## 偵察
    async def scout(self):
        if len(self.units(UnitTypeId.OBSERVER)) > 0:
            scout = self.units(UnitTypeId.OBSERVER)[0]
            if scout.is_idle:
                enemy_location = self.enemy_start_locations[0]
                move_to = self.random_location_variance(enemy_location)
                print(move_to)
                await self.do(scout.move(move_to))

        else:
            for rf in self.units(UnitTypeId.ROBOTICSFACILITY).ready.noqueue:
                if self.can_afford(UnitTypeId.OBSERVER) and self.supply_left > 0:
                    await self.do(rf.train(UnitTypeId.OBSERVER))

    async def intel(self):
        game_data = np.zeros((self.game_info.map_size[1], self.game_info.map_size[0], 3), np.uint8)

        # UnitTypeId作為key,半徑和顏色是value
        draw_dict = {
            UnitTypeId.NEXUS: [15, (0, 255, 0)],
            UnitTypeId.PYLON: [3, (20, 235, 0)],
            UnitTypeId.PROBE: [1, (55, 200, 0)],
            UnitTypeId.ASSIMILATOR: [2, (55, 200, 0)],
            UnitTypeId.GATEWAY: [3, (200, 100, 0)],
            UnitTypeId.CYBERNETICSCORE: [3, (150, 150, 0)],
            UnitTypeId.STARGATE: [5, (255, 0, 0)],
            UnitTypeId.ROBOTICSFACILITY: [5, (215, 155, 0)],

            UnitTypeId.VOIDRAY: [3, (255, 100, 0)],
            # OBSERVER: [3, (255, 255, 255)],
        }

        for unit_type in draw_dict:
            for unit in self.units(unit_type).ready:
                pos = unit.position
                cv2.circle(game_data, (int(pos[0]), int(pos[1])), draw_dict[unit_type][0], draw_dict[unit_type][1], -1)

        # 主基地名稱
        main_base_names = ["nexus", "supplydepot", "hatchery"]
        # 記錄敵方基地位置
        for enemy_building in self.known_enemy_structures:
            pos = enemy_building.position
            # 不是主基地建築,畫小一些
            if enemy_building.name.lower() not in main_base_names:
                cv2.circle(game_data, (int(pos[0]), int(pos[1])), 5, (200, 50, 212), -1)
        for enemy_building in self.known_enemy_structures:
            pos = enemy_building.position
            if enemy_building.name.lower() in main_base_names:
                cv2.circle(game_data, (int(pos[0]), int(pos[1])), 15, (0, 0, 255), -1)

        for enemy_unit in self.known_enemy_units:

            if not enemy_unit.is_structure:
                worker_names = ["probe", "scv", "drone"]
                # if that unit is a PROBE, SCV, or DRONE... it's a worker
                pos = enemy_unit.position
                if enemy_unit.name.lower() in worker_names:
                    cv2.circle(game_data, (int(pos[0]), int(pos[1])), 1, (55, 0, 155), -1)
                else:
                    cv2.circle(game_data, (int(pos[0]), int(pos[1])), 3, (50, 0, 215), -1)

        for obs in self.units(UnitTypeId.OBSERVER).ready:
            pos = obs.position
            cv2.circle(game_data, (int(pos[0]), int(pos[1])), 1, (255, 255, 255), -1)


        # 追蹤資源、人口和軍隊人口比
        line_max = 50
        mineral_ratio = self.minerals / 1500
        if mineral_ratio > 1.0:
            mineral_ratio = 1.0

        vespene_ratio = self.vespene / 1500
        if vespene_ratio > 1.0:
            vespene_ratio = 1.0

        population_ratio = self.supply_left / self.supply_cap
        if population_ratio > 1.0:
            population_ratio = 1.0

        plausible_supply = self.supply_cap / 200.0

        military_weight = len(self.units(UnitTypeId.VOIDRAY)) / (self.supply_cap - self.supply_left)
        if military_weight > 1.0:
            military_weight = 1.0

        # 农民/人口      worker/supply ratio
        cv2.line(game_data, (0, 19), (int(line_max * military_weight), 19), (250, 250, 200), 3)
        # 人口/200    plausible supply (supply/200.0)
        cv2.line(game_data, (0, 15), (int(line_max * plausible_supply), 15), (220, 200, 200), 3)
        # (人口-現有人口)/人口  population ratio (supply_left/supply)
        cv2.line(game_data, (0, 11), (int(line_max * population_ratio), 11), (150, 150, 150), 3)
        # 氣體/1500   gas/1500
        cv2.line(game_data, (0, 7), (int(line_max * vespene_ratio), 7), (210, 200, 0), 3)
        # 晶體礦/1500  minerals minerals/1500
        cv2.line(game_data, (0, 3), (int(line_max * mineral_ratio), 3), (0, 255, 25), 3)


        # flip horizontally to make our final fix in visual representation:
        self.flipped = cv2.flip(game_data, 0)

        if HEADLESS:
            resized = cv2.resize(self.flipped, dsize=None, fx=2, fy=2)

            cv2.imshow('Intel', resized)
            cv2.waitKey(1)

    def random_location_variance(self, enemy_start_location):
        x = enemy_start_location[0]
        y = enemy_start_location[1]

        x += ((random.randrange(-20, 20)) / 100) * enemy_start_location[0]
        y += ((random.randrange(-20, 20)) / 100) * enemy_start_location[1]

        if x < 0:
            x = 0
        if y < 0:
            y = 0
        if x > self.game_info.map_size[0]:
            x = self.game_info.map_size[0]
        if y > self.game_info.map_size[1]:
            y = self.game_info.map_size[1]

        go_to = position.Point2(position.Pointlike((x, y)))
        return go_to

    # 建造农民
    async def build_workers(self):
        # 星靈樞鈕*16(一個基地配備16個农民)大於農民數量並且現有农民數量小於MAX_WORKERS
        if len(self.units(UnitTypeId.NEXUS)) * 16 > len(self.units(UnitTypeId.PROBE)) and len(
                self.units(UnitTypeId.PROBE)) < self.MAX_WORKERS:
            # 星靈樞紐(NEXUS)無隊列建造,可以提高晶體礦的利用率,不至於佔用資源
            for nexus in self.units(UnitTypeId.NEXUS).ready.noqueue:
                # 是否有50晶體礦建造农民
                if self.can_afford(UnitTypeId.PROBE):
                    await self.do(nexus.train(UnitTypeId.PROBE))

    ## 建造水晶
    async def build_pylons(self):
        ## 供應人口和現有人口之差小於5且建築不是正在建造
        if self.supply_left < 5 and not self.already_pending(UnitTypeId.PYLON):
            nexuses = self.units(UnitTypeId.NEXUS).ready
            if nexuses.exists:
                if self.can_afford(UnitTypeId.PYLON):
                    await self.build(UnitTypeId.PYLON, near=nexuses.first)

    ## 建造吸收廠
    async def build_assimilators(self):
        for nexus in self.units(UnitTypeId.NEXUS).ready:
            # 在瓦斯泉上建造吸收廠
            vaspenes = self.state.vespene_geyser.closer_than(15.0, nexus)
            for vaspene in vaspenes:
                if not self.can_afford(UnitTypeId.ASSIMILATOR):
                    break
                worker = self.select_build_worker(vaspene.position)
                if worker is None:
                    break
                if not self.units(UnitTypeId.ASSIMILATOR).closer_than(1.0, vaspene).exists:
                    await self.do(worker.build(UnitTypeId.ASSIMILATOR, vaspene))

    ## 開礦
    async def expand(self):
        # (self.iteration / self.ITERATIONS_PER_MINUTE)是一個緩慢遞增的值,動態開礦
        if self.units(UnitTypeId.NEXUS).amount < self.iteration / self.ITERATIONS_PER_MINUTE and self.can_afford(
                UnitTypeId.NEXUS):
            await self.expand_now()

    ## 建造進攻性建築
    async def offensive_force_buildings(self):
        # print(self.iteration / self.ITERATIONS_PER_MINUTE)
        if self.units(UnitTypeId.PYLON).ready.exists:
            pylon = self.units(UnitTypeId.PYLON).ready.random
            # 根據神族建築科技圖,折躍門建造過後才可以建造控制核心
            if self.units(UnitTypeId.GATEWAY).ready.exists and not self.units(UnitTypeId.CYBERNETICSCORE):
                if self.can_afford(UnitTypeId.CYBERNETICSCORE) and not self.already_pending(UnitTypeId.CYBERNETICSCORE):
                    await self.build(UnitTypeId.CYBERNETICSCORE, near=pylon)
            # 否則建造折躍門
            # (self.iteration / self.ITERATIONS_PER_MINUTE)/2 是一個緩慢遞增的值
            # elif len(self.units(UnitTypeId.GATEWAY)) < ((self.iteration / self.ITERATIONS_PER_MINUTE) / 2):
            elif len(self.units(UnitTypeId.GATEWAY)) < 1:
                if self.can_afford(UnitTypeId.GATEWAY) and not self.already_pending(UnitTypeId.GATEWAY):
                    await self.build(UnitTypeId.GATEWAY, near=pylon)
            # 控制核心存在的情況下建造机械台
            if self.units(UnitTypeId.CYBERNETICSCORE).ready.exists:
                if len(self.units(UnitTypeId.ROBOTICSFACILITY)) < 1:
                    if self.can_afford(UnitTypeId.ROBOTICSFACILITY) and not self.already_pending(
                            UnitTypeId.ROBOTICSFACILITY):
                        await self.build(UnitTypeId.ROBOTICSFACILITY, near=pylon)

            # 控制核心存在的情況下建造星門
            if self.units(UnitTypeId.CYBERNETICSCORE).ready.exists:
                if len(self.units(UnitTypeId.STARGATE)) < ((self.iteration / self.ITERATIONS_PER_MINUTE) / 2):
                    if self.can_afford(UnitTypeId.STARGATE) and not self.already_pending(UnitTypeId.STARGATE):
                        await self.build(UnitTypeId.STARGATE, near=pylon)

    ## 造兵
    async def build_offensive_force(self):
        # 無隊列化建造
        # for gw in self.units(UnitTypeId.GATEWAY).ready.noqueue:
        #     if not self.units(UnitTypeId.STALKER).amount > self.units(UnitTypeId.VOIDRAY).amount:
        #
        #         if self.can_afford(UnitTypeId.STALKER) and self.supply_left > 0:
        #             await self.do(gw.train(UnitTypeId.STALKER))

        for sg in self.units(UnitTypeId.STARGATE).ready.noqueue:
            if self.can_afford(UnitTypeId.VOIDRAY) and self.supply_left > 0:
                await self.do(sg.train(UnitTypeId.VOIDRAY))

    ## 尋找目標
    def find_target(self, state):
        if len(self.known_enemy_units) > 0:
            # 隨機選取敵方單位
            return random.choice(self.known_enemy_units)
        elif len(self.known_enemy_units) > 0:
            # 隨機選取敵方建築
            return random.choice(self.known_enemy_structures)
        else:
            # 返回敵方出生點位
            return self.enemy_start_locations[0]

    ## 進攻
    async def attack(self):
        if len(self.units(UnitTypeId.VOIDRAY).idle) > 0:
            choice = random.randrange(0, 4)
            target = False
            if self.iteration > self.do_something_after:
                if choice == 0:
                    # 什麼都不做
                    wait = random.randrange(20, 165)
                    self.do_something_after = self.iteration + wait

                elif choice == 1:
                    # 攻擊離星靈樞紐最近的單位
                    if len(self.known_enemy_units) > 0:
                        target = self.known_enemy_units.closest_to(random.choice(self.units(UnitTypeId.NEXUS)))

                elif choice == 2:
                    # 攻擊敵方建築
                    if len(self.known_enemy_structures) > 0:
                        target = random.choice(self.known_enemy_structures)

                elif choice == 3:
                    # 攻擊敵方出生位置
                    target = self.enemy_start_locations[0]

                if target:
                    for vr in self.units(UnitTypeId.VOIDRAY).idle:
                        await self.do(vr.attack(target))
                y = np.zeros(4)
                y[choice] = 1
                print(y)
                self.train_data.append([y, self.flipped])


## 啟動遊戲
run_game(maps.get("AcidPlantLE"), [
    Bot(Race.Protoss, SentdeBot()), Computer(Race.Terran, Difficulty.Medium)
], realtime=False)

可以看到train_data文件夾下存儲了勝利數據

本站聲明:網站內容來源於博客園,如有侵權,請聯繫我們,我們將及時處理【其他文章推薦】

台北網頁設計公司這麼多,該如何挑選?? 網頁設計報價省錢懶人包"嚨底家"

網頁設計公司推薦更多不同的設計風格,搶佔消費者視覺第一線

※想知道購買電動車哪裡補助最多?台中電動車補助資訊懶人包彙整
深入理解Kafka必知必會(2)

Kafka目前有哪些內部topic,它們都有什麼特徵?各自的作用又是什麼?

__consumer_offsets:作用是保存 Kafka 消費者的位移信息
__transaction_state:用來存儲事務日誌消息

優先副本是什麼?它有什麼特殊的作用?

所謂的優先副本是指在AR集合列表中的第一個副本。
理想情況下,優先副本就是該分區的leader 副本,所以也可以稱之為 preferred leader。Kafka 要確保所有主題的優先副本在 Kafka 集群中均勻分佈,這樣就保證了所有分區的 leader 均衡分佈。以此來促進集群的負載均衡,這一行為也可以稱為“分區平衡”。

Kafka有哪幾處地方有分區分配的概念?簡述大致的過程及原理

  1. 生產者的分區分配是指為每條消息指定其所要發往的分區。可以編寫一個具體的類實現org.apache.kafka.clients.producer.Partitioner接口。
  2. 消費者中的分區分配是指為消費者指定其可以消費消息的分區。Kafka 提供了消費者客戶端參數 partition.assignment.strategy 來設置消費者與訂閱主題之間的分區分配策略。
  3. 分區副本的分配是指為集群制定創建主題時的分區副本分配方案,即在哪個 broker 中創建哪些分區的副本。kafka-topics.sh 腳本中提供了一個 replica-assignment 參數來手動指定分區副本的分配方案。

簡述Kafka的日誌目錄結構

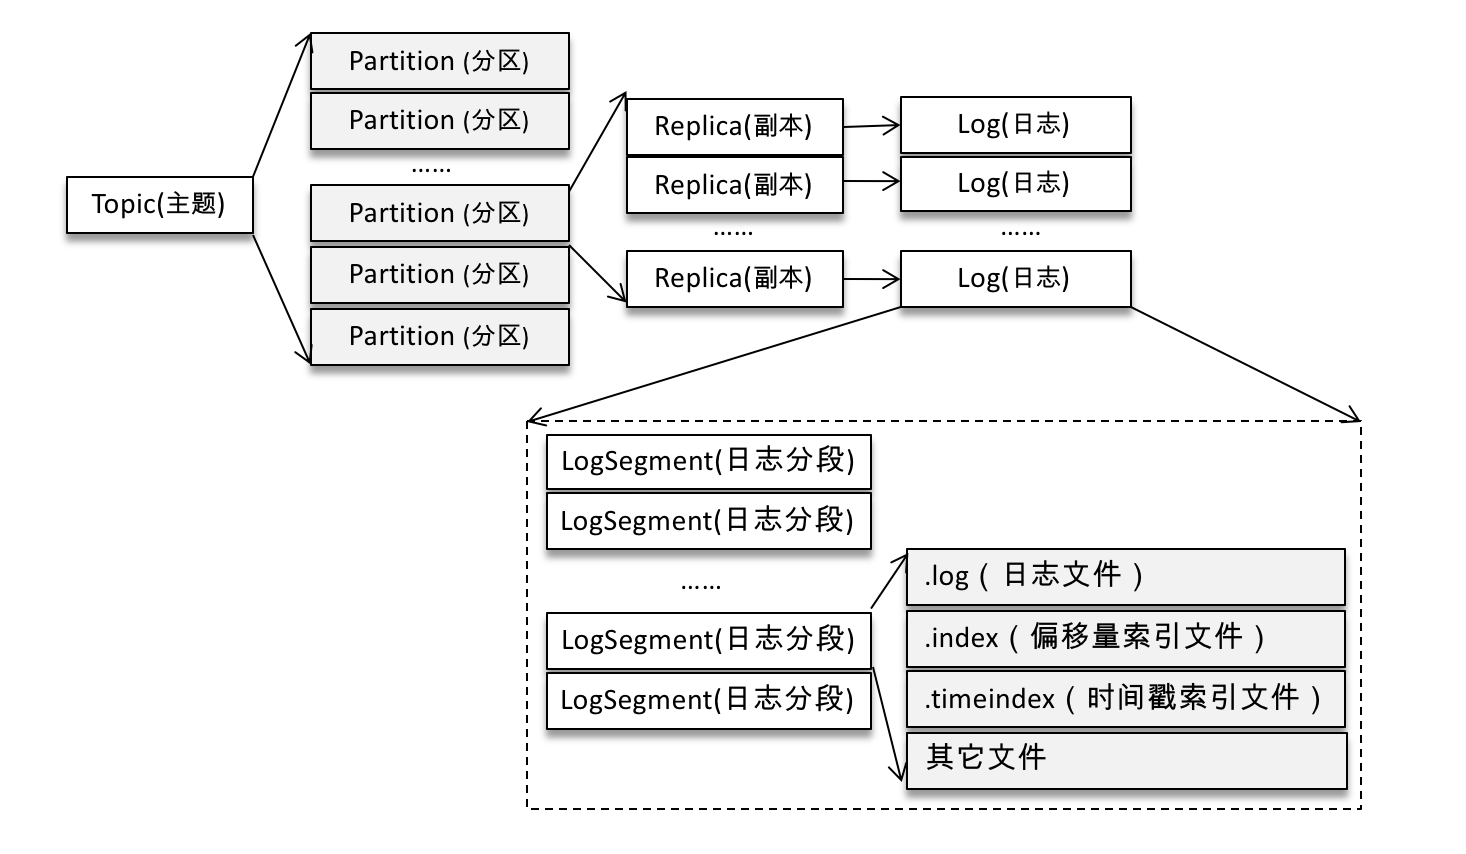
Kafka 中的消息是以主題為基本單位進行歸類的,各個主題在邏輯上相互獨立。每個主題又可以分為一個或多個分區。不考慮多副本的情況,一個分區對應一個日誌(Log)。為了防止 Log 過大,Kafka 又引入了日誌分段(LogSegment)的概念,將 Log 切分為多個 LogSegment,相當於一個巨型文件被平均分配為多個相對較小的文件。

Log 和 LogSegment 也不是純粹物理意義上的概念,Log 在物理上只以文件夾的形式存儲,而每個 LogSegment 對應於磁盤上的一個日誌文件和兩個索引文件,以及可能的其他文件(比如以“.txnindex”為後綴的事務索引文件)

Kafka中有那些索引文件?

每個日誌分段文件對應了兩個索引文件,主要用來提高查找消息的效率。
偏移量索引文件用來建立消息偏移量(offset)到物理地址之間的映射關係,方便快速定位消息所在的物理文件位置
時間戳索引文件則根據指定的時間戳(timestamp)來查找對應的偏移量信息。

如果我指定了一個offset,Kafka怎麼查找到對應的消息?

Kafka是通過seek() 方法來指定消費的,在執行seek() 方法之前要去執行一次poll()方法,等到分配到分區之後會去對應的分區的指定位置開始消費,如果指定的位置發生了越界,那麼會根據auto.offset.reset 參數設置的情況進行消費。

如果我指定了一個timestamp,Kafka怎麼查找到對應的消息?

Kafka提供了一個 offsetsForTimes() 方法,通過 timestamp 來查詢與此對應的分區位置。offsetsForTimes() 方法的參數 timestampsToSearch 是一個 Map 類型,key 為待查詢的分區,而 value 為待查詢的時間戳,該方法會返回時間戳大於等於待查詢時間的第一條消息對應的位置和時間戳,對應於 OffsetAndTimestamp 中的 offset 和 timestamp 字段。

聊一聊你對Kafka的Log Retention的理解

日誌刪除(Log Retention):按照一定的保留策略直接刪除不符合條件的日誌分段。
我們可以通過 broker 端參數 log.cleanup.policy 來設置日誌清理策略,此參數的默認值為“delete”,即採用日誌刪除的清理策略。

  1. 基於時間
    日誌刪除任務會檢查當前日誌文件中是否有保留時間超過設定的閾值(retentionMs)來尋找可刪除的日誌分段文件集合(deletableSegments)retentionMs 可以通過 broker 端參數 log.retention.hours、log.retention.minutes 和 log.retention.ms 來配置,其中 log.retention.ms 的優先級最高,log.retention.minutes 次之,log.retention.hours 最低。默認情況下只配置了 log.retention.hours 參數,其值為168,故默認情況下日誌分段文件的保留時間為7天。
    刪除日誌分段時,首先會從 Log 對象中所維護日誌分段的跳躍表中移除待刪除的日誌分段,以保證沒有線程對這些日誌分段進行讀取操作。然後將日誌分段所對應的所有文件添加上“.deleted”的後綴(當然也包括對應的索引文件)。最後交由一個以“delete-file”命名的延遲任務來刪除這些以“.deleted”為後綴的文件,這個任務的延遲執行時間可以通過 file.delete.delay.ms 參數來調配,此參數的默認值為60000,即1分鐘。

  2. 基於日誌大小
    日誌刪除任務會檢查當前日誌的大小是否超過設定的閾值(retentionSize)來尋找可刪除的日誌分段的文件集合(deletableSegments)。
    retentionSize 可以通過 broker 端參數 log.retention.bytes 來配置,默認值為-1,表示無窮大。注意 log.retention.bytes 配置的是 Log 中所有日誌文件的總大小,而不是單個日誌分段(確切地說應該為 .log 日誌文件)的大小。單個日誌分段的大小由 broker 端參數 log.segment.bytes 來限制,默認值為1073741824,即 1GB。
    這個刪除操作和基於時間的保留策略的刪除操作相同。
  3. 基於日誌起始偏移量
    基於日誌起始偏移量的保留策略的判斷依據是某日誌分段的下一個日誌分段的起始偏移量 baseOffset 是否小於等於 logStartOffset,若是,則可以刪除此日誌分段。

如上圖所示,假設 logStartOffset 等於25,日誌分段1的起始偏移量為0,日誌分段2的起始偏移量為11,日誌分段3的起始偏移量為23,通過如下動作收集可刪除的日誌分段的文件集合 deletableSegments:

從頭開始遍歷每個日誌分段,日誌分段1的下一個日誌分段的起始偏移量為11,小於 logStartOffset 的大小,將日誌分段1加入 deletableSegments。
日誌分段2的下一個日誌偏移量的起始偏移量為23,也小於 logStartOffset 的大小,將日誌分段2加入 deletableSegments。
日誌分段3的下一個日誌偏移量在 logStartOffset 的右側,故從日誌分段3開始的所有日誌分段都不會加入 deletableSegments。
收集完可刪除的日誌分段的文件集合之後的刪除操作同基於日誌大小的保留策略和基於時間的保留策略相同

聊一聊你對Kafka的Log Compaction的理解

日誌壓縮(Log Compaction):針對每個消息的 key 進行整合,對於有相同 key 的不同 value 值,只保留最後一個版本。
如果要採用日誌壓縮的清理策略,就需要將 log.cleanup.policy 設置為“compact”,並且還需要將 log.cleaner.enable (默認值為 true)設定為 true。

如下圖所示,Log Compaction 對於有相同 key 的不同 value 值,只保留最後一個版本。如果應用只關心 key 對應的最新 value 值,則可以開啟 Kafka 的日誌清理功能,Kafka 會定期將相同 key 的消息進行合併,只保留最新的 value 值。

聊一聊你對Kafka底層存儲的理解

頁緩存

頁緩存是操作系統實現的一種主要的磁盤緩存,以此用來減少對磁盤 I/O 的操作。具體來說,就是把磁盤中的數據緩存到內存中,把對磁盤的訪問變為對內存的訪問。

當一個進程準備讀取磁盤上的文件內容時,操作系統會先查看待讀取的數據所在的頁(page)是否在頁緩存(pagecache)中,如果存在(命中)則直接返回數據,從而避免了對物理磁盤的 I/O 操作;如果沒有命中,則操作系統會向磁盤發起讀取請求並將讀取的數據頁存入頁緩存,之後再將數據返回給進程。

同樣,如果一個進程需要將數據寫入磁盤,那麼操作系統也會檢測數據對應的頁是否在頁緩存中,如果不存在,則會先在頁緩存中添加相應的頁,最後將數據寫入對應的頁。被修改過後的頁也就變成了臟頁,操作系統會在合適的時間把臟頁中的數據寫入磁盤,以保持數據的一致性。

用過 Java 的人一般都知道兩點事實:對象的內存開銷非常大,通常會是真實數據大小的幾倍甚至更多,空間使用率低下;Java 的垃圾回收會隨着堆內數據的增多而變得越來越慢。基於這些因素,使用文件系統並依賴於頁緩存的做法明顯要優於維護一個進程內緩存或其他結構,至少我們可以省去了一份進程內部的緩存消耗,同時還可以通過結構緊湊的字節碼來替代使用對象的方式以節省更多的空間。

此外,即使 Kafka 服務重啟,頁緩存還是會保持有效,然而進程內的緩存卻需要重建。這樣也極大地簡化了代碼邏輯,因為維護頁緩存和文件之間的一致性交由操作系統來負責,這樣會比進程內維護更加安全有效。

零拷貝

除了消息順序追加、頁緩存等技術,Kafka 還使用零拷貝(Zero-Copy)技術來進一步提升性能。所謂的零拷貝是指將數據直接從磁盤文件複製到網卡設備中,而不需要經由應用程序之手。零拷貝大大提高了應用程序的性能,減少了內核和用戶模式之間的上下文切換。對 Linux 操作系統而言,零拷貝技術依賴於底層的 sendfile() 方法實現。對應於 Java 語言,FileChannal.transferTo() 方法的底層實現就是 sendfile() 方法。

聊一聊Kafka的延時操作的原理

Kafka 中有多種延時操作,比如延時生產,還有延時拉取(DelayedFetch)、延時數據刪除(DelayedDeleteRecords)等。
延時操作創建之後會被加入延時操作管理器(DelayedOperationPurgatory)來做專門的處理。延時操作有可能會超時,每個延時操作管理器都會配備一個定時器(SystemTimer)來做超時管理,定時器的底層就是採用時間輪(TimingWheel)實現的。

聊一聊Kafka控制器的作用

在 Kafka 集群中會有一個或多個 broker,其中有一個 broker 會被選舉為控制器(Kafka Controller),它負責管理整個集群中所有分區和副本的狀態。當某個分區的 leader 副本出現故障時,由控制器負責為該分區選舉新的 leader 副本。當檢測到某個分區的 ISR 集合發生變化時,由控制器負責通知所有broker更新其元數據信息。當使用 kafka-topics.sh 腳本為某個 topic 增加分區數量時,同樣還是由控制器負責分區的重新分配。

Kafka的舊版Scala的消費者客戶端的設計有什麼缺陷?

如上圖,舊版消費者客戶端每個消費組( )在 ZooKeeper 中都維護了一個 /consumers/ /ids 路徑,在此路徑下使用臨時節點記錄隸屬於此消費組的消費者的唯一標識(consumerIdString),/consumers/ /owner 路徑下記錄了分區和消費者的對應關係,/consumers/ /offsets 路徑下記錄了此消費組在分區中對應的消費位移。

每個消費者在啟動時都會在 /consumers/ /ids 和 /brokers/ids 路徑上註冊一個監聽器。當 /consumers/ /ids 路徑下的子節點發生變化時,表示消費組中的消費者發生了變化;當 /brokers/ids 路徑下的子節點發生變化時,表示 broker 出現了增減。這樣通過 ZooKeeper 所提供的 Watcher,每個消費者就可以監聽消費組和 Kafka 集群的狀態了。

這種方式下每個消費者對 ZooKeeper 的相關路徑分別進行監聽,當觸發再均衡操作時,一個消費組下的所有消費者會同時進行再均衡操作,而消費者之間並不知道彼此操作的結果,這樣可能導致 Kafka 工作在一個不正確的狀態。與此同時,這種嚴重依賴於 ZooKeeper 集群的做法還有兩個比較嚴重的問題。

  1. 羊群效應(Herd Effect):所謂的羊群效應是指ZooKeeper 中一個被監聽的節點變化,大量的 Watcher 通知被發送到客戶端,導致在通知期間的其他操作延遲,也有可能發生類似死鎖的情況。
  2. 腦裂問題(Split Brain):消費者進行再均衡操作時每個消費者都與 ZooKeeper 進行通信以判斷消費者或broker變化的情況,由於 ZooKeeper 本身的特性,可能導致在同一時刻各個消費者獲取的狀態不一致,這樣會導致異常問題發生。

消費再均衡的原理是什麼?(提示:消費者協調器和消費組協調器)

就目前而言,一共有如下幾種情形會觸發再均衡的操作:

  • 有新的消費者加入消費組。
  • 有消費者宕機下線。消費者並不一定需要真正下線,例如遇到長時間的GC、網絡延遲導致消費者長時間未向 GroupCoordinator 發送心跳等情況時,GroupCoordinator 會認為消費者已經下線。
  • 有消費者主動退出消費組(發送 LeaveGroupRequest 請求)。比如客戶端調用了 unsubscrible() 方法取消對某些主題的訂閱。
  • 消費組所對應的 GroupCoorinator 節點發生了變更。
  • 消費組內所訂閱的任一主題或者主題的分區數量發生變化。

GroupCoordinator 是 Kafka 服務端中用於管理消費組的組件。而消費者客戶端中的 ConsumerCoordinator 組件負責與 GroupCoordinator 進行交互。

第一階段(FIND_COORDINATOR)

消費者需要確定它所屬的消費組對應的 GroupCoordinator 所在的 broker,並創建與該 broker 相互通信的網絡連接。如果消費者已經保存了與消費組對應的 GroupCoordinator 節點的信息,並且與它之間的網絡連接是正常的,那麼就可以進入第二階段。否則,就需要向集群中的某個節點發送 FindCoordinatorRequest 請求來查找對應的 GroupCoordinator,這裏的“某個節點”並非是集群中的任意節點,而是負載最小的節點。

第二階段(JOIN_GROUP)

在成功找到消費組所對應的 GroupCoordinator 之後就進入加入消費組的階段,在此階段的消費者會向 GroupCoordinator 發送 JoinGroupRequest 請求,並處理響應。

選舉消費組的leader
如果消費組內還沒有 leader,那麼第一個加入消費組的消費者即為消費組的 leader。如果某一時刻 leader 消費者由於某些原因退出了消費組,那麼會重新選舉一個新的 leader

選舉分區分配策略

  1. 收集各個消費者支持的所有分配策略,組成候選集 candidates。
  2. 每個消費者從候選集 candidates 中找出第一個自身支持的策略,為這個策略投上一票。
  3. 計算候選集中各個策略的選票數,選票數最多的策略即為當前消費組的分配策略。

第三階段(SYNC_GROUP)

leader 消費者根據在第二階段中選舉出來的分區分配策略來實施具體的分區分配,在此之後需要將分配的方案同步給各個消費者,通過 GroupCoordinator 這個“中間人”來負責轉發同步分配方案的。

第四階段(HEARTBEAT)

進入這個階段之後,消費組中的所有消費者就會處於正常工作狀態。在正式消費之前,消費者還需要確定拉取消息的起始位置。假設之前已經將最後的消費位移提交到了 GroupCoordinator,並且 GroupCoordinator 將其保存到了 Kafka 內部的 __consumer_offsets 主題中,此時消費者可以通過 OffsetFetchRequest 請求獲取上次提交的消費位移並從此處繼續消費。

消費者通過向 GroupCoordinator 發送心跳來維持它們與消費組的從屬關係,以及它們對分區的所有權關係。只要消費者以正常的時間間隔發送心跳,就被認為是活躍的,說明它還在讀取分區中的消息。心跳線程是一個獨立的線程,可以在輪詢消息的空檔發送心跳。如果消費者停止發送心跳的時間足夠長,則整個會話就被判定為過期,GroupCoordinator 也會認為這個消費者已經死亡,就會觸發一次再均衡行為。

Kafka中的冪等是怎麼實現的?

為了實現生產者的冪等性,Kafka 為此引入了 producer id(以下簡稱 PID)和序列號(sequence number)這兩個概念。

每個新的生產者實例在初始化的時候都會被分配一個 PID,這個 PID 對用戶而言是完全透明的。對於每個 PID,消息發送到的每一個分區都有對應的序列號,這些序列號從0開始單調遞增。生產者每發送一條消息就會將 <PID,分區> 對應的序列號的值加1。

broker 端會在內存中為每一對 <PID,分區> 維護一個序列號。對於收到的每一條消息,只有當它的序列號的值(SN_new)比 broker 端中維護的對應的序列號的值(SN_old)大1(即 SN_new = SN_old + 1)時,broker 才會接收它。如果 SN_new< SN_old + 1,那麼說明消息被重複寫入,broker 可以直接將其丟棄。如果 SN_new> SN_old + 1,那麼說明中間有數據尚未寫入,出現了亂序,暗示可能有消息丟失,對應的生產者會拋出 OutOfOrderSequenceException,這個異常是一個嚴重的異常,後續的諸如 send()、beginTransaction()、commitTransaction() 等方法的調用都會拋出 IllegalStateException 的異常。

本站聲明:網站內容來源於博客園,如有侵權,請聯繫我們,我們將及時處理【其他文章推薦】

※想知道網站建置網站改版該如何進行嗎?將由專業工程師為您規劃客製化網頁設計後台網頁設計

※不管是台北網頁設計公司台中網頁設計公司,全省皆有專員為您服務

※Google地圖已可更新顯示潭子電動車充電站設置地點!!

※帶您來看台北網站建置台北網頁設計,各種案例分享

linux與Windows進程控制

進程管理控制

這裏實現的是一個自定義timer用於統計子進程運行的時間。使用方式主要是

timer [-t seconds] command arguments

例如要統計ls的運行時間可以直接輸入timer ls,其後的arguments是指所要運行的程序的參數。如:timer ls -al。如果要指定程序運行多少時間,如5秒鐘,可以輸入timer -t 5 ls -al。需要注意的是,該程序對輸入沒有做異常檢測,所以要確保程序輸入正確。

Linux

程序思路

  1. 獲取時間

    時間獲取函數使用gettimeofday,精度可以達到微秒

    struct timeval{
         long tv_sec;*//秒*
         long tv_usec;*//微秒*
    }
  2. 子進程創建

    1. fork()函數

      #include <sys/types.h>
      #include <unistd.h>
      pid_t fork(void);

      fork調用失敗則返回-1,調用成功則:

      fork函數會有兩種返回值,一是為0,一是為正整數。若為0,則說明當前進程為子進程;若為正整數,則該進程為父進程且該值為子進程pid。關於進程控制的詳細說明請參考:

    2. exec函數

      用fork創建子進程后執行的是和父進程相同的程序(但有可能執行不同的代碼分支),子進程往往要調用一種exec函數以執行另一個程序。當進程調用一種exec函數時,該進程的用戶空間代碼和數據完全被新程序替換,從新程序的啟動例程開始執行。調用exec並不創建新進程,所以調用exec前後該進程的id並未改變。
      其實有六種以exec開頭的函數,統稱exec函數:

      #include <unistd.h>
      int execl(const char *path, const char *arg, ...);
      int execlp(const char *file, const char *arg, ...);
      int execle(const char *path, const char *arg, ..., char *const envp[]);
      int execv(const char *path, char *const argv[]);
      int execvp(const char *file, char *const argv[]);
      int execve(const char *path, char *const argv[], char *const envp[]);

      這些函數如果調用成功則加載新的程序從啟動代碼開始執行,不再返回,如果調用出錯則返回-1,所以exec函數只有出錯的返回值而沒有成功的返回值。

    3. waitwaitpid

      一個進程在終止時會關閉所有文件描述符,釋放在用戶空間分配的內存,但它的PCB還保留着,內核在其中保存了一些信息:如果是正常終止則保存着退出狀態,如果是異常終止則保存着導致該進程終止的信號是哪個。這個進程的父進程可以調用wait或waitpid獲取這些信息,然後徹底清除掉這個進程。我們知道一個進程的退出狀態可以在Shell中用特殊變量$?查看,因為Shell是它的父進程,當它終止時Shell調用wait或waitpid得到它的退出狀態同時徹底清除掉這個進程。
      如果一個進程已經終止,但是它的父進程尚未調用wait或waitpid對它進行清理,這時的進程狀態稱為殭屍(Zombie)進程。任何進程在剛終止時都是殭屍進程,正常情況下,殭屍進程都立刻被父進程清理了。
      殭屍進程是不能用kill命令清除掉的,因為kill命令只是用來終止進程的,而殭屍進程已經終止了。

    #include <sys/types.h>
    #include <sys/wait.h>
    pid_t wait(int *status);
    pid_t waitpid(pid_t pid, int *status, int options);

    若調用成功則返回清理掉的子進程id,若調用出錯則返回-1。父進程調用wait或waitpid時可能會:

    • 阻塞(如果它的所有子進程都還在運行

    • 帶子進程的終止信息立即返回(如果一個子進程已終止,正等待父進程讀取其終止信息)
    • 出錯立即返回(如果它沒有任何子進程)

    這兩個函數的區別是:

    • 如果父進程的所有子進程都還在運行,調用wait將使父進程阻塞,而調用waitpid時如果在options參數中指定WNOHANG可以使父進程不阻塞而立即返回0
    • wait等待第一個終止的子進程,而waitpid可以通過pid參數指定等待哪一個子進程

源代碼

timer源代碼

#include <math.h>
#include <stdio.h>
#include <stdlib.h>
#include <sys/time.h>
#include <unistd.h>
#include <wait.h>
#include <ctime>
#include <iostream>
#include <cstring>
//程序假定輸入完全正確,沒有做異常處理
//mytime [-t number] 程序
using namespace std;
//調用系統時間
struct timeval time_start;
struct timeval time_end;

void printTime();

void newProcess(const char *child_process, char *argv[], double duration);

int main(int argc, char const *argv[])
{
    double duration = 0;
    char **arg;
    int step = 2;
    if (argc > 3 && (strcmp((char *)"-t", argv[1]) == 0)) //如果指定了運行時間
    {
        step = 4;
        duration = atof(argv[2]); //沒有做異常處理
    }

    arg = new char *[argc - step + 1];
    for (int i = 0; i < argc - step; i++)
    {
        arg[i] = new char[100];
        strcpy(arg[i], argv[i + step]);
    }
    arg[argc - step] = NULL;

    newProcess(argv[step - 1], arg, duration);
    return 0;
}

void printTime()
{
    //用以記錄進程運行的時間
    int time_use = 0;  // us
    int time_left = 0; // us
    int time_hour = 0, time_min = 0, time_sec = 0, time_ms = 0, time_us = 0;
    gettimeofday(&time_end, NULL);

    time_use = (time_end.tv_sec - time_start.tv_sec) * 1000000 + (time_end.tv_usec - time_start.tv_usec);
    time_hour = time_use / (60 * 60 * (int)pow(10, 6));
    time_left = time_use % (60 * 60 * (int)pow(10, 6));
    time_min = time_left / (60 * (int)pow(10, 6));
    time_left %= (60 * (int)pow(10, 6));
    time_sec = time_left / ((int)pow(10, 6));
    time_left %= ((int)pow(10, 6));
    time_ms = time_left / 1000;
    time_left %= 1000;
    time_us = time_left;
    printf("此程序運行的時間為:%d 小時, %d 分鐘, %d 秒, %d 毫秒, %d 微秒\n", time_hour, time_min, time_sec, time_ms, time_us);
}

void newProcess(const char* child_process, char **argv, double duration)
{
    pid_t pid = fork();
    if (pid < 0) //出錯
    {
        printf("創建子進程失敗!");
        exit(1);
    }
    if (pid == 0) //子進程
    {
        execvp(child_process, argv);
    }
    else
    {
        if (abs(duration - 0) < 1e-6)
        {
            gettimeofday(&time_start, NULL);
            wait(NULL); //等待子進程結束
            printTime();
        }
        else
        {
            gettimeofday(&time_start, NULL);
            // printf("sleep: %lf\n", duration);
            waitpid(pid, NULL, WNOHANG);
            usleep(duration * 1000000); // sec to usec
            int kill_ret_val = kill(pid, SIGKILL);
            if (kill_ret_val == -1) // return -1, fail
            {
                printf("kill failed.\n");
                perror("kill");
            }
            else if (kill_ret_val == 0) // return 0, success
            {
                printf("process %d has been killed\n", pid);
            }
            printTime();
        }
    }
}

測試源代碼

#include <iostream>
#include <ctime>
#include <unistd.h>
using namespace std;
int main(int argc, char const *argv[])
{
    for(int n = 0; n < argc; n++)
    {
        printf("arg[%d]:%s\n",n, argv[n]);
    }
    sleep(5);
    return 0;
}

測試

  1. 自行編寫程序測試

  2. 系統程序測試

  3. 將timer加入環境變量

    這裏僅進行了臨時變量修改。

Windows

在Windows下進行父子進程的創建和管理在api調用上相較Linux有一定難度,但實際上在使用管理上比Linux容易的多。

CreateProcess

#include <Windows.h>
BOOL CreateProcessA(
  LPCSTR                lpApplicationName,
  LPSTR                 lpCommandLine,
  LPSECURITY_ATTRIBUTES lpProcessAttributes,
  LPSECURITY_ATTRIBUTES lpThreadAttributes,
  BOOL                  bInheritHandles,
  DWORD                 dwCreationFlags,
  LPVOID                lpEnvironment,
  LPCSTR                lpCurrentDirectory,
  LPSTARTUPINFOA        lpStartupInfo,
  LPPROCESS_INFORMATION lpProcessInformation
);

源代碼實現

timer程序

// 進程管理.cpp : 此文件包含 "main" 函數。程序執行將在此處開始並結束。
//

#include <iostream>
#include <wchar.h>
#include <Windows.h>
#include <tchar.h>
using namespace std;


void printTime(SYSTEMTIME* start, SYSTEMTIME* end);
void newProcess(TCHAR* cWinDir, double duration);

int _tmain(int argc, TCHAR *argv[])
{
    TCHAR* cWinDir = new TCHAR[MAX_PATH];
    memset(cWinDir, sizeof(TCHAR) * MAX_PATH, 0);

    printf("argc:   %d\n", argc);

    int step = 1;
    double duration = 0;
    if (argc > 1)
    {
        if (argv[1][0] == TCHAR('-') && argv[1][1] == TCHAR('t') && argv[1][2] == TCHAR('\0'))
        {
            step = 3;
            duration = atof((char*)argv[2]);
        }
    }
    //printf("printf content start: %ls\n", argv[1]);
    int j = 0;
    for (int i = 0, h = 0; i < argc - step; i++)
    {
        wcscpy_s(cWinDir + j, MAX_PATH - j, argv[i + step]);
        for (h = 0; argv[i + step][h] != TCHAR('\0'); h++);
        j += h;
        cWinDir[j++] = ' ';
        //printf("%d : %d\n", i, j);
        //printf("printf content start: %ls\n", cWinDir);
    }
    cWinDir[j - 2] = TCHAR('\0');
    //printf("printf content start: %ls\n", cWinDir);

    newProcess(cWinDir,duration);

    return 0;
}


void printTime(SYSTEMTIME* start, SYSTEMTIME* end)
{
    int hours = end->wHour - start->wHour;
    int minutes = end->wMinute - start->wMinute;
    int seconds = end->wSecond - start->wSecond;
    int ms = end->wMilliseconds - start->wMilliseconds;
    if (ms < 0)
    {
        ms += 1000;
        seconds -= 1;
    }
    if (seconds < 0)
    {
        seconds += 60;
        minutes -= 1;
    }
    if (minutes < 0)
    {
        minutes += 60;
        hours -= 1;
    }
    //由於僅考慮在一天之內,不考慮小時會變成負數的情況
    printf("runtime: %02dhours %02dminutes %02dseconds %02dmilliseconds\n", hours, minutes, seconds, ms);
}

void newProcess(TCHAR* cWinDir, double duration)
{
    PROCESS_INFORMATION pi;
    STARTUPINFO si;
    ZeroMemory(&si, sizeof(si));
    si.cb = sizeof(si);
    ZeroMemory(&pi, sizeof(pi));
    

    SYSTEMTIME start_time, end_time;
    memset(&start_time, sizeof(SYSTEMTIME), 0);
    memset(&end_time, sizeof(SYSTEMTIME), 0);
    GetSystemTime(&start_time);

        //建議大家不要單獨傳入lpApplicationName,而是將程序名放入cWinDir中
        //這樣會自動搜索PATH
    if (CreateProcess(
        NULL,       //lpApplicationName.若為空,則lpCommandLine必須指定可執行程序
                    //若路徑中存在空格,必須使用引號框定
        cWinDir,    //lpCommandLine
                    //若lpApplicationName為空,lpCommandLine長度不超過MAX_PATH
        NULL,       //指向一個SECURITY_ATTRIBUTES結構體,這個結構體決定是否返回的句柄可以被子進程繼承,進程安全性
        NULL,       //  如果lpProcessAttributes參數為空(NULL),那麼句柄不能被繼承。<同上>,線程安全性
        false,      //  指示新進程是否從調用進程處繼承了句柄。句柄可繼承性
        0,          //  指定附加的、用來控制優先類和進程的創建的標識符(優先級)
                    //  CREATE_NEW_CONSOLE  新控制台打開子進程
                    //  CREATE_SUSPENDED    子進程創建后掛起,直到調用ResumeThread函數
        NULL,       //  指向一個新進程的環境塊。如果此參數為空,新進程使用調用進程的環境。指向環境字符串
        NULL,       //  指定子進程的工作路徑
        &si,        //  決定新進程的主窗體如何显示的STARTUPINFO結構體
        &pi         //  接收新進程的識別信息的PROCESS_INFORMATION結構體。進程線程以及句柄
    ))
    {
    }
    else
    {
        printf("CreateProcess failed (%d).\n", GetLastError());
        return;
    }


    //wait untill the child process exits
    if (abs(duration - 0) < 1e-6)
        WaitForSingleObject(pi.hProcess, INFINITE);//這裏指定運行時間,單位毫秒
    else
        WaitForSingleObject(pi.hProcess, duration * 1000);

    GetSystemTime(&end_time);

    printTime(&start_time, &end_time);

    CloseHandle(pi.hProcess);
    CloseHandle(pi.hThread);
}

測試程序

#include <iostream>
#include <Windows.h>
using namespace std;
int main(int argc, char* argv[])
{
    for (int n = 0; n < argc; n++)
    {
        printf("arg[%d]:%s\n", n, argv[n]);
    }
    Sleep(5*1000);
    return 0;
}

測試

  1. 自行編寫程序測試

  2. 系統程序測試

  3. 添加至環境變量

參考資料

Windows

Linux

本站聲明:網站內容來源於博客園,如有侵權,請聯繫我們,我們將及時處理【其他文章推薦】

網頁設計公司推薦更多不同的設計風格,搶佔消費者視覺第一線

※廣告預算用在刀口上,網站設計公司幫您達到更多曝光效益

※自行創業 缺乏曝光? 下一步"網站設計"幫您第一時間規劃公司的門面形象

java中hashmap容量的初始化

HashMap使用HashMap(int initialCapacity)對集合進行初始化。

在默認的情況下,HashMap的容量是16。但是如果用戶通過構造函數指定了一個数字作為容量,那麼Hash會選擇大於該数字的第一個2的冪作為容量。比如如果指定了3,則容量是4;如果指定了7,則容量是8;如果指定了9,則容量是16。

為什麼要設置HashMap的初始化容量

在《阿里巴巴Java開發手冊》中,有一條開發建議是建議我們設置HashMap的初始化容量。

下面我們通過具體的代碼來了解下為什麼會這麼建議。

我們先來寫一段代碼在JDK1.7的環境下運行,來分別測試下,在不指定初始化容量和指定初始化容量的情況下性能情況的不同。

public static void main(String[] args) {
    int aHundredMillion = 10000000;

    // 未初始化容量
    Map<Integer, Integer> map = new HashMap<>();
    long s1 = System.currentTimeMillis();
    for (int i = 0; i < aHundredMillion; i++) {
        map.put(i, i);
    }
    long s2 = System.currentTimeMillis();
    System.out.println("未初始化容量,耗時: " + (s2 - s1)); // 14322

    // 初始化容量為50000000
    Map<Integer, Integer> map1 = new HashMap<>(aHundredMillion / 2);
    long s3 = System.currentTimeMillis();
    for (int i = 0; i < aHundredMillion; i++) {
        map1.put(i, i);
    }
    long s4 = System.currentTimeMillis();
    System.out.println("初始化容量5000000,耗時: " + (s4 - s3)); // 11819

    // 初始化容量為100000000
    Map<Integer, Integer> map2 = new HashMap<>(aHundredMillion);
    long s5 = System.currentTimeMillis();
    for (int i = 0; i < aHundredMillion; i++) {
        map2.put(i, i);
    }
    long s6 = System.currentTimeMillis();
    System.out.println("初始化容量為10000000,耗時: " + (s6 - s5)); // 7978
}

從以上的代碼不難理解,我們創建了3個HashMap,分別使用默認的容量(16)、使用元素個數的一半(5千萬)作為初始容量和使用元素個數(一億)作為初始容量進行初始化,然後分別向其中put一億個KV。

從上面的打印結果中可以得到一個初步的結論:在已知HashMap中將要存放的KV個數的時候,設置一個合理的初始化容量可以有效地提高性能。下面我們來簡單分析一下原因。

我們知道,HashMap是有擴容機制的。所謂的擴容機制,指的是當達到擴容條件的時候,HashMap就會自動進行擴容。而HashMap的擴容條件就是當HashMap中的元素個數(Size)超過臨界值(Threshold)的情況下就會自動擴容。

threshold = loadFactor * capacity

在元素個數超過臨界值的情況下,隨着元素的不斷增加,HashMap就會發生擴容,而HashMap中的擴容機制決定了每次擴容都需要重建hash表,這一操作需要消耗大量資源,是非常影響性能的。因此,如果我們沒有設置初始的容量大小,HashMap就可能會不斷髮生擴容,也就使得程序的性能降低了。

另外,在上面的代碼中我們會發現,同樣是設置了初始化容量,設置的數值不同也會影響性能,那麼當我們已知HashMap中即將存放的KV個數的時候,容量的設置就成了一個問題。

HashMap中容量的初始化

開頭提到,在默認的情況下,當我們設置HashMap的初始化容量時,實際上HashMap會採用第一個大於該數值的2的冪作為初始化容量。

Map<String, String> map = new HashMap<>(1);
map.put("huangq", "yanggb");

Class<?> mapType = map.getClass();
Method capacity = mapType.getDeclaredMethod("capacity");
capacity.setAccessible(true);
System.out.println("capacity : " + capacity.invoke(map)); // 2

當初始化的容量設置成1的時候,通過反射取出來的capacity卻是2。在JDK1.8中,如果我們傳入的初始化容量為1,實際上設置的結果也是1。上面的代碼打印的結果為2的原因,是代碼中給map塞入值的操作導致了擴容,容量從1擴容到了2。事實上,在JDK1.7和JDK1.8中,HashMap初始化容量(capacity)的時機不同。在JDK1.8中,調用HashMap的構造函數定義HashMap的時候,就會進行容量的設定。而在JDK1.7中,要等到第一次put操作時才進行這一操作。

因此,當我們通過HashMap(int initialCapacity)設置初始容量的時候,HashMap並不一定會直接採用我們傳入的數值,而是經過計算,得到一個新值,目的是提高hash的效率。比如1->1、3->4、7->8和9->16。

HashMap中初始容量的合理值

通過上面的分析我們可以知道,當我們使用HashMap(int initialCapacity)來初始化容量的時候,JDK會默認幫我們計算一個相對合理的值當做初始容量。那麼,是不是我們只需要把已知的HashMap中即將存放的元素個數直接傳給initialCapacity就可以了呢?

initialCapacity = (需要存儲的元素個數 / 負載因子) + 1

這裏的負載因子就是loaderFactor,默認值為0.75。

initialCapacity = expectedSize / 0.75F + 1.0F

上面這個公式是《阿里巴巴Java開發手冊》中的一個建議,在Guava中也是提供了相同的算法,更甚之,這個算法實際上是JDK8中putAll()方法的實現。這是公式的得出是因為,當HashMap內部維護的哈希表的容量達到75%時(默認情況下),就會觸發rehash(重建hash表)操作。而rehash的過程是比較耗費時間的。所以初始化容量要設置成expectedSize/0.75 + 1的話,可以有效地減少衝突,也可以減小誤差。

總結

當我們想要在代碼中創建一個HashMap的時候,如果我們已知這個Map中即將存放的元素個數,給HashMap設置初始容量可以在一定程度上提升效率。

但是,JDK並不會直接拿用戶傳進來的数字當做默認容量,而是會進行一番運算,最終得到一個2的冪。而為了最大程度地避免擴容帶來的性能消耗,通常是建議可以把默認容量的数字設置成expectedSize / 0.75F + 1.0F。

在日常開發中,可以使用Guava提供的一個方法來創建一個HashMap,計算的過程Guava會幫我們完成。

Map<String, String> map = Maps.newHashMapWithExpectedSize(10);

最後要說的一點是,這種算法實際上是一種使用內存換取性能的做法,在真正的應用場景中要考慮到內存的影響。


“當你認真喜歡一個人的時候,你的全世界都是她。”

本站聲明:網站內容來源於博客園,如有侵權,請聯繫我們,我們將及時處理【其他文章推薦】

※如何讓商品強力曝光呢? 網頁設計公司幫您建置最吸引人的網站,提高曝光率!!

網頁設計一頭霧水??該從何著手呢? 找到專業技術的網頁設計公司,幫您輕鬆架站!

※想知道最厲害的台北網頁設計公司推薦台中網頁設計公司推薦專業設計師”嚨底家”!!

如何教會女友遞歸算法?

一到周末就開始放蕩自我,這不帶着女朋友去萬達電影院看電影(其實是由於整天呆在家敲代碼硬是

被女朋友強行拖拽去看電影,作為一個有理想的程序員,我想各位應該都能體諒我),一到電影院,

女朋友說要買爆米花和可樂,我當時二話沒說,臣本布衣躬耕於南陽,壤中羞澀,所以單買了爆米

花,買完都不帶回頭看老闆的那種,飲料喝多了不好,出門的時候我帶了白開水,還得虧我長得銷

魂,乍一看就能看出是個社會精神小伙,女朋友也沒多說什麼,只是對我微了微笑(我估計是被我的

顏值以及獨到的見解所折服),剛坐下沒多久,女朋友突然問我,咱們現在坐在第幾排啊?電影院里

面太黑了,看不清,沒法數,這個時候,如果是你現在你怎麼辦?別忘了你我是程序員,這個可難不

倒我,遞歸就開始排上用場了。於是我就問前面一排的人他是第幾排,你想只要在他的数字上加一,

就知道自己在哪一排了。但是,前面的人也看不清啊,所以他也問他前面的人。就這樣一排一排往前

問,直到問到第一排的人,說我在第一排,然後再這樣一排一排再把数字傳回來。直到你前面的人告

訴你他在哪一排,於是你就知道答案了。這就是一個非常標準的遞歸求解問題的分解過程,去的過程

叫“遞”,回來的過程叫“歸”。基本上,所有的遞歸問題都可以用遞推公式來表示。我們用遞推公式將

它表示出來就是這樣的

f ( n ) = f (n – 1) + 1 其中,f ( 1 ) = 1

f(n)表示你想知道自己在哪一排,f(n-1)表示前面一排所在的排數,f(1)=1表示第一排的人知道自己在

第一排。有了這個遞推公式,我們就可以很輕鬆地將它改為遞歸代碼,如下:

int f(int n) {
  if (n == 1) return 1;
  return f(n-1) + 1;
}

女朋友不懂遞歸,於是我給她講遞歸需要滿足的三個條件:

1.一個問題的解可以分解為幾個子問題的解

何為子問題?子問題就是數據規模更小的問題。就好比,在電影院,你要知道,“自己在哪一排”的問

題,可以分解為“前一排的人在哪一排”這樣一個子問題。

2.這個問題與分解之後的子問題,除了數據規模不同,求解思路完全一樣

你求解“自己在哪一排”的思路,和前面一排人求解“自己在哪一排”的思路,是一模一樣的。

3.存在遞歸終止條件

把問題分解為子問題,把子問題再分解為子子問題,一層一層分解下去,不能存在無限循環,這就需

要有終止條件。就好比,第一排的人不需要再繼續詢問任何人,就知道自己在哪一排,也就是

f(1)=1,這就是遞歸的終止條件。

如何教女友敲遞歸代碼?

剛剛鋪墊了這麼多,現在我們來看,如何來教女友敲遞歸代碼?個人覺得,寫遞歸代碼最關鍵的是寫

出遞推公式,找到終止條件,剩下將遞推公式轉化為代碼就很簡單了。

你先記住這個理論。我舉一個例子,帶你一步一步實現一個遞歸代碼,幫你理解。

假如這裡有n個台階,每次你可以跨1個台階或者2個台階,請問走這n個台階有多少種走法?如果有7個台階,你可以2,2,2,1這樣子上去,也可以1,2,1,1,2這樣子上去,總之走法有很多,那如何用編程求得總共有多少種走法呢?

我們仔細想下,實際上,可以根據第一步的走法把所有走法分為兩類,第一類是第一步走了1個台

階,另一類是第一步走了2個台階。所以n個台階的走法就等於先走1階后,n-1個台階的走法 加上先

走2階后,n-2個台階的走法。用公式表示就是:

f ( n ) = f (n – 1) + f ( n – 2 )

有了遞推公式,遞歸代碼基本上就完成了一半。我們再來看下終止條件。當有一個台階時,我們不需

要再繼續遞歸,就只有一種走法。所以f(1)=1。這個遞歸終止條件足夠嗎?我們可以用n=2,n=3這樣

比較小的數試驗一下。

n=2時,f(2)=f(1)+f(0)。如果遞歸終止條件只有一個f(1)=1,那f(2)就無法求解了。所以除了f(1)=1這一

個遞歸終止條件外,還要有f(0)=1,表示走0個台階有一種走法,不過這樣子看起來就不符合正常的

邏輯思維了。所以,我們可以把f(2)=2作為一種終止條件,表示走2個台階,有兩種走法,一步走完

或者分兩步來走。

所以,遞歸終止條件就是f(1)=1,f(2)=2。這個時候,你可以再拿n=3,n=4來驗證一下,這個終止條

件是否足夠並且正確。

我們把遞歸終止條件和剛剛得到的遞推公式放到一起就是這樣的:

f(1) = 1;
f(2) = 2;
f(n) = f(n-1)+f(n-2)

有了這個公式,我們轉化成遞歸代碼就簡單多了。最終的遞歸代碼是這樣的:

int f(int n) {
  if (n == 1) return 1;
  if (n == 2) return 2;
  return f(n-1) + f(n-2);
}

我總結一下,寫遞歸代碼的關鍵就是找到如何將大問題分解為小問題的規律,並且基於此寫出遞推公式,然後再推敲終止條件,最後將遞推公式和終止條件翻譯成代碼。

如果以後再遇到類似問題,A可以分解為若干子問題B、C、D情況,你可以假設子問題B、C、D已經

解決,在此基礎上思考如何解決問題A。而且,你只需要思考問題A與子問題B、C、D兩層之間的關

系即可,不需要一層一層往下思考子問題與子子問題,子子問題與子子子問題之間的關係。屏蔽掉遞

歸細節,這樣子理解起來就簡單多了。

因此,編寫遞歸代碼的關鍵是,只要遇到遞歸,我們就把它抽象成一個遞推公式,不用想一層層的調

用關係,不要試圖用人腦去分解遞歸的每個步驟

如何教女友玩轉漢羅塔

好了,講完了遞歸算法,再回到電影院,不說別的,我還真那麼做了,我真問了前面一排的人他是第

幾排如果不清楚並讓他跟我一樣問他的上一排,顯然,沒循環到第三人,我差點被認為是神經病,差

點沒被幾個社會精神小伙打si,座位事情暫時告一段落,話說這電影屬實夠無聊,於是我不知是趁熱

打鐵,還是心血來潮,非要給女朋友玩一個漢羅塔遊戲,我這暴脾氣,剛實踐遞歸算法被懟,是時候

挽回形象了,不秀一把遞歸算法我就不得勁。就是這個遊戲,至於遊戲規則,我覺得你體驗一兩把絕

對比我說的更加記憶深刻,,別看4399覺得有點弱zhi,再怎麼說也承

載着童年

果然,女朋友是個哈皮,剛過第三關就撲街了,這個時候,頭冒五丈光芒的我身披金甲挺身而出(貌

似有一點點小誇張,劇情需要嘛)一聲不吭地敲了幾行靚麗的代碼

public class TestHanoi {

    public static void main(String[] args) {
        hanoi(5,'A','B','C');  //可以理解為5個圈或者第5關
    }
    
    /**
     * @param n     共有N個圈
     * @param A    開始的柱子
     * @param B 中間的柱子
     * @param C 目標的柱子
     * 無論有多少個圈,都認為只有兩個。上面的所有圈和最下面一個圈。
     */
    public static void hanoi(int n,char A,char B,char C) {
        //只有一個圈。
        if(n==1) {
            System.out.println("第1個盤子從"+A+"移到"+C);
        //無論有多少個圈,都認為只有兩個。上面的所有圈和最下面一個圈。
        }else {
            //移動上面所有的圈到中間位置
            hanoi(n-1,A,C,B);
            //移動下面的圈
            System.out.println("第"+n+"個圈從"+A+"移到"+C);
            //把上面的所有圈從中間位置移到目標位置
            hanoi(n-1,B,A,C);
        }
    }

}

只要main方法一致行,對着結果移動即可,就跟開了掛一樣的,其實漢羅塔問題核心關鍵是無論有多少個圈,都認為只有兩個。上面的所有圈和最下面一個圈。

到這裏,教女友敲遞歸算法代碼,你學會了嗎?

哦豁,明天還是一個晴天~老天賜給宜春一個女朋友吧~畢竟我們程序員長得又帥敲代碼又好看,是吧哥幾個~~

如果本文對你有一點點幫助,那麼請點個讚唄,謝謝~

最後,若有不足或者不正之處,歡迎指正批評,感激不盡!如果有疑問歡迎留言,絕對第一時間回復!

歡迎各位關注我的公眾號,一起探討技術,嚮往技術,追求技術,說好了來了就是盆友喔…

本站聲明:網站內容來源於博客園,如有侵權,請聯繫我們,我們將及時處理【其他文章推薦】

※帶您來了解什麼是 USB CONNECTOR  ?

※自行創業 缺乏曝光? 下一步"網站設計"幫您第一時間規劃公司的門面形象

※如何讓商品強力曝光呢? 網頁設計公司幫您建置最吸引人的網站,提高曝光率!!

※綠能、環保無空污,成為電動車最新代名詞,目前市場使用率逐漸普及化

※廣告預算用在刀口上,網站設計公司幫您達到更多曝光效益

[springboot 開發單體web shop] 7. 多種形式提供商品列表

上文回顧

我們實現了仿jd的輪播廣告以及商品分類的功能,並且講解了不同的注入方式,本節我們將繼續實現我們的電商主業務,商品信息的展示。

需求分析

首先,在我們開始本節編碼之前,我們先來分析一下都有哪些地方會對商品進行展示,打開jd首頁,鼠標下拉可以看到如下:

可以看到,在大類型下查詢了部分商品在首頁進行展示(可以是最新的,也可以是網站推薦等等),然後點擊任何一個分類,可以看到如下:

我們一般進到電商網站之後,最常用的一個功能就是搜索, 結果如下:

選擇任意一個商品點擊,都可以進入到詳情頁面,這個是單個商品的信息展示。
綜上,我們可以知道,要實現一個電商平台的商品展示,最基本的包含:

  • 首頁推薦/最新上架商品
  • 分類查詢商品
  • 關鍵詞搜索商品
  • 商品詳情展示

接下來,我們就可以開始商品相關的業務開發了。

首頁商品列表|IndexProductList

開發梳理

我們首先來實現在首頁展示的推薦商品列表,來看一下都需要展示哪些信息,以及如何進行展示。

  • 商品主鍵(product_id)
  • 展示圖片(image_url)
  • 商品名稱(product_name)
  • 商品價格(product_price)
  • 分類說明(description)
  • 分類名稱(category_name)
  • 分類主鍵(category_id)
  • 其他…

編碼實現

根據一級分類查詢

遵循開發順序,自下而上,如果基礎mapper解決不了,那麼優先編寫SQL mapper,因為我們需要在同一張表中根據parent_id遞歸的實現數據查詢,當然我們這裏使用的是錶鏈接的方式實現。因此,common mapper無法滿足我們的需求,需要自定義mapper實現。

Custom Mapper實現

和根據一級分類查詢子分類一樣,在項目mscx-shop-mapper中添加一個自定義實現接口com.liferunner.custom.ProductCustomMapper,然後在resources\mapper\custom路徑下同步創建xml文件mapper/custom/ProductCustomMapper.xml,此時,因為我們在上節中已經配置了當前文件夾可以被容器掃描到,所以我們添加的新的mapper就會在啟動時被掃描加載,代碼如下:

/**
 * ProductCustomMapper for : 自定義商品Mapper
 */
public interface ProductCustomMapper {

    /***
     * 根據一級分類查詢商品
     *
     * @param paramMap 傳遞一級分類(map傳遞多參數)
     * @return java.util.List<com.liferunner.dto.IndexProductDTO>
     */
    List<IndexProductDTO> getIndexProductDtoList(@Param("paramMap") Map<String, Integer> paramMap);
}
<?xml version="1.0" encoding="UTF-8"?>
<!DOCTYPE mapper PUBLIC "-//mybatis.org//DTD Mapper 3.0//EN" "http://mybatis.org/dtd/mybatis-3-mapper.dtd">
<mapper namespace="com.liferunner.custom.ProductCustomMapper">
    <resultMap id="IndexProductDTO" type="com.liferunner.dto.IndexProductDTO">
        <id column="rootCategoryId" property="rootCategoryId"/>
        <result column="rootCategoryName" property="rootCategoryName"/>
        <result column="slogan" property="slogan"/>
        <result column="categoryImage" property="categoryImage"/>
        <result column="bgColor" property="bgColor"/>
        <collection property="productItemList" ofType="com.liferunner.dto.IndexProductItemDTO">
            <id column="productId" property="productId"/>
            <result column="productName" property="productName"/>
            <result column="productMainImageUrl" property="productMainImageUrl"/>
            <result column="productCreateTime" property="productCreateTime"/>
        </collection>
    </resultMap>
    <select id="getIndexProductDtoList" resultMap="IndexProductDTO" parameterType="Map">
        SELECT
        c.id as rootCategoryId,
        c.name as rootCategoryName,
        c.slogan as slogan,
        c.category_image as categoryImage,
        c.bg_color as bgColor,
        p.id as productId,
        p.product_name as productName,
        pi.url as productMainImageUrl,
        p.created_time as productCreateTime
        FROM category c
        LEFT JOIN products p
        ON c.id = p.root_category_id
        LEFT JOIN products_img pi
        ON p.id = pi.product_id
        WHERE c.type = 1
        AND p.root_category_id = #{paramMap.rootCategoryId}
        AND pi.is_main = 1
        LIMIT 0,10;
    </select>
</mapper>

Service實現

serviceproject 創建com.liferunner.service.IProductService接口以及其實現類com.liferunner.service.impl.ProductServiceImpl,添加查詢方法如下:

public interface IProductService {

    /**
     * 根據一級分類id獲取首頁推薦的商品list
     *
     * @param rootCategoryId 一級分類id
     * @return 商品list
     */
    List<IndexProductDTO> getIndexProductDtoList(Integer rootCategoryId);
    ...
}

---
    
@Slf4j
@Service
@RequiredArgsConstructor(onConstructor = @__(@Autowired))
public class ProductServiceImpl implements IProductService {

    // RequiredArgsConstructor 構造器注入
    private final ProductCustomMapper productCustomMapper;

    @Transactional(propagation = Propagation.SUPPORTS)
    @Override
    public List<IndexProductDTO> getIndexProductDtoList(Integer rootCategoryId) {
        log.info("====== ProductServiceImpl#getIndexProductDtoList(rootCategoryId) : {}=======", rootCategoryId);
        Map<String, Integer> map = new HashMap<>();
        map.put("rootCategoryId", rootCategoryId);
        val indexProductDtoList = this.productCustomMapper.getIndexProductDtoList(map);
        if (CollectionUtils.isEmpty(indexProductDtoList)) {
            log.warn("ProductServiceImpl#getIndexProductDtoList未查詢到任何商品信息");
        }
        log.info("查詢結果:{}", indexProductDtoList);
        return indexProductDtoList;
    }
}

Controller實現

接着,在com.liferunner.api.controller.IndexController中實現對外暴露的查詢接口:

@RestController
@RequestMapping("/index")
@Api(value = "首頁信息controller", tags = "首頁信息接口API")
@Slf4j
public class IndexController {
    ...
    @Autowired
    private IProductService productService;

    @GetMapping("/rootCategorys")
    @ApiOperation(value = "查詢一級分類", notes = "查詢一級分類")
    public JsonResponse findAllRootCategorys() {
        log.info("============查詢一級分類==============");
        val categoryResponseDTOS = this.categoryService.getAllRootCategorys();
        if (CollectionUtils.isEmpty(categoryResponseDTOS)) {
            log.info("============未查詢到任何分類==============");
            return JsonResponse.ok(Collections.EMPTY_LIST);
        }
        log.info("============一級分類查詢result:{}==============", categoryResponseDTOS);
        return JsonResponse.ok(categoryResponseDTOS);
    }
    ...
}

Test API

編寫完成之後,我們需要對我們的代碼進行測試驗證,還是通過使用RestService插件來實現,當然,大家也可以通過Postman來測試,結果如下:

商品列表|ProductList

如開文之初我們看到的京東商品列表一樣,我們先分析一下在商品列表頁面都需要哪些元素信息?

開發梳理

商品列表的展示按照我們之前的分析,總共分為2大類:

  • 選擇商品分類之後,展示當前分類下所有商品
  • 輸入搜索關鍵詞后,展示當前搜索到相關的所有商品

在這兩類中展示的商品列表數據,除了數據來源不同以外,其他元素基本都保持一致,那麼我們是否可以使用統一的接口來根據參數實現隔離呢? 理論上不存在問題,完全可以通過傳參判斷的方式進行數據回傳,但是,在我們實現一些可預見的功能需求時,一定要給自己的開發預留後路,也就是我們常說的可拓展性,基於此,我們會分開實現各自的接口,以便於後期的擴展。
接着來分析在列表頁中我們需要展示的元素,首先因為需要分上述兩種情況,因此我們需要在我們API設計的時候分別處理,針對於
1.分類的商品列表展示,需要傳入的參數有:

  • 分類id
  • 排序(在電商列表我們常見的幾種排序(銷量,價格等等))
  • 分頁相關(因為我們不可能把數據庫中所有的商品都取出來)
    • PageNumber(當前第幾頁)
    • PageSize(每頁显示多少條數據)

2.關鍵詞查詢商品列表,需要傳入的參數有:

  • 關鍵詞
  • 排序(在電商列表我們常見的幾種排序(銷量,價格等等))
  • 分頁相關(因為我們不可能把數據庫中所有的商品都取出來)
    • PageNumber(當前第幾頁)
    • PageSize(每頁显示多少條數據)

需要在頁面展示的信息有:

  • 商品id(用於跳轉商品詳情使用)
  • 商品名稱
  • 商品價格
  • 商品銷量
  • 商品圖片
  • 商品優惠

編碼實現

根據上面我們的分析,接下來開始我們的編碼:

根據商品分類查詢

根據我們的分析,肯定不會在一張表中把所有數據獲取全,因此我們需要進行多表聯查,故我們需要在自定義mapper中實現我們的功能查詢.

ResponseDTO 實現

根據我們前面分析的前端需要展示的信息,我們來定義一個用於展示這些信息的對象com.liferunner.dto.SearchProductDTO,代碼如下:

@Data
@NoArgsConstructor
@AllArgsConstructor
@Builder
public class SearchProductDTO {
    private String productId;
    private String productName;
    private Integer sellCounts;
    private String imgUrl;
    private Integer priceDiscount;
    //商品優惠,我們直接計算之後返回優惠后價格
}

Custom Mapper 實現

com.liferunner.custom.ProductCustomMapper.java中新增一個方法接口:

    List<SearchProductDTO> searchProductListByCategoryId(@Param("paramMap") Map<String, Object> paramMap);

同時,在mapper/custom/ProductCustomMapper.xml中實現我們的查詢方法:

<select id="searchProductListByCategoryId" resultType="com.liferunner.dto.SearchProductDTO" parameterType="Map">
        SELECT
        p.id as productId,
        p.product_name as productName,
        p.sell_counts as sellCounts,
        pi.url as imgUrl,
        tp.priceDiscount
        FROM products p
        LEFT JOIN products_img pi
        ON p.id = pi.product_id
        LEFT JOIN
        (
        SELECT product_id, MIN(price_discount) as priceDiscount
        FROM products_spec
        GROUP BY product_id
        ) tp
        ON tp.product_id = p.id
        WHERE pi.is_main = 1
        AND p.category_id = #{paramMap.categoryId}
        ORDER BY
        <choose>
            <when test="paramMap.sortby != null and paramMap.sortby == 'sell'">
                p.sell_counts DESC
            </when>
            <when test="paramMap.sortby != null and paramMap.sortby == 'price'">
                tp.priceDiscount ASC
            </when>
            <otherwise>
                p.created_time DESC
            </otherwise>
        </choose>
    </select>

主要來說明一下這裏的<choose>模塊,以及為什麼不使用if標籤。
在有的時候,我們並不希望所有的條件都同時生效,而只是想從多個選項中選擇一個,但是在使用IF標籤時,只要test中的表達式為 true,就會執行IF 標籤中的條件。MyBatis 提供了 choose 元素。IF標籤是與(and)的關係,而 choose 是或(or)的關係。
它的選擇是按照順序自上而下,一旦有任何一個滿足條件,則選擇退出。

Service 實現

然後在servicecom.liferunner.service.IProductService中添加方法接口:

    /**
     * 根據商品分類查詢商品列表
     *
     * @param categoryId 分類id
     * @param sortby     排序方式
     * @param pageNumber 當前頁碼
     * @param pageSize   每頁展示多少條數據
     * @return 通用分頁結果視圖
     */
    CommonPagedResult searchProductList(Integer categoryId, String sortby, Integer pageNumber, Integer pageSize);

在實現類com.liferunner.service.impl.ProductServiceImpl中,實現上述方法:

    // 方法重載
    @Override
    public CommonPagedResult searchProductList(Integer categoryId, String sortby, Integer pageNumber, Integer pageSize) {
        Map<String, Object> paramMap = new HashMap<>();
        paramMap.put("categoryId", categoryId);
        paramMap.put("sortby", sortby);
        // mybatis-pagehelper
        PageHelper.startPage(pageNumber, pageSize);
        val searchProductDTOS = this.productCustomMapper.searchProductListByCategoryId(paramMap);
        // 獲取mybatis插件中獲取到信息
        PageInfo<?> pageInfo = new PageInfo<>(searchProductDTOS);
        // 封裝為返回到前端分頁組件可識別的視圖
        val commonPagedResult = CommonPagedResult.builder()
                .pageNumber(pageNumber)
                .rows(searchProductDTOS)
                .totalPage(pageInfo.getPages())
                .records(pageInfo.getTotal())
                .build();
        return commonPagedResult;
    }

在這裏,我們使用到了一個mybatis-pagehelper插件,會在下面的福利講解中分解。

Controller 實現

繼續在com.liferunner.api.controller.ProductController中添加對外暴露的接口API:

@GetMapping("/searchByCategoryId")
    @ApiOperation(value = "查詢商品信息列表", notes = "根據商品分類查詢商品列表")
    public JsonResponse searchProductListByCategoryId(
        @ApiParam(name = "categoryId", value = "商品分類id", required = true, example = "0")
        @RequestParam Integer categoryId,
        @ApiParam(name = "sortby", value = "排序方式", required = false)
        @RequestParam String sortby,
        @ApiParam(name = "pageNumber", value = "當前頁碼", required = false, example = "1")
        @RequestParam Integer pageNumber,
        @ApiParam(name = "pageSize", value = "每頁展示記錄數", required = false, example = "10")
        @RequestParam Integer pageSize
    ) {
        if (null == categoryId || categoryId == 0) {
            return JsonResponse.errorMsg("分類id錯誤!");
        }
        if (null == pageNumber || 0 == pageNumber) {
            pageNumber = DEFAULT_PAGE_NUMBER;
        }
        if (null == pageSize || 0 == pageSize) {
            pageSize = DEFAULT_PAGE_SIZE;
        }
        log.info("============根據分類:{} 搜索列表==============", categoryId);

        val searchResult = this.productService.searchProductList(categoryId, sortby, pageNumber, pageSize);
        return JsonResponse.ok(searchResult);
    }

因為我們的請求中,只會要求商品分類id是必填項,其餘的調用方都可以不提供,但是如果不提供的話,我們系統就需要給定一些默認的參數來保證我們的系統正常穩定的運行,因此,我定義了com.liferunner.api.controller.BaseController,用於存儲一些公共的配置信息。

/**
 * BaseController for : controller 基類
 */
@Controller
public class BaseController {
    /**
     * 默認展示第1頁
     */
    public final Integer DEFAULT_PAGE_NUMBER = 1;
    /**
     * 默認每頁展示10條數據
     */
    public final Integer DEFAULT_PAGE_SIZE = 10;
}

Test API

測試的參數分別是:categoryId : 51 ,sortby : price,pageNumber : 1,pageSize : 5

可以看到,我們查詢到7條數據,總頁數totalPage為2,並且根據價格從小到大進行了排序,證明我們的編碼是正確的。接下來,通過相同的代碼邏輯,我們繼續實現根據搜索關鍵詞進行查詢。

根據關鍵詞查詢

Response DTO 實現

使用上面實現的com.liferunner.dto.SearchProductDTO.

Custom Mapper 實現

com.liferunner.custom.ProductCustomMapper中新增方法:

List<SearchProductDTO> searchProductList(@Param("paramMap") Map<String, Object> paramMap);

mapper/custom/ProductCustomMapper.xml中添加查詢SQL:

<select id="searchProductList" resultType="com.liferunner.dto.SearchProductDTO" parameterType="Map">
        SELECT
        p.id as productId,
        p.product_name as productName,
        p.sell_counts as sellCounts,
        pi.url as imgUrl,
        tp.priceDiscount
        FROM products p
        LEFT JOIN products_img pi
        ON p.id = pi.product_id
        LEFT JOIN
        (
        SELECT product_id, MIN(price_discount) as priceDiscount
        FROM products_spec
        GROUP BY product_id
        ) tp
        ON tp.product_id = p.id
        WHERE pi.is_main = 1
        <if test="paramMap.keyword != null and paramMap.keyword != ''">
            AND p.item_name LIKE "%${paramMap.keyword}%"
        </if>
        ORDER BY
        <choose>
            <when test="paramMap.sortby != null and paramMap.sortby == 'sell'">
                p.sell_counts DESC
            </when>
            <when test="paramMap.sortby != null and paramMap.sortby == 'price'">
                tp.priceDiscount ASC
            </when>
            <otherwise>
                p.created_time DESC
            </otherwise>
        </choose>
    </select>

Service 實現

com.liferunner.service.IProductService中新增查詢接口:

    /**
     * 查詢商品列表
     *
     * @param keyword    查詢關鍵詞
     * @param sortby     排序方式
     * @param pageNumber 當前頁碼
     * @param pageSize   每頁展示多少條數據
     * @return 通用分頁結果視圖
     */
    CommonPagedResult searchProductList(String keyword, String sortby, Integer pageNumber, Integer pageSize);

com.liferunner.service.impl.ProductServiceImpl實現上述接口方法:

    @Override
    public CommonPagedResult searchProductList(String keyword, String sortby, Integer pageNumber, Integer pageSize) {
        Map<String, Object> paramMap = new HashMap<>();
        paramMap.put("keyword", keyword);
        paramMap.put("sortby", sortby);
        // mybatis-pagehelper
        PageHelper.startPage(pageNumber, pageSize);
        val searchProductDTOS = this.productCustomMapper.searchProductList(paramMap);
        // 獲取mybatis插件中獲取到信息
        PageInfo<?> pageInfo = new PageInfo<>(searchProductDTOS);
        // 封裝為返回到前端分頁組件可識別的視圖
        val commonPagedResult = CommonPagedResult.builder()
                .pageNumber(pageNumber)
                .rows(searchProductDTOS)
                .totalPage(pageInfo.getPages())
                .records(pageInfo.getTotal())
                .build();
        return commonPagedResult;
    }

上述方法和之前searchProductList(Integer categoryId, String sortby, Integer pageNumber, Integer pageSize)唯一的區別就是它是肯定搜索關鍵詞來進行數據查詢,使用重載的目的是為了我們後續不同類型的業務擴展而考慮的。

Controller 實現

com.liferunner.api.controller.ProductController中添加關鍵詞搜索API:

    @GetMapping("/search")
    @ApiOperation(value = "查詢商品信息列表", notes = "查詢商品信息列表")
    public JsonResponse searchProductList(
        @ApiParam(name = "keyword", value = "搜索關鍵詞", required = true)
        @RequestParam String keyword,
        @ApiParam(name = "sortby", value = "排序方式", required = false)
        @RequestParam String sortby,
        @ApiParam(name = "pageNumber", value = "當前頁碼", required = false, example = "1")
        @RequestParam Integer pageNumber,
        @ApiParam(name = "pageSize", value = "每頁展示記錄數", required = false, example = "10")
        @RequestParam Integer pageSize
    ) {
        if (StringUtils.isBlank(keyword)) {
            return JsonResponse.errorMsg("搜索關鍵詞不能為空!");
        }
        if (null == pageNumber || 0 == pageNumber) {
            pageNumber = DEFAULT_PAGE_NUMBER;
        }
        if (null == pageSize || 0 == pageSize) {
            pageSize = DEFAULT_PAGE_SIZE;
        }
        log.info("============根據關鍵詞:{} 搜索列表==============", keyword);

        val searchResult = this.productService.searchProductList(keyword, sortby, pageNumber, pageSize);
        return JsonResponse.ok(searchResult);
    }

Test API

測試參數:keyword : 西鳳,sortby : sell,pageNumber : 1,pageSize : 10

根據銷量排序正常,查詢關鍵詞正常,總條數32,每頁10條,總共3頁正常。

福利講解

在本節編碼實現中,我們使用到了一個通用的mybatis分頁插件mybatis-pagehelper,接下來,我們來了解一下這個插件的基本情況。

mybatis-pagehelper

如果各位小夥伴使用過:, 那麼對於這個就很容易理解了,它其實就是基於來實現的,當攔截到原始SQL之後,對SQL進行一次改造處理。
我們來看看我們自己代碼中的實現,根據springboot編碼三部曲:

1.添加依賴

        <!-- 引入mybatis-pagehelper 插件-->
        <dependency>
            <groupId>com.github.pagehelper</groupId>
            <artifactId>pagehelper-spring-boot-starter</artifactId>
            <version>1.2.12</version>
        </dependency>

有同學就要問了,為什麼引入的這個依賴和我原來使用的不同?以前使用的是:

<dependency>
    <groupId>com.github.pagehelper</groupId>
    <artifactId>pagehelper</artifactId>
    <version>5.1.10</version>
</dependency>

答案就在這裏:

我們使用的是springboot進行的項目開發,既然使用的是springboot,那我們完全可以用到它的自動裝配特性,作者幫我們實現了這麼一個,我們只需要參考示例來編寫就ok了。

2.改配置

# mybatis 分頁組件配置
pagehelper:
  helperDialect: mysql #插件支持12種數據庫,選擇類型
  supportMethodsArguments: true

3.改代碼

如下示例代碼:

    @Override
    public CommonPagedResult searchProductList(String keyword, String sortby, Integer pageNumber, Integer pageSize) {
        Map<String, Object> paramMap = new HashMap<>();
        paramMap.put("keyword", keyword);
        paramMap.put("sortby", sortby);
        // mybatis-pagehelper
        PageHelper.startPage(pageNumber, pageSize);
        val searchProductDTOS = this.productCustomMapper.searchProductList(paramMap);
        // 獲取mybatis插件中獲取到信息
        PageInfo<?> pageInfo = new PageInfo<>(searchProductDTOS);
        // 封裝為返回到前端分頁組件可識別的視圖
        val commonPagedResult = CommonPagedResult.builder()
                .pageNumber(pageNumber)
                .rows(searchProductDTOS)
                .totalPage(pageInfo.getPages())
                .records(pageInfo.getTotal())
                .build();
        return commonPagedResult;
    }

在我們查詢數據庫之前,我們引入了一句PageHelper.startPage(pageNumber, pageSize);,告訴mybatis我們要對查詢進行分頁處理,這個時候插件會啟動一個攔截器com.github.pagehelper.PageInterceptor,針對所有的query進行攔截,添加自定義參數和添加查詢數據總數。(後續我們會打印sql來證明。)

當查詢到結果之後,我們需要將我們查詢到的結果通知給插件,也就是PageInfo<?> pageInfo = new PageInfo<>(searchProductDTOS);com.github.pagehelper.PageInfo是對插件針對分頁做的一個屬性包裝,具體可以查看)。

至此,我們的插件使用就已經結束了。但是為什麼我們在後面又封裝了一個對象來對外進行返回,而不是使用查詢到的PageInfo呢?這是因為我們實際開發過程中,為了數據結構的一致性做的一次結構封裝,你也可不實現該步驟,都是對結果沒有任何影響的。

SQL打印對比

2019-11-21 12:04:21 INFO  ProductController:134 - ============根據關鍵詞:西鳳 搜索列表==============
Creating a new SqlSession
SqlSession [org.apache.ibatis.session.defaults.DefaultSqlSession@4ff449ba] was not registered for synchronization because synchronization is not active
JDBC Connection [HikariProxyConnection@1980420239 wrapping com.mysql.cj.jdbc.ConnectionImpl@563b22b1] will not be managed by Spring
==>  Preparing: SELECT count(0) FROM products p LEFT JOIN products_img pi ON p.id = pi.product_id LEFT JOIN (SELECT product_id, MIN(price_discount) AS priceDiscount FROM products_spec GROUP BY product_id) tp ON tp.product_id = p.id WHERE pi.is_main = 1 AND p.product_name LIKE "%西鳳%" 
==> Parameters: 
<==    Columns: count(0)
<==        Row: 32
<==      Total: 1
==>  Preparing: SELECT p.id as productId, p.product_name as productName, p.sell_counts as sellCounts, pi.url as imgUrl, tp.priceDiscount FROM product p LEFT JOIN products_img pi ON p.id = pi.product_id LEFT JOIN ( SELECT product_id, MIN(price_discount) as priceDiscount FROM products_spec GROUP BY product_id ) tp ON tp.product_id = p.id WHERE pi.is_main = 1 AND p.product_name LIKE "%西鳳%" ORDER BY p.sell_counts DESC LIMIT ? 
==> Parameters: 10(Integer)

我們可以看到,我們的SQL中多了一個SELECT count(0),第二條SQL多了一個LIMIT參數,在代碼中,我們很明確的知道,我們並沒有显示的去搜索總數和查詢條數,可以確定它就是插件幫我們實現的。

源碼下載

下節預告

下一節我們將繼續開發商品詳情展示以及商品評價業務,在過程中使用到的任何開發組件,我都會通過專門的一節來進行介紹的,兄弟們末慌!

gogogo!

本站聲明:網站內容來源於博客園,如有侵權,請聯繫我們,我們將及時處理【其他文章推薦】

※為什麼 USB CONNECTOR 是電子產業重要的元件?

網頁設計一頭霧水??該從何著手呢? 找到專業技術的網頁設計公司,幫您輕鬆架站!

※想要讓你的商品成為最夯、最多人討論的話題?網頁設計公司讓你強力曝光

※想知道最厲害的台北網頁設計公司推薦台中網頁設計公司推薦專業設計師”嚨底家”!!

五分鐘學會HTML5的WebSocket協議

1、背景

  很多網站為了實現推送技術,所用的技術都是Ajax輪詢。輪詢是在特定的的時間間隔由瀏覽器對服務器發出HTTP請求,然後由服務器返回最新的數據給客戶端的瀏覽器。這種傳統的模式帶來很明顯的缺點,即瀏覽器需要不斷的向服務器發出請求,然而HTTP請求可能包含較長的頭部,其中真正有效的數據可能只是很小的一部分,顯然這樣會浪費很多的帶寬等資源。HTML5新增的一些新協議WebSocket,可以提供在單個TCP連接上提供全雙工,雙向通信,能夠節省服務器資源和帶寬,並且能夠實時進行通信。

2、WebSocket介紹

  傳統的http也是一種協議,WebSocket是一種協議,使用http服務器無法實現WebSocket,

2.1.瀏覽器支持情況

基本主流瀏覽器都支持

2.2.優點

相對於http有如下好處:

  • 1.客戶端與服務器只建立一個TCP連接,可以使用更少的連接。
  • 2.WebSocket服務器端可以主動推送數據到客戶端,更靈活高效。
  • 3.更輕量級的協議頭,減少數據傳送量。

對比輪訓機制

3、WebSocket用法

  我們了解WebSocket是什麼,有哪些優點后,怎麼使用呢?

3.1.WebSocket創建

WebSocket使用了自定義協議,url模式與http略有不同,未加密的連接是ws://,加密的連接是wss://,WebSocket實例使用new WebSocket()方法來創建,

var ws = new WebSocket(url, [protocol] );

第一個參數 url, 指定連接的 URL。第二個參數 protocol 是可選的,指定了可接受的子協議。

3.2.WebSocket屬性

當創建ws對象后,readyState為ws實例狀態,共4種狀態

  • 0 表示連接尚未建立。

  • 1 表示連接已建立,可以進行通信。

  • 2 表示連接正在進行關閉。

  • 3 表示連接已經關閉或者連接不能打開。

Tips:在發送報文之前要判斷狀態,斷開也應該有重連機制。

3.3.WebSocket事件

在創建ws實例對象后,會擁有以下幾個事件,根據不同狀態可在事件回調寫方法。

  • ws.onopen 連接建立時觸發

  • ws.onmessage 客戶端接收服務端數據時觸發

  • ws.onerror 通信發生錯誤時觸發

  • ws.onclose 連接關閉時觸發

ws.onmessage = (res) => {
  console.log(res.data);
};

ws.onopen = () => {
  console.log('OPEN...');
};

ws.onclose=()=>{
 console.log('CLOSE...');
}

3.4.WebSocket方法

  • ws.send() 使用連接發送數據(只能發送純文本數據)

  • ws.close() 關閉連接

4、Demo演示

  了解WebSocket的一些API之後,趁熱打鐵,做一個小案例跑一下。

4.1.Node服務器端

WebSocket協議與Node一起用非常好,原因有以下兩點:

1.WebSocket客戶端基於事件編程與Node中自定義事件差不多。

2.WebSocket實現客戶端與服務器端長連接,Node基本事件驅動的方式十分適合高併發連接

創建一個webSocket.js如下:

const WebSocketServer = require('ws').Server;
const wss = new WebSocketServer({ port: 8080 });
wss.on('connection', function (ws) {
    console.log('client connected');
    ws.on('message', function (message) {
        ws.send('我收到了' + message);
    });
});

打開windows命令窗口運行

4.2.HTML客戶端

新建一個index.html頁面

<!DOCTYPE html>
<html lang="en">
<head>
    <meta charset="UTF-8">
    <title>webSocket小Demo</title>
</head>
<body>
    <div class="container">
        <div>
            <input type="text" id="msg">
            <button onclick="sendMsg()">發送報文</button>
        </div>
    </div>
    <script>
        const ws = new WebSocket('ws://localhost:8080');
        ws.onmessage = (res) => {
            console.log(res);
        };
        ws.onopen = () => {
            console.log('OPEN...');
        };
        ws.onclose = () => {
            console.log('CLOSE...');
        }
        function sendMsg() {
            let msg = document.getElementById('msg').value;
            ws.send(msg);
        }
    </script>
</body>

打開瀏覽器依次輸入字符1,2,3,每次輸入完點擊發送報體,可見在ws.onmessage事件中res.data中返回來我們發的報文

5、問題與總結

  以上只是簡單的介紹了下WebSocket的API與簡單用法,在處理高併發,長連接這些需求上,例如聊天室,可能WebSocket的http請求更加合適高效。

   但在使用WebSocket過程中發現容易斷開連接等問題,所以在每次發送報文前要判斷是否斷開,當多次發送報文時,由於服務器端返回數據量不同,返回客戶端前後順序也不同,所以需要在客戶端收到上一個報文返回數據后再發送下一個報文,為了避免回調嵌套過多,通過Promise ,async ,await等同步方式解決。關於WebSocket就寫這麼多,如有不足,歡迎多多指正!

參考資料:
《JavaScript高級教程》
《深入檢出NodeJs》

本站聲明:網站內容來源於博客園,如有侵權,請聯繫我們,我們將及時處理【其他文章推薦】

USB CONNECTOR掌控什麼技術要點? 帶您認識其相關發展及效能

※評比前十大台北網頁設計台北網站設計公司知名案例作品心得分享

※智慧手機時代的來臨,RWD網頁設計已成為網頁設計推薦首選