準備
我的環境是python3.6,sc2包0.11.1
機器學習包下載鏈接:
地圖下載鏈接
pysc2是DeepMind開發的星際爭霸Ⅱ學習環境。 它是封裝星際爭霸Ⅱ機器學習API,同時也提供Python增強學習環境。
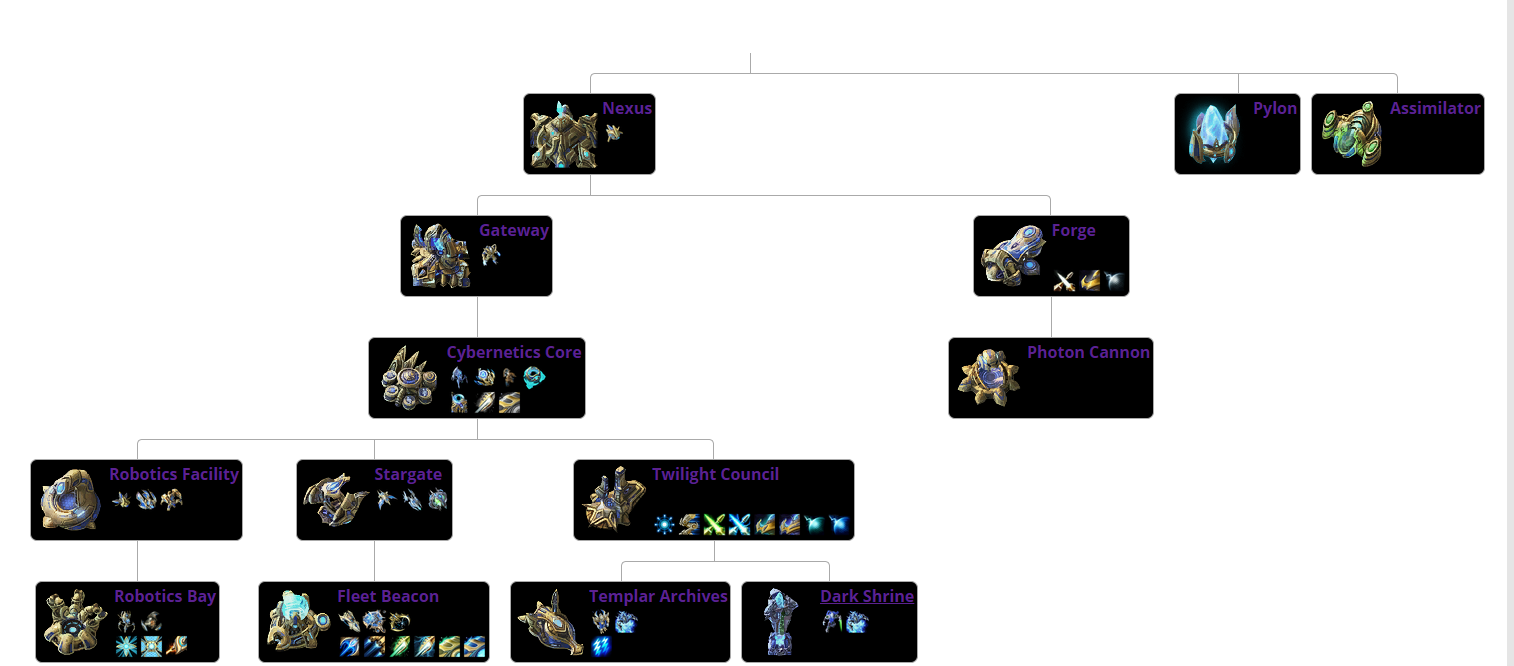
以神族為例編寫代碼,神族建築科技圖如下:
採礦
# -*- encoding: utf-8 -*-
'''
@File    :   __init__.py.py
@Modify Time      @Author       @Desciption
------------      -------       -----------
2019/11/3 12:32   Jonas           None
'''

import sc2
from sc2 import run_game, maps, Race, Difficulty
from sc2.player import Bot, Computer


class SentdeBot(sc2.BotAI):
    async def on_step(self, iteration: int):
        await self.distribute_workers()


run_game(maps.get("AcidPlantLE"), [
    Bot(Race.Protoss, SentdeBot()), Computer(Race.Terran, Difficulty.Easy)
],realtime = True)
注意
game_data.py的assert self.id != 0註釋掉
pixel_map.py的assert self.bits_per_pixel % 8 == 0, "Unsupported pixel density"註釋掉
否則會報錯
運行結果如下,农民開始採礦
可以正常採礦
建造农民和水晶塔
import sc2
from sc2 import run_game, maps, Race, Difficulty
from sc2.player import Bot, Computer
from sc2.constants import *


class SentdeBot(sc2.BotAI):
    async def on_step(self, iteration: int):
        await self.distribute_workers()
        await self.build_workers()
        await self.build_pylons()

    # 建造农民
    async def build_workers(self):
        # 星靈樞紐(NEXUS)無隊列建造,可以提高晶體礦的利用率,不至於佔用資源
        for nexus in self.units(UnitTypeId.NEXUS).ready.noqueue:
            # 是否有50晶體礦
            if self.can_afford(UnitTypeId.PROBE):
                await self.do(nexus.train(UnitTypeId.PROBE))

    ## 建造水晶
    async def build_pylons(self):
        ## 供應人口和現有人口之差小於5且水晶不是正在建造
        if self.supply_left<5 and not self.already_pending(UnitTypeId.PYLON):
            nexuses = self.units(UnitTypeId.NEXUS).ready
            if nexuses.exists:
                if self.can_afford(UnitTypeId.PYLON):
                    await self.build(UnitTypeId.PYLON,near=nexuses.first)

## 啟動遊戲
run_game(maps.get("AcidPlantLE"), [
    Bot(Race.Protoss, SentdeBot()), Computer(Race.Terran, Difficulty.Easy)
],realtime = True)
運行結果如下,基地造农民,农民造水晶
收集氣體和開礦
代碼如下
import sc2
from sc2 import run_game, maps, Race, Difficulty
from sc2.player import Bot, Computer
from sc2.constants import *


class SentdeBot(sc2.BotAI):
    async def on_step(self, iteration: int):
        await self.distribute_workers()
        await self.build_workers()
        await self.build_pylons()
        await self.build_assimilators()
        await self.expand()

    # 建造农民
    async def build_workers(self):
        # 星靈樞紐(NEXUS)無隊列建造,可以提高晶體礦的利用率,不至於佔用資源
        for nexus in self.units(UnitTypeId.NEXUS).ready.noqueue:
            # 是否有50晶體礦
            if self.can_afford(UnitTypeId.PROBE):
                await self.do(nexus.train(UnitTypeId.PROBE))

    ## 建造水晶
    async def build_pylons(self):
        ## 供應人口和現有人口之差小於5且建築不是正在建造
        if self.supply_left < 5 and not self.already_pending(UnitTypeId.PYLON):
            nexuses = self.units(UnitTypeId.NEXUS).ready
            if nexuses.exists:
                if self.can_afford(UnitTypeId.PYLON):
                    await self.build(UnitTypeId.PYLON, near=nexuses.first)

    ## 建造吸收廠
    async def build_assimilators(self):
        for nexus in self.units(UnitTypeId.NEXUS).ready:
            # 在瓦斯泉上建造吸收廠
            vaspenes = self.state.vespene_geyser.closer_than(15.0,nexus)
            for vaspene in vaspenes:
                if not self.can_afford(UnitTypeId.ASSIMILATOR):
                    break
                worker = self.select_build_worker(vaspene.position)
                if worker is None:
                    break
                if not self.units(UnitTypeId.ASSIMILATOR).closer_than(1.0,vaspene).exists:
                    await self.do(worker.build(UnitTypeId.ASSIMILATOR,vaspene))

    ## 開礦
    async def expand(self):
        if self.units(UnitTypeId.NEXUS).amount<3 and self.can_afford(UnitTypeId.NEXUS):
            await self.expand_now()

## 啟動遊戲
run_game(maps.get("AcidPlantLE"), [
    Bot(Race.Protoss, SentdeBot()), Computer(Race.Terran, Difficulty.Easy)
], realtime=False)
run_game的realtime設置成False,可以在加速模式下運行遊戲。
運行效果如下:
可以建造吸收廠和開礦
建造軍隊
import sc2
from sc2 import run_game, maps, Race, Difficulty
from sc2.player import Bot, Computer
from sc2.constants import *


class SentdeBot(sc2.BotAI):
    async def on_step(self, iteration: int):
        await self.distribute_workers()
        await self.build_workers()
        await self.build_pylons()
        await self.build_assimilators()
        await self.expand()
        await self.offensive_force_buildings()
        await self.build_offensive_force()

    # 建造农民
    async def build_workers(self):
        # 星靈樞紐(NEXUS)無隊列建造,可以提高晶體礦的利用率,不至於佔用資源
        for nexus in self.units(UnitTypeId.NEXUS).ready.noqueue:
            # 是否有50晶體礦
            if self.can_afford(UnitTypeId.PROBE):
                await self.do(nexus.train(UnitTypeId.PROBE))

    ## 建造水晶
    async def build_pylons(self):
        ## 供應人口和現有人口之差小於5且建築不是正在建造
        if self.supply_left < 5 and not self.already_pending(UnitTypeId.PYLON):
            nexuses = self.units(UnitTypeId.NEXUS).ready
            if nexuses.exists:
                if self.can_afford(UnitTypeId.PYLON):
                    await self.build(UnitTypeId.PYLON, near=nexuses.first)

    ## 建造吸收廠
    async def build_assimilators(self):
        for nexus in self.units(UnitTypeId.NEXUS).ready:
            # 在瓦斯泉上建造吸收廠
            vaspenes = self.state.vespene_geyser.closer_than(15.0,nexus)
            for vaspene in vaspenes:
                if not self.can_afford(UnitTypeId.ASSIMILATOR):
                    break
                worker = self.select_build_worker(vaspene.position)
                if worker is None:
                    break
                if not self.units(UnitTypeId.ASSIMILATOR).closer_than(1.0,vaspene).exists:
                    await self.do(worker.build(UnitTypeId.ASSIMILATOR,vaspene))

    ## 開礦
    async def expand(self):
        if self.units(UnitTypeId.NEXUS).amount<2 and self.can_afford(UnitTypeId.NEXUS):
            await self.expand_now()

    ## 建造進攻性建築
    async def offensive_force_buildings(self):
        if self.units(UnitTypeId.PYLON).ready.exists:
            pylon = self.units(UnitTypeId.PYLON).ready.random
            if self.units(UnitTypeId.PYLON).ready.exists:
                # 根據神族建築科技圖,折躍門建造過後才可以建造控制核心
                if self.units(UnitTypeId.GATEWAY).ready.exists:
                    if not self.units(UnitTypeId.CYBERNETICSCORE):
                        if self.can_afford(UnitTypeId.CYBERNETICSCORE) and not self.already_pending(UnitTypeId.CYBERNETICSCORE):
                            await self.build(UnitTypeId.CYBERNETICSCORE,near = pylon)
                # 否則建造折躍門
                else:
                    if self.can_afford(UnitTypeId.GATEWAY) and not self.already_pending(UnitTypeId.GATEWAY):
                        await self.build(UnitTypeId.GATEWAY,near=pylon)

    # 造兵
    async def build_offensive_force(self):
        # 無隊列化建造
        for gw in self.units(UnitTypeId.GATEWAY).ready.noqueue:
            if self.can_afford(UnitTypeId.STALKER) and self.supply_left>0:
                await self.do(gw.train(UnitTypeId.STALKER))


## 啟動遊戲
run_game(maps.get("AcidPlantLE"), [
    Bot(Race.Protoss, SentdeBot()), Computer(Race.Terran, Difficulty.Easy)
], realtime=False)
運行結果如下:
可以看到,我們建造了折躍門和控制核心並訓練了追獵者
控制部隊進攻
代碼如下
import sc2
from sc2 import run_game, maps, Race, Difficulty
from sc2.player import Bot, Computer
from sc2.constants import *
import random

class SentdeBot(sc2.BotAI):
    async def on_step(self, iteration: int):
        await self.distribute_workers()
        await self.build_workers()
        await self.build_pylons()
        await self.build_assimilators()
        await self.expand()
        await self.offensive_force_buildings()
        await self.build_offensive_force()
        await self.attack()

    # 建造农民
    async def build_workers(self):
        # 星靈樞紐(NEXUS)無隊列建造,可以提高晶體礦的利用率,不至於佔用資源
        for nexus in self.units(UnitTypeId.NEXUS).ready.noqueue:
            # 是否有50晶體礦
            if self.can_afford(UnitTypeId.PROBE):
                await self.do(nexus.train(UnitTypeId.PROBE))

    ## 建造水晶
    async def build_pylons(self):
        ## 供應人口和現有人口之差小於5且建築不是正在建造
        if self.supply_left < 5 and not self.already_pending(UnitTypeId.PYLON):
            nexuses = self.units(UnitTypeId.NEXUS).ready
            if nexuses.exists:
                if self.can_afford(UnitTypeId.PYLON):
                    await self.build(UnitTypeId.PYLON, near=nexuses.first)

    ## 建造吸收廠
    async def build_assimilators(self):
        for nexus in self.units(UnitTypeId.NEXUS).ready:
            # 在瓦斯泉上建造吸收廠
            vaspenes = self.state.vespene_geyser.closer_than(15.0,nexus)
            for vaspene in vaspenes:
                if not self.can_afford(UnitTypeId.ASSIMILATOR):
                    break
                worker = self.select_build_worker(vaspene.position)
                if worker is None:
                    break
                if not self.units(UnitTypeId.ASSIMILATOR).closer_than(1.0,vaspene).exists:
                    await self.do(worker.build(UnitTypeId.ASSIMILATOR,vaspene))

    ## 開礦
    async def expand(self):
        if self.units(UnitTypeId.NEXUS).amount<3 and self.can_afford(UnitTypeId.NEXUS):
            await self.expand_now()

    ## 建造進攻性建築
    async def offensive_force_buildings(self):
        if self.units(UnitTypeId.PYLON).ready.exists:
            pylon = self.units(UnitTypeId.PYLON).ready.random
            # 根據神族建築科技圖,折躍門建造過後才可以建造控制核心
            if self.units(UnitTypeId.GATEWAY).ready.exists and not self.units(UnitTypeId.CYBERNETICSCORE):
                if self.can_afford(UnitTypeId.CYBERNETICSCORE) and not self.already_pending(UnitTypeId.CYBERNETICSCORE):
                    await self.build(UnitTypeId.CYBERNETICSCORE,near = pylon)
            # 否則建造折躍門
            elif len(self.units(UnitTypeId.GATEWAY))<=3:
                if self.can_afford(UnitTypeId.GATEWAY) and not self.already_pending(UnitTypeId.GATEWAY):
                    await self.build(UnitTypeId.GATEWAY,near=pylon)

    ## 造兵
    async def build_offensive_force(self):
        # 無隊列化建造
        for gw in self.units(UnitTypeId.GATEWAY).ready.noqueue:
            if self.can_afford(UnitTypeId.STALKER) and self.supply_left>0:
                await self.do(gw.train(UnitTypeId.STALKER))

    ## 尋找目標
    def find_target(self,state):
        if len(self.known_enemy_units)>0:
            # 隨機選取敵方單位
            return random.choice(self.known_enemy_units)
        elif len(self.known_enemy_units)>0:
            # 隨機選取敵方建築
            return random.choice(self.known_enemy_structures)
        else:
            # 返回敵方出生點位
            return self.enemy_start_locations[0]

    ## 進攻
    async def attack(self):
        # 追獵者數量超過15個開始進攻
        if self.units(UnitTypeId.STALKER).amount>15:
            for s in self.units(UnitTypeId.STALKER).idle:
                await self.do(s.attack(self.find_target(self.state)))

        # 防衛模式:視野範圍內存在敵人,開始攻擊
        if self.units(UnitTypeId.STALKER).amount>5:
            if len(self.known_enemy_units)>0:
                for s in self.units(UnitTypeId.STALKER).idle:
                    await self.do(s.attack(random.choice(self.known_enemy_units)))

## 啟動遊戲
run_game(maps.get("AcidPlantLE"), [
    Bot(Race.Protoss, SentdeBot()), Computer(Race.Terran, Difficulty.Medium)
], realtime=False)
運行結果如下
可以看到,4個折躍門訓練追獵者並發動進攻。
擊敗困難電腦
我們目前的代碼只能擊敗中等和簡單電腦,那麼如何擊敗困難電腦呢?
代碼如下
import sc2
from sc2 import run_game, maps, Race, Difficulty
from sc2.player import Bot, Computer
from sc2.constants import *
import random


class SentdeBot(sc2.BotAI):
    def __init__(self):
        # 經過計算,每分鐘大約165迭代次數
        self.ITERATIONS_PER_MINUTE = 165
        # 最大农民數量
        self.MAX_WORKERS = 65

    async def on_step(self, iteration: int):
        self.iteration = iteration
        await self.distribute_workers()
        await self.build_workers()
        await self.build_pylons()
        await self.build_assimilators()
        await self.expand()
        await self.offensive_force_buildings()
        await self.build_offensive_force()
        await self.attack()

    # 建造农民
    async def build_workers(self):
        # 星靈樞鈕*16(一個基地配備16個农民)大於農民數量並且現有农民數量小於MAX_WORKERS
        if len(self.units(UnitTypeId.NEXUS))*16>len(self.units(UnitTypeId.PROBE)) and len(self.units(UnitTypeId.PROBE))<self.MAX_WORKERS:
                # 星靈樞紐(NEXUS)無隊列建造,可以提高晶體礦的利用率,不至於佔用資源
                for nexus in self.units(UnitTypeId.NEXUS).ready.noqueue:
                    # 是否有50晶體礦建造农民
                    if self.can_afford(UnitTypeId.PROBE):
                        await self.do(nexus.train(UnitTypeId.PROBE))

    ## 建造水晶
    async def build_pylons(self):
        ## 供應人口和現有人口之差小於5且建築不是正在建造
        if self.supply_left < 5 and not self.already_pending(UnitTypeId.PYLON):
            nexuses = self.units(UnitTypeId.NEXUS).ready
            if nexuses.exists:
                if self.can_afford(UnitTypeId.PYLON):
                    await self.build(UnitTypeId.PYLON, near=nexuses.first)

    ## 建造吸收廠
    async def build_assimilators(self):
        for nexus in self.units(UnitTypeId.NEXUS).ready:
            # 在瓦斯泉上建造吸收廠
            vaspenes = self.state.vespene_geyser.closer_than(15.0,nexus)
            for vaspene in vaspenes:
                if not self.can_afford(UnitTypeId.ASSIMILATOR):
                    break
                worker = self.select_build_worker(vaspene.position)
                if worker is None:
                    break
                if not self.units(UnitTypeId.ASSIMILATOR).closer_than(1.0,vaspene).exists:
                    await self.do(worker.build(UnitTypeId.ASSIMILATOR,vaspene))

    ## 開礦
    async def expand(self):
        # (self.iteration / self.ITERATIONS_PER_MINUTE)是一個緩慢遞增的值,動態開礦
        if self.units(UnitTypeId.NEXUS).amount<self.iteration / self.ITERATIONS_PER_MINUTE and self.can_afford(UnitTypeId.NEXUS):
            await self.expand_now()

    ## 建造進攻性建築
    async def offensive_force_buildings(self):
        print(self.iteration / self.ITERATIONS_PER_MINUTE)
        if self.units(UnitTypeId.PYLON).ready.exists:
            pylon = self.units(UnitTypeId.PYLON).ready.random
            # 根據神族建築科技圖,折躍門建造過後才可以建造控制核心
            if self.units(UnitTypeId.GATEWAY).ready.exists and not self.units(UnitTypeId.CYBERNETICSCORE):
                if self.can_afford(UnitTypeId.CYBERNETICSCORE) and not self.already_pending(UnitTypeId.CYBERNETICSCORE):
                    await self.build(UnitTypeId.CYBERNETICSCORE, near=pylon)
            # 否則建造折躍門
            # (self.iteration / self.ITERATIONS_PER_MINUTE)/2 是一個緩慢遞增的值
            elif len(self.units(UnitTypeId.GATEWAY)) < ((self.iteration / self.ITERATIONS_PER_MINUTE) / 2):
                if self.can_afford(UnitTypeId.GATEWAY) and not self.already_pending(UnitTypeId.GATEWAY):
                    await self.build(UnitTypeId.GATEWAY, near=pylon)
            # 控制核心存在的情況下建造星門
            if self.units(UnitTypeId.CYBERNETICSCORE).ready.exists:
                if len(self.units(UnitTypeId.STARGATE)) < ((self.iteration / self.ITERATIONS_PER_MINUTE) / 2):
                    if self.can_afford(UnitTypeId.STARGATE) and not self.already_pending(UnitTypeId.STARGATE):
                        await self.build(UnitTypeId.STARGATE, near=pylon)

    ## 造兵
    async def build_offensive_force(self):
        # 無隊列化建造
        for gw in self.units(UnitTypeId.GATEWAY).ready.noqueue:
            if not self.units(UnitTypeId.STALKER).amount > self.units(UnitTypeId.VOIDRAY).amount:

                if self.can_afford(UnitTypeId.STALKER) and self.supply_left > 0:
                    await self.do(gw.train(UnitTypeId.STALKER))

        for sg in self.units(UnitTypeId.STARGATE).ready.noqueue:
            if self.can_afford(UnitTypeId.VOIDRAY) and self.supply_left > 0:
                await self.do(sg.train(UnitTypeId.VOIDRAY))

    ## 尋找目標
    def find_target(self,state):
        if len(self.known_enemy_units)>0:
            # 隨機選取敵方單位
            return random.choice(self.known_enemy_units)
        elif len(self.known_enemy_units)>0:
            # 隨機選取敵方建築
            return random.choice(self.known_enemy_structures)
        else:
            # 返回敵方出生點位
            return self.enemy_start_locations[0]

    ## 進攻
    async def attack(self):
        # {UNIT: [n to fight, n to defend]}
        aggressive_units = {UnitTypeId.STALKER: [15, 5],
                            UnitTypeId.VOIDRAY: [8, 3]}

        for UNIT in aggressive_units:
            # 攻擊模式
            if self.units(UNIT).amount > aggressive_units[UNIT][0] and self.units(UNIT).amount > aggressive_units[UNIT][
                1]:
                for s in self.units(UNIT).idle:
                    await self.do(s.attack(self.find_target(self.state)))
            # 防衛模式
            elif self.units(UNIT).amount > aggressive_units[UNIT][1]:
                if len(self.known_enemy_units) > 0:
                    for s in self.units(UNIT).idle:
                        await self.do(s.attack(random.choice(self.known_enemy_units)))
## 啟動遊戲
run_game(maps.get("AcidPlantLE"), [
    Bot(Race.Protoss, SentdeBot()), Computer(Race.Terran, Difficulty.Hard)
], realtime=False)
運行結果如下
可以看到,擊敗了困難人族電腦,但是電腦選擇了rush戰術,我們寫得AI腳本會輸掉遊戲。顯然,這不是最佳方案。
“只有AI才能拯救我的勝率”,請看下文。
採集地圖數據
這次我們只造一個折躍門,全力通過星門造虛空光輝艦
修改offensive_force_buildings(self)方法的判斷
elif len(self.units(GATEWAY)) < 1:
                if self.can_afford(GATEWAY) and not self.already_pending(GATEWAY):
                    await self.build(GATEWAY, near=pylon)
註釋或者刪除build_offensive_force(self)的建造追獵者的代碼
        ## 造兵
    async def build_offensive_force(self):
        # 無隊列化建造
        # for gw in self.units(UnitTypeId.GATEWAY).ready.noqueue:
        #     if not self.units(UnitTypeId.STALKER).amount > self.units(UnitTypeId.VOIDRAY).amount:
        #
        #         if self.can_afford(UnitTypeId.STALKER) and self.supply_left > 0:
        #             await self.do(gw.train(UnitTypeId.STALKER))

        for sg in self.units(UnitTypeId.STARGATE).ready.noqueue:
            if self.can_afford(UnitTypeId.VOIDRAY) and self.supply_left > 0:
                await self.do(sg.train(UnitTypeId.VOIDRAY))
attack(self)中的aggressive_units註釋掉Stalker
導入numpy和cv2庫
game_data = np.zeros((self.game_info.map_size[1], self.game_info.map_size[0], 3), np.uint8)建立以地圖Heigt為行,Width為列的三維矩陣
for nexus in self.units(NEXUS):
            nex_pos = nexus.position
            print(nex_pos)
            cv2.circle(game_data, (int(nex_pos[0]), int(nex_pos[1])), 10, (0, 255, 0), -1)  # BGR
遍歷星靈樞紐,獲取下一個位置,畫圓,circle(承載圓的img, 圓心, 半徑, 顏色, thickness=-1表示填充)
接下來我們要垂直翻轉三維矩陣,因為我們建立的矩陣左上角是原點(0,0),縱坐標向下延申,橫坐標向右延申。翻轉之後就成了正常的坐標系。
flipped = cv2.flip(game_data, 0)圖像縮放,達到可視化最佳。
        resized = cv2.resize(flipped, dsize=None, fx=2, fy=2)
        cv2.imshow('Intel', resized)
        cv2.waitKey(1)
至此,完整代碼如下
import sc2
from sc2 import run_game, maps, Race, Difficulty
from sc2.player import Bot, Computer
from sc2.constants import *
import random
import numpy as np
import cv2


class SentdeBot(sc2.BotAI):
    def __init__(self):
        # 經過計算,每分鐘大約165迭代次數
        self.ITERATIONS_PER_MINUTE = 165
        # 最大农民數量
        self.MAX_WORKERS = 65

    async def on_step(self, iteration: int):
        self.iteration = iteration
        await self.distribute_workers()
        await self.build_workers()
        await self.build_pylons()
        await self.build_assimilators()
        await self.expand()
        await self.offensive_force_buildings()
        await self.build_offensive_force()
        await self.intel()
        await self.attack()

    async def intel(self):
        # 根據地圖建立的三維矩陣
        game_data = np.zeros((self.game_info.map_size[1], self.game_info.map_size[0], 3), np.uint8)
        for nexus in self.units(UnitTypeId.NEXUS):
            nex_pos = nexus.position
            # circle(承載圓的img, 圓心, 半徑, 顏色, thickness=-1表示填充)
            # 記錄星靈樞紐的位置
            cv2.circle(game_data, (int(nex_pos[0]), int(nex_pos[1])), 10, (0, 255, 0), -1)
        # 圖像翻轉垂直鏡像
        flipped = cv2.flip(game_data, 0)
        # 圖像縮放
        # cv2.resize(原圖像,輸出圖像的大小,width方向的縮放比例,height方向縮放的比例)
        resized = cv2.resize(flipped, dsize=None, fx=2, fy=2)
        cv2.imshow('Intel', resized)

        # cv2.waitKey(每Xms刷新圖像)
        cv2.waitKey(1)

    # 建造农民
    async def build_workers(self):
        # 星靈樞鈕*16(一個基地配備16個农民)大於農民數量並且現有农民數量小於MAX_WORKERS
        if len(self.units(UnitTypeId.NEXUS)) * 16 > len(self.units(UnitTypeId.PROBE)) and len(
                self.units(UnitTypeId.PROBE)) < self.MAX_WORKERS:
            # 星靈樞紐(NEXUS)無隊列建造,可以提高晶體礦的利用率,不至於佔用資源
            for nexus in self.units(UnitTypeId.NEXUS).ready.noqueue:
                # 是否有50晶體礦建造农民
                if self.can_afford(UnitTypeId.PROBE):
                    await self.do(nexus.train(UnitTypeId.PROBE))

    ## 建造水晶
    async def build_pylons(self):
        ## 供應人口和現有人口之差小於5且建築不是正在建造
        if self.supply_left < 5 and not self.already_pending(UnitTypeId.PYLON):
            nexuses = self.units(UnitTypeId.NEXUS).ready
            if nexuses.exists:
                if self.can_afford(UnitTypeId.PYLON):
                    await self.build(UnitTypeId.PYLON, near=nexuses.first)

    ## 建造吸收廠
    async def build_assimilators(self):
        for nexus in self.units(UnitTypeId.NEXUS).ready:
            # 在瓦斯泉上建造吸收廠
            vaspenes = self.state.vespene_geyser.closer_than(15.0, nexus)
            for vaspene in vaspenes:
                if not self.can_afford(UnitTypeId.ASSIMILATOR):
                    break
                worker = self.select_build_worker(vaspene.position)
                if worker is None:
                    break
                if not self.units(UnitTypeId.ASSIMILATOR).closer_than(1.0, vaspene).exists:
                    await self.do(worker.build(UnitTypeId.ASSIMILATOR, vaspene))

    ## 開礦
    async def expand(self):
        # (self.iteration / self.ITERATIONS_PER_MINUTE)是一個緩慢遞增的值,動態開礦
        if self.units(UnitTypeId.NEXUS).amount < self.iteration / self.ITERATIONS_PER_MINUTE and self.can_afford(
                UnitTypeId.NEXUS):
            await self.expand_now()

    ## 建造進攻性建築
    async def offensive_force_buildings(self):
        print(self.iteration / self.ITERATIONS_PER_MINUTE)
        if self.units(UnitTypeId.PYLON).ready.exists:
            pylon = self.units(UnitTypeId.PYLON).ready.random
            # 根據神族建築科技圖,折躍門建造過後才可以建造控制核心
            if self.units(UnitTypeId.GATEWAY).ready.exists and not self.units(UnitTypeId.CYBERNETICSCORE):
                if self.can_afford(UnitTypeId.CYBERNETICSCORE) and not self.already_pending(UnitTypeId.CYBERNETICSCORE):
                    await self.build(UnitTypeId.CYBERNETICSCORE, near=pylon)
            # 否則建造折躍門
            # (self.iteration / self.ITERATIONS_PER_MINUTE)/2 是一個緩慢遞增的值
            # elif len(self.units(UnitTypeId.GATEWAY)) < ((self.iteration / self.ITERATIONS_PER_MINUTE) / 2):
            elif len(self.units(UnitTypeId.GATEWAY)) < 1:
                if self.can_afford(UnitTypeId.GATEWAY) and not self.already_pending(UnitTypeId.GATEWAY):
                    await self.build(UnitTypeId.GATEWAY, near=pylon)
            # 控制核心存在的情況下建造星門
            if self.units(UnitTypeId.CYBERNETICSCORE).ready.exists:
                if len(self.units(UnitTypeId.STARGATE)) < ((self.iteration / self.ITERATIONS_PER_MINUTE) / 2):
                    if self.can_afford(UnitTypeId.STARGATE) and not self.already_pending(UnitTypeId.STARGATE):
                        await self.build(UnitTypeId.STARGATE, near=pylon)

    ## 造兵
    async def build_offensive_force(self):
        # 無隊列化建造
        for sg in self.units(UnitTypeId.STARGATE).ready.noqueue:
            if self.can_afford(UnitTypeId.VOIDRAY) and self.supply_left > 0:
                await self.do(sg.train(UnitTypeId.VOIDRAY))

    ## 尋找目標
    def find_target(self, state):
        if len(self.known_enemy_units) > 0:
            # 隨機選取敵方單位
            return random.choice(self.known_enemy_units)
        elif len(self.known_enemy_units) > 0:
            # 隨機選取敵方建築
            return random.choice(self.known_enemy_structures)
        else:
            # 返回敵方出生點位
            return self.enemy_start_locations[0]

    ## 進攻
    async def attack(self):
        # {UNIT: [n to fight, n to defend]}
        aggressive_units = {UnitTypeId.VOIDRAY: [8, 3]}

        for UNIT in aggressive_units:
            # 攻擊模式
            if self.units(UNIT).amount > aggressive_units[UNIT][0] and self.units(UNIT).amount > aggressive_units[UNIT][1]:
                for s in self.units(UNIT).idle:
                    await self.do(s.attack(self.find_target(self.state)))
            # 防衛模式
            elif self.units(UNIT).amount > aggressive_units[UNIT][1]:
                if len(self.known_enemy_units) > 0:
                    for s in self.units(UNIT).idle:
                        await self.do(s.attack(random.choice(self.known_enemy_units)))


## 啟動遊戲
run_game(maps.get("AcidPlantLE"), [
    Bot(Race.Protoss, SentdeBot()), Computer(Race.Terran, Difficulty.Hard)
], realtime=False)
運行結果如下
採集到了地圖位置。
偵察
在intel(self)里創建一個字典draw_dict,UnitTypeId作為key,半徑和顏色是value
        draw_dict = {
            UnitTypeId.NEXUS: [15, (0, 255, 0)],
            UnitTypeId.PYLON: [3, (20, 235, 0)],
            UnitTypeId.PROBE: [1, (55, 200, 0)],
            UnitTypeId.ASSIMILATOR: [2, (55, 200, 0)],
            UnitTypeId.GATEWAY: [3, (200, 100, 0)],
            UnitTypeId.CYBERNETICSCORE: [3, (150, 150, 0)],
            UnitTypeId.STARGATE: [5, (255, 0, 0)],
            UnitTypeId.ROBOTICSFACILITY: [5, (215, 155, 0)],

            UnitTypeId.VOIDRAY: [3, (255, 100, 0)]
        }
迭代同上
for unit_type in draw_dict:
            for unit in self.units(unit_type).ready:
                pos = unit.position
                cv2.circle(game_data, (int(pos[0]), int(pos[1])), draw_dict[unit_type][0], draw_dict[unit_type][1], -1)
存儲三族的主基地名稱(星靈樞紐,指揮中心,孵化場),刻畫敵方建築。
# 主基地名稱
        main_base_names = ["nexus", "supplydepot", "hatchery"]
        # 記錄敵方基地位置
        for enemy_building in self.known_enemy_structures:
            pos = enemy_building.position
            if enemy_building.name.lower() not in main_base_names:
                cv2.circle(game_data, (int(pos[0]), int(pos[1])), 5, (200, 50, 212), -1)
        for enemy_building in self.known_enemy_structures:
            pos = enemy_building.position
            if enemy_building.name.lower() in main_base_names:
                cv2.circle(game_data, (int(pos[0]), int(pos[1])), 15, (0, 0, 255), -1)
刻畫敵方單位,如果是农民畫得小些,其他單位則畫大些。
        for enemy_unit in self.known_enemy_units:

            if not enemy_unit.is_structure:
                worker_names = ["probe", "scv", "drone"]
                # if that unit is a PROBE, SCV, or DRONE... it's a worker
                pos = enemy_unit.position
                if enemy_unit.name.lower() in worker_names:
                    cv2.circle(game_data, (int(pos[0]), int(pos[1])), 1, (55, 0, 155), -1)
                else:
                    cv2.circle(game_data, (int(pos[0]), int(pos[1])), 3, (50, 0, 215), -1)
在offensive_force_buildings(self)方法中添加建造机械台
            if self.units(CYBERNETICSCORE).ready.exists:
                if len(self.units(ROBOTICSFACILITY)) < 1:
                    if self.can_afford(ROBOTICSFACILITY) and not self.already_pending(ROBOTICSFACILITY):
                        await self.build(ROBOTICSFACILITY, near=pylon)
創建scout(),訓練Observer
async def scout(self):
        if len(self.units(OBSERVER)) > 0:
            scout = self.units(OBSERVER)[0]
            if scout.is_idle:
                enemy_location = self.enemy_start_locations[0]
                move_to = self.random_location_variance(enemy_location)
                print(move_to)
                await self.do(scout.move(move_to))

        else:
            for rf in self.units(ROBOTICSFACILITY).ready.noqueue:
                if self.can_afford(OBSERVER) and self.supply_left > 0:
                    await self.do(rf.train(OBSERVER))
生成隨機位置,很簡單。意思是橫坐標累計遞增-0.2和0.2倍的橫坐標,限制條件為如果x超過橫坐標,那麼就是橫坐標最大值。
縱坐標同理。
    def random_location_variance(self, enemy_start_location):
        x = enemy_start_location[0]
        y = enemy_start_location[1]

        x += ((random.randrange(-20, 20))/100) * enemy_start_location[0]
        y += ((random.randrange(-20, 20))/100) * enemy_start_location[1]

        if x < 0:
            x = 0
        if y < 0:
            y = 0
        if x > self.game_info.map_size[0]:
            x = self.game_info.map_size[0]
        if y > self.game_info.map_size[1]:
            y = self.game_info.map_size[1]

        go_to = position.Point2(position.Pointlike((x,y)))
        return go_to
完整代碼如下
# -*- encoding: utf-8 -*-
'''
@File    :   demo.py
@Modify Time      @Author       @Desciption
------------      -------       -----------
2019/11/3 12:32   Jonas           None
'''

import sc2
from sc2 import run_game, maps, Race, Difficulty, position
from sc2.player import Bot, Computer
from sc2.constants import *
import random
import numpy as np
import cv2


class SentdeBot(sc2.BotAI):
    def __init__(self):
        # 經過計算,每分鐘大約165迭代次數
        self.ITERATIONS_PER_MINUTE = 165
        # 最大农民數量
        self.MAX_WORKERS = 50

    async def on_step(self, iteration: int):
        self.iteration = iteration
        await self.scout()
        await self.distribute_workers()
        await self.build_workers()
        await self.build_pylons()
        await self.build_assimilators()
        await self.expand()
        await self.offensive_force_buildings()
        await self.build_offensive_force()
        await self.intel()
        await self.attack()

    ## 偵察
    async def scout(self):
        if len(self.units(UnitTypeId.OBSERVER)) > 0:
            scout = self.units(UnitTypeId.OBSERVER)[0]
            if scout.is_idle:
                enemy_location = self.enemy_start_locations[0]
                move_to = self.random_location_variance(enemy_location)
                print(move_to)
                await self.do(scout.move(move_to))

        else:
            for rf in self.units(UnitTypeId.ROBOTICSFACILITY).ready.noqueue:
                if self.can_afford(UnitTypeId.OBSERVER) and self.supply_left > 0:
                    await self.do(rf.train(UnitTypeId.OBSERVER))

    async def intel(self):
        game_data = np.zeros((self.game_info.map_size[1], self.game_info.map_size[0], 3), np.uint8)

        # UnitTypeId作為key,半徑和顏色是value
        draw_dict = {
            UnitTypeId.NEXUS: [15, (0, 255, 0)],
            UnitTypeId.PYLON: [3, (20, 235, 0)],
            UnitTypeId.PROBE: [1, (55, 200, 0)],
            UnitTypeId.ASSIMILATOR: [2, (55, 200, 0)],
            UnitTypeId.GATEWAY: [3, (200, 100, 0)],
            UnitTypeId.CYBERNETICSCORE: [3, (150, 150, 0)],
            UnitTypeId.STARGATE: [5, (255, 0, 0)],
            UnitTypeId.ROBOTICSFACILITY: [5, (215, 155, 0)],

            UnitTypeId.VOIDRAY: [3, (255, 100, 0)],
            # OBSERVER: [3, (255, 255, 255)],
        }

        for unit_type in draw_dict:
            for unit in self.units(unit_type).ready:
                pos = unit.position
                cv2.circle(game_data, (int(pos[0]), int(pos[1])), draw_dict[unit_type][0], draw_dict[unit_type][1], -1)

        # 主基地名稱
        main_base_names = ["nexus", "supplydepot", "hatchery"]
        # 記錄敵方基地位置
        for enemy_building in self.known_enemy_structures:
            pos = enemy_building.position
            # 不是主基地建築,畫小一些
            if enemy_building.name.lower() not in main_base_names:
                cv2.circle(game_data, (int(pos[0]), int(pos[1])), 5, (200, 50, 212), -1)
        for enemy_building in self.known_enemy_structures:
            pos = enemy_building.position
            if enemy_building.name.lower() in main_base_names:
                cv2.circle(game_data, (int(pos[0]), int(pos[1])), 15, (0, 0, 255), -1)

        for enemy_unit in self.known_enemy_units:

            if not enemy_unit.is_structure:
                worker_names = ["probe", "scv", "drone"]
                # if that unit is a PROBE, SCV, or DRONE... it's a worker
                pos = enemy_unit.position
                if enemy_unit.name.lower() in worker_names:
                    cv2.circle(game_data, (int(pos[0]), int(pos[1])), 1, (55, 0, 155), -1)
                else:
                    cv2.circle(game_data, (int(pos[0]), int(pos[1])), 3, (50, 0, 215), -1)

        for obs in self.units(UnitTypeId.OBSERVER).ready:
            pos = obs.position
            cv2.circle(game_data, (int(pos[0]), int(pos[1])), 1, (255, 255, 255), -1)

        # flip horizontally to make our final fix in visual representation:
        flipped = cv2.flip(game_data, 0)
        resized = cv2.resize(flipped, dsize=None, fx=2, fy=2)

        cv2.imshow('Intel', resized)
        cv2.waitKey(1)

    def random_location_variance(self, enemy_start_location):
        x = enemy_start_location[0]
        y = enemy_start_location[1]

        x += ((random.randrange(-20, 20)) / 100) * enemy_start_location[0]
        y += ((random.randrange(-20, 20)) / 100) * enemy_start_location[1]

        if x < 0:
            x = 0
        if y < 0:
            y = 0
        if x > self.game_info.map_size[0]:
            x = self.game_info.map_size[0]
        if y > self.game_info.map_size[1]:
            y = self.game_info.map_size[1]

        go_to = position.Point2(position.Pointlike((x, y)))
        return go_to

    # 建造农民
    async def build_workers(self):
        # 星靈樞鈕*16(一個基地配備16個农民)大於農民數量並且現有农民數量小於MAX_WORKERS
        if len(self.units(UnitTypeId.NEXUS)) * 16 > len(self.units(UnitTypeId.PROBE)) and len(
                self.units(UnitTypeId.PROBE)) < self.MAX_WORKERS:
            # 星靈樞紐(NEXUS)無隊列建造,可以提高晶體礦的利用率,不至於佔用資源
            for nexus in self.units(UnitTypeId.NEXUS).ready.noqueue:
                # 是否有50晶體礦建造农民
                if self.can_afford(UnitTypeId.PROBE):
                    await self.do(nexus.train(UnitTypeId.PROBE))

    ## 建造水晶
    async def build_pylons(self):
        ## 供應人口和現有人口之差小於5且建築不是正在建造
        if self.supply_left < 5 and not self.already_pending(UnitTypeId.PYLON):
            nexuses = self.units(UnitTypeId.NEXUS).ready
            if nexuses.exists:
                if self.can_afford(UnitTypeId.PYLON):
                    await self.build(UnitTypeId.PYLON, near=nexuses.first)

    ## 建造吸收廠
    async def build_assimilators(self):
        for nexus in self.units(UnitTypeId.NEXUS).ready:
            # 在瓦斯泉上建造吸收廠
            vaspenes = self.state.vespene_geyser.closer_than(15.0, nexus)
            for vaspene in vaspenes:
                if not self.can_afford(UnitTypeId.ASSIMILATOR):
                    break
                worker = self.select_build_worker(vaspene.position)
                if worker is None:
                    break
                if not self.units(UnitTypeId.ASSIMILATOR).closer_than(1.0, vaspene).exists:
                    await self.do(worker.build(UnitTypeId.ASSIMILATOR, vaspene))

    ## 開礦
    async def expand(self):
        # (self.iteration / self.ITERATIONS_PER_MINUTE)是一個緩慢遞增的值,動態開礦
        if self.units(UnitTypeId.NEXUS).amount < self.iteration / self.ITERATIONS_PER_MINUTE and self.can_afford(
                UnitTypeId.NEXUS):
            await self.expand_now()

    ## 建造進攻性建築
    async def offensive_force_buildings(self):
        print(self.iteration / self.ITERATIONS_PER_MINUTE)
        if self.units(UnitTypeId.PYLON).ready.exists:
            pylon = self.units(UnitTypeId.PYLON).ready.random
            # 根據神族建築科技圖,折躍門建造過後才可以建造控制核心
            if self.units(UnitTypeId.GATEWAY).ready.exists and not self.units(UnitTypeId.CYBERNETICSCORE):
                if self.can_afford(UnitTypeId.CYBERNETICSCORE) and not self.already_pending(UnitTypeId.CYBERNETICSCORE):
                    await self.build(UnitTypeId.CYBERNETICSCORE, near=pylon)
            # 否則建造折躍門
            # (self.iteration / self.ITERATIONS_PER_MINUTE)/2 是一個緩慢遞增的值
            # elif len(self.units(UnitTypeId.GATEWAY)) < ((self.iteration / self.ITERATIONS_PER_MINUTE) / 2):
            elif len(self.units(UnitTypeId.GATEWAY)) < 1:
                if self.can_afford(UnitTypeId.GATEWAY) and not self.already_pending(UnitTypeId.GATEWAY):
                    await self.build(UnitTypeId.GATEWAY, near=pylon)
            # 控制核心存在的情況下建造机械台
            if self.units(UnitTypeId.CYBERNETICSCORE).ready.exists:
                if len(self.units(UnitTypeId.ROBOTICSFACILITY)) < 1:
                    if self.can_afford(UnitTypeId.ROBOTICSFACILITY) and not self.already_pending(
                            UnitTypeId.ROBOTICSFACILITY):
                        await self.build(UnitTypeId.ROBOTICSFACILITY, near=pylon)

            # 控制核心存在的情況下建造星門
            if self.units(UnitTypeId.CYBERNETICSCORE).ready.exists:
                if len(self.units(UnitTypeId.STARGATE)) < ((self.iteration / self.ITERATIONS_PER_MINUTE) / 2):
                    if self.can_afford(UnitTypeId.STARGATE) and not self.already_pending(UnitTypeId.STARGATE):
                        await self.build(UnitTypeId.STARGATE, near=pylon)

    ## 造兵
    async def build_offensive_force(self):
        # 無隊列化建造
        # for gw in self.units(UnitTypeId.GATEWAY).ready.noqueue:
        #     if not self.units(UnitTypeId.STALKER).amount > self.units(UnitTypeId.VOIDRAY).amount:
        #
        #         if self.can_afford(UnitTypeId.STALKER) and self.supply_left > 0:
        #             await self.do(gw.train(UnitTypeId.STALKER))

        for sg in self.units(UnitTypeId.STARGATE).ready.noqueue:
            if self.can_afford(UnitTypeId.VOIDRAY) and self.supply_left > 0:
                await self.do(sg.train(UnitTypeId.VOIDRAY))

    ## 尋找目標
    def find_target(self, state):
        if len(self.known_enemy_units) > 0:
            # 隨機選取敵方單位
            return random.choice(self.known_enemy_units)
        elif len(self.known_enemy_units) > 0:
            # 隨機選取敵方建築
            return random.choice(self.known_enemy_structures)
        else:
            # 返回敵方出生點位
            return self.enemy_start_locations[0]

    ## 進攻
    async def attack(self):
        # {UNIT: [n to fight, n to defend]}
        aggressive_units = {UnitTypeId.VOIDRAY: [8, 3]}

        for UNIT in aggressive_units:
            # 攻擊模式
            if self.units(UNIT).amount > aggressive_units[UNIT][0] and self.units(UNIT).amount > aggressive_units[UNIT][
                1]:
                for s in self.units(UNIT).idle:
                    await self.do(s.attack(self.find_target(self.state)))
            # 防衛模式
            elif self.units(UNIT).amount > aggressive_units[UNIT][1]:
                if len(self.known_enemy_units) > 0:
                    for s in self.units(UNIT).idle:
                        await self.do(s.attack(random.choice(self.known_enemy_units)))


## 啟動遊戲
run_game(maps.get("AcidPlantLE"), [
    Bot(Race.Protoss, SentdeBot()), Computer(Race.Terran, Difficulty.Hard)
], realtime=False)
運行結果如下,紅色和粉紅色是敵方單位。
創建訓練數據
統計資源、人口和軍隊人口比,在intel方法添加如下代碼
        # 追蹤資源、人口和軍隊人口比
        line_max = 50
        mineral_ratio = self.minerals / 1500
        if mineral_ratio > 1.0:
            mineral_ratio = 1.0

        vespene_ratio = self.vespene / 1500
        if vespene_ratio > 1.0:
            vespene_ratio = 1.0

        population_ratio = self.supply_left / self.supply_cap
        if population_ratio > 1.0:
            population_ratio = 1.0

        plausible_supply = self.supply_cap / 200.0

        military_weight = len(self.units(UnitTypeId.VOIDRAY)) / (self.supply_cap - self.supply_left)
        if military_weight > 1.0:
            military_weight = 1.0

        # 农民/人口      worker/supply ratio
        cv2.line(game_data, (0, 19), (int(line_max * military_weight), 19), (250, 250, 200), 3)
        # 人口/200    plausible supply (supply/200.0)
        cv2.line(game_data, (0, 15), (int(line_max * plausible_supply), 15), (220, 200, 200), 3)
        # (人口-現有人口)/人口  population ratio (supply_left/supply)
        cv2.line(game_data, (0, 11), (int(line_max * population_ratio), 11), (150, 150, 150), 3)
        # 氣體/1500   gas/1500
        cv2.line(game_data, (0, 7), (int(line_max * vespene_ratio), 7), (210, 200, 0), 3)
        # 晶體礦/1500  minerals minerals/1500
        cv2.line(game_data, (0, 3), (int(line_max * mineral_ratio), 3), (0, 255, 25), 3)
運行結果如下,左下角自上而下依次是“农民/人口”,“人口/200”,“(人口-現有人口)/人口”,“氣體/1500”,“晶體礦/1500”
採集進攻行為數據,在attack方法中加入如下代碼
        if len(self.units(UnitTypeId.VOIDRAY).idle) > 0:
            choice = random.randrange(0, 4)
            target = False
            if self.iteration > self.do_something_after:
                if choice == 0:
                    # 什麼都不做
                    wait = random.randrange(20, 165)
                    self.do_something_after = self.iteration + wait

                elif choice == 1:
                    # 攻擊離星靈樞紐最近的單位
                    if len(self.known_enemy_units) > 0:
                        target = self.known_enemy_units.closest_to(random.choice(self.units(UnitTypeId.NEXUS)))

                elif choice == 2:
                    # 攻擊敵方建築
                    if len(self.known_enemy_structures) > 0:
                        target = random.choice(self.known_enemy_structures)

                elif choice == 3:
                    # 攻擊敵方出生位置
                    target = self.enemy_start_locations[0]

                if target:
                    for vr in self.units(UnitTypeId.VOIDRAY).idle:
                        await self.do(vr.attack(target))
                y = np.zeros(4)
                y[choice] = 1
                print(y)
                self.train_data.append([y, self.flipped])
輸出如下結果
···
[1. 0. 0. 0.]
[0. 0. 1. 0.]
[0. 0. 0. 1.]
[0. 0. 1. 0.]
[1. 0. 0. 0.]
···
為了使用self.flipped = cv2.flip(game_data, 0),修改
        flipped = cv2.flip(game_data, 0)
        resized = cv2.resize(flipped, dsize=None, fx=2, fy=2)
為
        self.flipped = cv2.flip(game_data, 0)
        resized = cv2.resize(self.flipped, dsize=None, fx=2, fy=2)
init 方法添加do_something_after和train_data
    def __init__(self):
        self.ITERATIONS_PER_MINUTE = 165
        self.MAX_WORKERS = 50
        self.do_something_after = 0
self.train_data = []採集攻擊數據的時候不需要畫圖,我們在類前加HEADLESS = False,intel方法代碼修改如下
        self.flipped = cv2.flip(game_data, 0)

        if not HEADLESS:
            resized = cv2.resize(self.flipped, dsize=None, fx=2, fy=2)
            cv2.imshow('Intel', resized)
            cv2.waitKey(1)
加入on_end方法,只存儲勝利的數據,在和代碼同級目錄新建train_data文件夾
    def on_end(self, game_result):
        print('--- on_end called ---')
        print(game_result)

        if game_result == Result.Victory:
            np.save("train_data/{}.npy".format(str(int(time.time()))), np.array(self.train_data))
完整代碼如下
import os
import time

import sc2
from sc2 import run_game, maps, Race, Difficulty, position, Result
from sc2.player import Bot, Computer
from sc2.constants import *
import random
import numpy as np
import cv2

HEADLESS = True
# os.environ["SC2PATH"] = 'F:\StarCraft II'

class SentdeBot(sc2.BotAI):
    def __init__(self):
        # 經過計算,每分鐘大約165迭代次數
        self.ITERATIONS_PER_MINUTE = 165
        # 最大农民數量
        self.MAX_WORKERS = 50
        self.do_something_after = 0
        self.train_data = []

    def on_end(self, game_result):
        print('--- on_end called ---')
        print(game_result)

        if game_result == Result.Victory:
            np.save("train_data/{}.npy".format(str(int(time.time()))), np.array(self.train_data))

    async def on_step(self, iteration: int):
        self.iteration = iteration
        await self.scout()
        await self.distribute_workers()
        await self.build_workers()
        await self.build_pylons()
        await self.build_assimilators()
        await self.expand()
        await self.offensive_force_buildings()
        await self.build_offensive_force()
        await self.intel()
        await self.attack()

    ## 偵察
    async def scout(self):
        if len(self.units(UnitTypeId.OBSERVER)) > 0:
            scout = self.units(UnitTypeId.OBSERVER)[0]
            if scout.is_idle:
                enemy_location = self.enemy_start_locations[0]
                move_to = self.random_location_variance(enemy_location)
                print(move_to)
                await self.do(scout.move(move_to))

        else:
            for rf in self.units(UnitTypeId.ROBOTICSFACILITY).ready.noqueue:
                if self.can_afford(UnitTypeId.OBSERVER) and self.supply_left > 0:
                    await self.do(rf.train(UnitTypeId.OBSERVER))

    async def intel(self):
        game_data = np.zeros((self.game_info.map_size[1], self.game_info.map_size[0], 3), np.uint8)

        # UnitTypeId作為key,半徑和顏色是value
        draw_dict = {
            UnitTypeId.NEXUS: [15, (0, 255, 0)],
            UnitTypeId.PYLON: [3, (20, 235, 0)],
            UnitTypeId.PROBE: [1, (55, 200, 0)],
            UnitTypeId.ASSIMILATOR: [2, (55, 200, 0)],
            UnitTypeId.GATEWAY: [3, (200, 100, 0)],
            UnitTypeId.CYBERNETICSCORE: [3, (150, 150, 0)],
            UnitTypeId.STARGATE: [5, (255, 0, 0)],
            UnitTypeId.ROBOTICSFACILITY: [5, (215, 155, 0)],

            UnitTypeId.VOIDRAY: [3, (255, 100, 0)],
            # OBSERVER: [3, (255, 255, 255)],
        }

        for unit_type in draw_dict:
            for unit in self.units(unit_type).ready:
                pos = unit.position
                cv2.circle(game_data, (int(pos[0]), int(pos[1])), draw_dict[unit_type][0], draw_dict[unit_type][1], -1)

        # 主基地名稱
        main_base_names = ["nexus", "supplydepot", "hatchery"]
        # 記錄敵方基地位置
        for enemy_building in self.known_enemy_structures:
            pos = enemy_building.position
            # 不是主基地建築,畫小一些
            if enemy_building.name.lower() not in main_base_names:
                cv2.circle(game_data, (int(pos[0]), int(pos[1])), 5, (200, 50, 212), -1)
        for enemy_building in self.known_enemy_structures:
            pos = enemy_building.position
            if enemy_building.name.lower() in main_base_names:
                cv2.circle(game_data, (int(pos[0]), int(pos[1])), 15, (0, 0, 255), -1)

        for enemy_unit in self.known_enemy_units:

            if not enemy_unit.is_structure:
                worker_names = ["probe", "scv", "drone"]
                # if that unit is a PROBE, SCV, or DRONE... it's a worker
                pos = enemy_unit.position
                if enemy_unit.name.lower() in worker_names:
                    cv2.circle(game_data, (int(pos[0]), int(pos[1])), 1, (55, 0, 155), -1)
                else:
                    cv2.circle(game_data, (int(pos[0]), int(pos[1])), 3, (50, 0, 215), -1)

        for obs in self.units(UnitTypeId.OBSERVER).ready:
            pos = obs.position
            cv2.circle(game_data, (int(pos[0]), int(pos[1])), 1, (255, 255, 255), -1)


        # 追蹤資源、人口和軍隊人口比
        line_max = 50
        mineral_ratio = self.minerals / 1500
        if mineral_ratio > 1.0:
            mineral_ratio = 1.0

        vespene_ratio = self.vespene / 1500
        if vespene_ratio > 1.0:
            vespene_ratio = 1.0

        population_ratio = self.supply_left / self.supply_cap
        if population_ratio > 1.0:
            population_ratio = 1.0

        plausible_supply = self.supply_cap / 200.0

        military_weight = len(self.units(UnitTypeId.VOIDRAY)) / (self.supply_cap - self.supply_left)
        if military_weight > 1.0:
            military_weight = 1.0

        # 农民/人口      worker/supply ratio
        cv2.line(game_data, (0, 19), (int(line_max * military_weight), 19), (250, 250, 200), 3)
        # 人口/200    plausible supply (supply/200.0)
        cv2.line(game_data, (0, 15), (int(line_max * plausible_supply), 15), (220, 200, 200), 3)
        # (人口-現有人口)/人口  population ratio (supply_left/supply)
        cv2.line(game_data, (0, 11), (int(line_max * population_ratio), 11), (150, 150, 150), 3)
        # 氣體/1500   gas/1500
        cv2.line(game_data, (0, 7), (int(line_max * vespene_ratio), 7), (210, 200, 0), 3)
        # 晶體礦/1500  minerals minerals/1500
        cv2.line(game_data, (0, 3), (int(line_max * mineral_ratio), 3), (0, 255, 25), 3)


        # flip horizontally to make our final fix in visual representation:
        self.flipped = cv2.flip(game_data, 0)

        if HEADLESS:
            resized = cv2.resize(self.flipped, dsize=None, fx=2, fy=2)

            cv2.imshow('Intel', resized)
            cv2.waitKey(1)

    def random_location_variance(self, enemy_start_location):
        x = enemy_start_location[0]
        y = enemy_start_location[1]

        x += ((random.randrange(-20, 20)) / 100) * enemy_start_location[0]
        y += ((random.randrange(-20, 20)) / 100) * enemy_start_location[1]

        if x < 0:
            x = 0
        if y < 0:
            y = 0
        if x > self.game_info.map_size[0]:
            x = self.game_info.map_size[0]
        if y > self.game_info.map_size[1]:
            y = self.game_info.map_size[1]

        go_to = position.Point2(position.Pointlike((x, y)))
        return go_to

    # 建造农民
    async def build_workers(self):
        # 星靈樞鈕*16(一個基地配備16個农民)大於農民數量並且現有农民數量小於MAX_WORKERS
        if len(self.units(UnitTypeId.NEXUS)) * 16 > len(self.units(UnitTypeId.PROBE)) and len(
                self.units(UnitTypeId.PROBE)) < self.MAX_WORKERS:
            # 星靈樞紐(NEXUS)無隊列建造,可以提高晶體礦的利用率,不至於佔用資源
            for nexus in self.units(UnitTypeId.NEXUS).ready.noqueue:
                # 是否有50晶體礦建造农民
                if self.can_afford(UnitTypeId.PROBE):
                    await self.do(nexus.train(UnitTypeId.PROBE))

    ## 建造水晶
    async def build_pylons(self):
        ## 供應人口和現有人口之差小於5且建築不是正在建造
        if self.supply_left < 5 and not self.already_pending(UnitTypeId.PYLON):
            nexuses = self.units(UnitTypeId.NEXUS).ready
            if nexuses.exists:
                if self.can_afford(UnitTypeId.PYLON):
                    await self.build(UnitTypeId.PYLON, near=nexuses.first)

    ## 建造吸收廠
    async def build_assimilators(self):
        for nexus in self.units(UnitTypeId.NEXUS).ready:
            # 在瓦斯泉上建造吸收廠
            vaspenes = self.state.vespene_geyser.closer_than(15.0, nexus)
            for vaspene in vaspenes:
                if not self.can_afford(UnitTypeId.ASSIMILATOR):
                    break
                worker = self.select_build_worker(vaspene.position)
                if worker is None:
                    break
                if not self.units(UnitTypeId.ASSIMILATOR).closer_than(1.0, vaspene).exists:
                    await self.do(worker.build(UnitTypeId.ASSIMILATOR, vaspene))

    ## 開礦
    async def expand(self):
        # (self.iteration / self.ITERATIONS_PER_MINUTE)是一個緩慢遞增的值,動態開礦
        if self.units(UnitTypeId.NEXUS).amount < self.iteration / self.ITERATIONS_PER_MINUTE and self.can_afford(
                UnitTypeId.NEXUS):
            await self.expand_now()

    ## 建造進攻性建築
    async def offensive_force_buildings(self):
        # print(self.iteration / self.ITERATIONS_PER_MINUTE)
        if self.units(UnitTypeId.PYLON).ready.exists:
            pylon = self.units(UnitTypeId.PYLON).ready.random
            # 根據神族建築科技圖,折躍門建造過後才可以建造控制核心
            if self.units(UnitTypeId.GATEWAY).ready.exists and not self.units(UnitTypeId.CYBERNETICSCORE):
                if self.can_afford(UnitTypeId.CYBERNETICSCORE) and not self.already_pending(UnitTypeId.CYBERNETICSCORE):
                    await self.build(UnitTypeId.CYBERNETICSCORE, near=pylon)
            # 否則建造折躍門
            # (self.iteration / self.ITERATIONS_PER_MINUTE)/2 是一個緩慢遞增的值
            # elif len(self.units(UnitTypeId.GATEWAY)) < ((self.iteration / self.ITERATIONS_PER_MINUTE) / 2):
            elif len(self.units(UnitTypeId.GATEWAY)) < 1:
                if self.can_afford(UnitTypeId.GATEWAY) and not self.already_pending(UnitTypeId.GATEWAY):
                    await self.build(UnitTypeId.GATEWAY, near=pylon)
            # 控制核心存在的情況下建造机械台
            if self.units(UnitTypeId.CYBERNETICSCORE).ready.exists:
                if len(self.units(UnitTypeId.ROBOTICSFACILITY)) < 1:
                    if self.can_afford(UnitTypeId.ROBOTICSFACILITY) and not self.already_pending(
                            UnitTypeId.ROBOTICSFACILITY):
                        await self.build(UnitTypeId.ROBOTICSFACILITY, near=pylon)

            # 控制核心存在的情況下建造星門
            if self.units(UnitTypeId.CYBERNETICSCORE).ready.exists:
                if len(self.units(UnitTypeId.STARGATE)) < ((self.iteration / self.ITERATIONS_PER_MINUTE) / 2):
                    if self.can_afford(UnitTypeId.STARGATE) and not self.already_pending(UnitTypeId.STARGATE):
                        await self.build(UnitTypeId.STARGATE, near=pylon)

    ## 造兵
    async def build_offensive_force(self):
        # 無隊列化建造
        # for gw in self.units(UnitTypeId.GATEWAY).ready.noqueue:
        #     if not self.units(UnitTypeId.STALKER).amount > self.units(UnitTypeId.VOIDRAY).amount:
        #
        #         if self.can_afford(UnitTypeId.STALKER) and self.supply_left > 0:
        #             await self.do(gw.train(UnitTypeId.STALKER))

        for sg in self.units(UnitTypeId.STARGATE).ready.noqueue:
            if self.can_afford(UnitTypeId.VOIDRAY) and self.supply_left > 0:
                await self.do(sg.train(UnitTypeId.VOIDRAY))

    ## 尋找目標
    def find_target(self, state):
        if len(self.known_enemy_units) > 0:
            # 隨機選取敵方單位
            return random.choice(self.known_enemy_units)
        elif len(self.known_enemy_units) > 0:
            # 隨機選取敵方建築
            return random.choice(self.known_enemy_structures)
        else:
            # 返回敵方出生點位
            return self.enemy_start_locations[0]

    ## 進攻
    async def attack(self):
        if len(self.units(UnitTypeId.VOIDRAY).idle) > 0:
            choice = random.randrange(0, 4)
            target = False
            if self.iteration > self.do_something_after:
                if choice == 0:
                    # 什麼都不做
                    wait = random.randrange(20, 165)
                    self.do_something_after = self.iteration + wait

                elif choice == 1:
                    # 攻擊離星靈樞紐最近的單位
                    if len(self.known_enemy_units) > 0:
                        target = self.known_enemy_units.closest_to(random.choice(self.units(UnitTypeId.NEXUS)))

                elif choice == 2:
                    # 攻擊敵方建築
                    if len(self.known_enemy_structures) > 0:
                        target = random.choice(self.known_enemy_structures)

                elif choice == 3:
                    # 攻擊敵方出生位置
                    target = self.enemy_start_locations[0]

                if target:
                    for vr in self.units(UnitTypeId.VOIDRAY).idle:
                        await self.do(vr.attack(target))
                y = np.zeros(4)
                y[choice] = 1
                print(y)
                self.train_data.append([y, self.flipped])


## 啟動遊戲
run_game(maps.get("AcidPlantLE"), [
    Bot(Race.Protoss, SentdeBot()), Computer(Race.Terran, Difficulty.Medium)
], realtime=False)
可以看到train_data文件夾下存儲了勝利數據
本站聲明:網站內容來源於博客園,如有侵權,請聯繫我們,我們將及時處理【其他文章推薦】
※台北網頁設計公司這麼多,該如何挑選?? 網頁設計報價省錢懶人包"嚨底家"
※網頁設計公司推薦更多不同的設計風格,搶佔消費者視覺第一線
※想知道購買電動車哪裡補助最多?台中電動車補助資訊懶人包彙整


 為了促進電動車等環保車型的普及,德國為每位購買電動車的消費者提供4000歐元的補貼,插電式混合動力車的補貼為3000歐元。在計畫實施後,有1791位插電式混合動力車的車主申請了補貼,其中有581位購買了寶馬的車型。同時還有444位申請者購買了雷諾車型,大眾汽車買主為154位。 據統計,目前德國人汽車擁有量為4500萬輛,而其中僅有5萬輛是純電動或者是混合動力車輛。為改善這一情況,德國此次計畫共投入12億歐元,由政府和汽車製造商平攤,希望能夠在2019年6月底,即計畫截止期前售出40萬輛電動車。 文章來源:環球網
 近日,美國專利商標局通過了一批蘋果公司的新專利,其中一項專利顯示了一種採用履帶以及軌槽設計的交通工具草圖。這項專利其實是兩個貨箱之間的接駁原理,駕駛員可以在極端寒冷空氣條件下,直接,通過加熱裝置,控制第一個車廂的轉向構件及包括一個連接機制的第二個車廂。 據悉,這項專利由瑞典軍用坦克製造商BAE公司授權給蘋果,因此至少目前來看肯定不會被使用在普通的消費和商業領域。 文章來源:騰訊數碼