在應用開發過程中經常需要對其他應用或者客戶端提供 RESTful API 接口,尤其是在版本快速迭代的開發過程中,修改接口的同時還需要同步修改對應的接口文檔,這使我們總是做着重複的工作,並且如果忘記修改接口文檔,就可能造成不必要的麻煩。
為了解決這些問題,Swagger 就孕育而生了,那讓我們先簡單了解下。
Swagger 簡介
Swagger 是一個規範和完整的框架,用於生成、描述、調用和可視化 RESTful 風格的 Web 服務。
總體目標是使客戶端和文件系統作為服務器,以同樣的速度來更新。文件的方法、參數和模型緊密集成到服務器端的代碼中,允許 API 始終保持同步。
下面我們在 Spring Boot 中集成 Swagger 來構建強大的接口文檔。
Spring Boot 集成 Swagger
Spring Boot 集成 Swagger 主要分為以下三步:
- 加入 Swagger 依賴
- 加入 Swagger 文檔配置
- 使用 Swagger 註解編寫 API 文檔
加入依賴
首先創建一個項目,在項目中加入 Swagger 依賴,項目依賴如下所示:
        <dependency>
            <groupId>org.springframework.boot</groupId>
            <artifactId>spring-boot-starter-web</artifactId>
        </dependency>
        <dependency>
            <groupId>io.springfox</groupId>
            <artifactId>springfox-swagger2</artifactId>
            <version>2.9.2</version>
        </dependency>
        <dependency>
            <groupId>io.springfox</groupId>
            <artifactId>springfox-swagger-ui</artifactId>
            <version>2.9.2</version>
        </dependency>
加入配置
接下來在 config 包下創建一個 Swagger 配置類 Swagger2Configuration,在配置類上加入註解 @EnableSwagger2,表明開啟 Swagger,注入一個 Docket 類來配置一些 API 相關信息,apiInfo() 方法內定義了幾個文檔信息,代碼如下:
@Configuration
@EnableSwagger2
public class Swagger2Configuration {

    @Bean
    public Docket createRestApi() {
        return new Docket(DocumentationType.SWAGGER_2)
                .apiInfo(apiInfo())
                .select()
                // swagger 文檔掃描的包
                .apis(RequestHandlerSelectors.basePackage("com.wupx.interfacedoc.controller"))
                .paths(PathSelectors.any())
                .build();
    }

    private ApiInfo apiInfo() {
        return new ApiInfoBuilder()
                .title("測試接口列表")
                .description("Swagger2 接口文檔")
                .version("v1.0.0")
                .contact(new Contact("wupx", "https://www.tianheyu.top", "wupx@qq.com"))
                .license("Apache License, Version 2.0")
                .licenseUrl("http://www.apache.org/licenses/LICENSE-2.0.html")
                .build();
    }
}
列舉其中幾個文檔信息說明下:
- title:接口文檔的標題
- description:接口文檔的詳細描述
- termsOfServiceUrl:一般用於存放公司的地址
- version:API 文檔的版本號
- contact:維護人、維護人 URL 以及 email
- license:許可證
- licenseUrl:許可證 URL
編寫 API 文檔
在 domain 包下創建一個 User 實體類,使用 @ApiModel 註解表明這是一個 Swagger 返回的實體,@ApiModelProperty 註解表明幾個實體的屬性,代碼如下(其中 getter/setter 省略不显示):
@ApiModel(value = "用戶", description = "用戶實體類")
public class User {

    @ApiModelProperty(value = "用戶 id", hidden = true)
    private Long id;

    @ApiModelProperty(value = "用戶姓名")
    private String name;

    @ApiModelProperty(value = "用戶年齡")
    private String age;

    // getter/setter
}
最後,在 controller 包下創建一個 UserController 類,提供用戶 API 接口(未使用數據庫),代碼如下:
@RestController
@RequestMapping("/users")
@Api(tags = "用戶管理接口")
public class UserController {

    Map<Long, User> users = Collections.synchronizedMap(new HashMap<>());

    @GetMapping("/")
    @ApiOperation(value = "獲取用戶列表", notes = "獲取用戶列表")
    public List<User> getUserList() {
        return new ArrayList<>(users.values());
    }

    @PostMapping("/")
    @ApiOperation(value = "創建用戶")
    public String addUser(@RequestBody User user) {
        users.put(user.getId(), user);
        return "success";
    }

    @GetMapping("/{id}")
    @ApiOperation(value = "獲取指定 id 的用戶")
    @ApiImplicitParam(name = "id", value = "用戶 id", paramType = "query", dataTypeClass = Long.class, defaultValue = "999", required = true)
    public User getUserById(@PathVariable Long id) {
        return users.get(id);
    }

    @PutMapping("/{id}")
    @ApiOperation(value = "根據 id 更新用戶")
    @ApiImplicitParams({
            @ApiImplicitParam(name = "id", value = "用戶 id", defaultValue = "1"),
            @ApiImplicitParam(name = "name", value = "用戶姓名", defaultValue = "wupx"),
            @ApiImplicitParam(name = "age", value = "用戶年齡", defaultValue = "18")
    })
    public User updateUserById(@PathVariable Long id, @RequestParam String name, @RequestParam Integer age) {
        User user = users.get(id);
        user.setName(name);
        user.setAge(age);
        return user;
    }

    @DeleteMapping("/{id}")
    @ApiOperation(value = "刪除用戶", notes = "根據 id 刪除用戶")
    @ApiImplicitParam(name = "id", value = "用戶 id", dataTypeClass = Long.class, required = true)
    public String deleteUserById(@PathVariable Long id) {
        users.remove(id);
        return "success";
    }
}
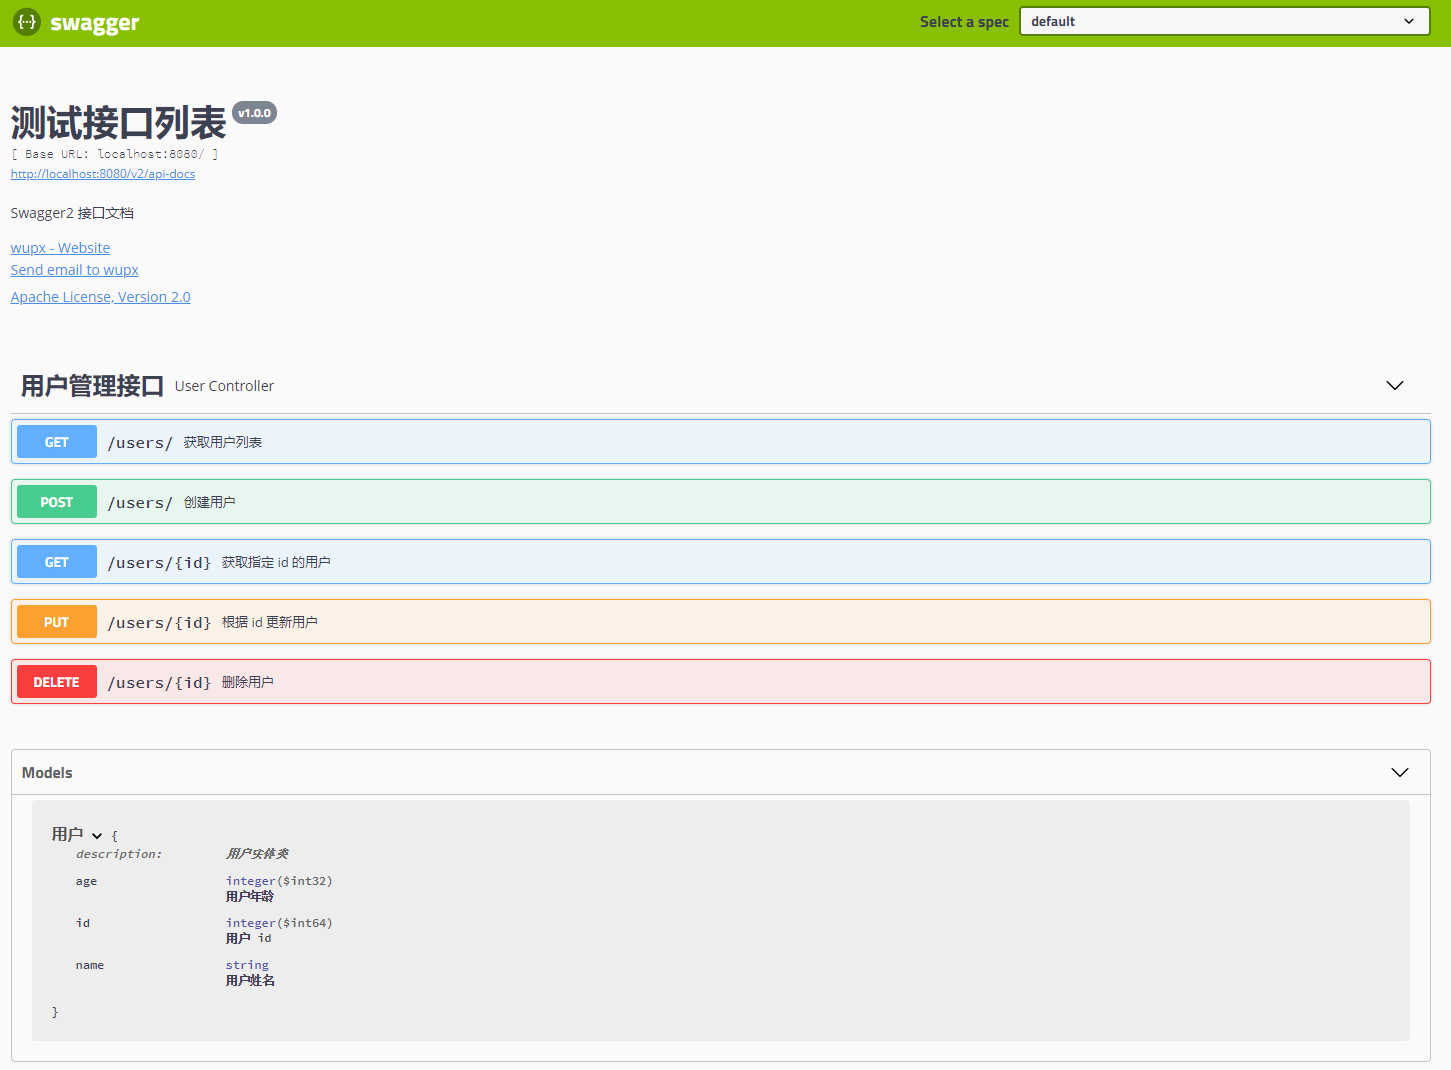
啟動項目,訪問 http://localhost:8080/swagger-ui.html,可以看到我們定義的文檔已經在 Swagger 頁面上显示了,如下圖所示:
到此為止,我們就完成了 Spring Boot 與 Swagger 的集成。
同時 Swagger 除了接口文檔功能外,還提供了接口調試功能,以創建用戶接口為例,單擊創建用戶接口,可以看到接口定義的參數、返回值、響應碼等,單擊 Try it out 按鈕,然後點擊 Execute 就可以發起調用請求、創建用戶,如下圖所示:
註解介紹
由於 Swagger 2 提供了非常多的註解供開發使用,這裏列舉一些比較常用的註解。
@Api
@Api 用在接口文檔資源類上,用於標記當前類為 Swagger 的文檔資源,其中含有幾個常用屬性:
- value:定義當前接口文檔的名稱。
- description:用於定義當前接口文檔的介紹。
- tag:可以使用多個名稱來定義文檔,但若同時存在 tag 屬性和 value 屬性,則 value 屬性會失效。
- hidden:如果值為 true,就會隱藏文檔。
@ApiOperation
@ApiOperation 用在接口文檔的方法上,主要用來註解接口,其中包含幾個常用屬性:
- value:對API的簡短描述。
- note:API的有關細節描述。
- esponse:接口的返回類型(注意:這裏不是返回實際響應,而是返回對象的實際結果)。
- hidden:如果值為 true,就會在文檔中隱藏。
@ApiResponse、@ApiResponses
@ApiResponses 和 @ApiResponse 二者配合使用返回 HTTP 狀態碼。@ApiResponses 的 value 值是 @ApiResponse 的集合,多個 @ApiResponse 用逗號分隔,其中 @ApiResponse 包含的屬性如下:
- code:HTTP狀態碼。
- message:HTTP狀態信息。
- responseHeaders:HTTP 響應頭。
@ApiParam
@ApiParam 用於方法的參數,其中包含以下幾個常用屬性:
- name:參數的名稱。
- value:參數值。
- required:如果值為 true,就是必傳字段。
- defaultValue:參數的默認值。
- type:參數的類型。
- hidden:如果值為 true,就隱藏這個參數。
@ApiImplicitParam、@ApiImplicitParams
二者配合使用在 API 方法上,@ApiImplicitParams 的子集是 @ApiImplicitParam 註解,其中 @ApiImplicitParam 註解包含以下幾個參數:
- name:參數的名稱。
- value:參數值。
- required:如果值為 true,就是必傳字段。
- defaultValue:參數的默認值。
- dataType:數據的類型。
- hidden:如果值為 true,就隱藏這個參數。
- allowMultiple:是否允許重複。
@ResponseHeader
API 文檔的響應頭,如果需要設置響應頭,就將 @ResponseHeader 設置到 @ApiResponse 的 responseHeaders 參數中。@ResponseHeader 提供了以下幾個參數:
- name:響應頭名稱。
- description:響應頭備註。
@ApiModel
設置 API 響應的實體類,用作 API 返回對象。@ApiModel 提供了以下幾個參數:
- value:實體類名稱。
- description:實體類描述。
- subTypes:子類的類型。
@ApiModelProperty
設置 API 響應實體的屬性,其中包含以下幾個參數:
- name:屬性名稱。
- value:屬性值。
- notes:屬性的註釋。
- dataType:數據的類型。
- required:如果值為 true,就必須傳入這個字段。
- hidden:如果值為 true,就隱藏這個字段。
- readOnly:如果值為 true,字段就是只讀的。
- allowEmptyValue:如果為 true,就允許為空值。
到此為止,我們就介紹完了 Swagger 提供的主要註解。
總結
Swagger 可以輕鬆地整合到 Spring Boot 中構建出強大的 RESTful API 文檔,可以減少我們編寫接口文檔的工作量,同時接口的說明內容也整合入代碼中,可以讓我們在修改代碼邏輯的同時方便的修改接口文檔說明,另外 Swagger 也提供了頁面測試功能來調試每個 RESTful API。
如果項目中還未使用,不防嘗試一下,會發現效率會提升不少。
本文的完整代碼在 https://github.com/wupeixuan/SpringBoot-Learn 的 interface-doc 目錄下。
最好的關係就是互相成就,大家的在看、轉發、留言三連就是我創作的最大動力。
參考
http://swagger.io
https://github.com/wupeixuan/SpringBoot-Learn
《Spring Boot 2 實戰之旅》
本站聲明:網站內容來源於博客園,如有侵權,請聯繫我們,我們將及時處理
【其他文章推薦】
※超省錢租車方案
※別再煩惱如何寫文案,掌握八大原則!
※回頭車貨運收費標準
※教你寫出一流的銷售文案?
※產品缺大量曝光嗎?你需要的是一流包裝設計!
※廣告預算用在刀口上,台北網頁設計公司幫您達到更多曝光效益
※網頁設計最專業,超強功能平台可客製化